Healthy Chewy Anzac Biscuits

Anzac Biscuits
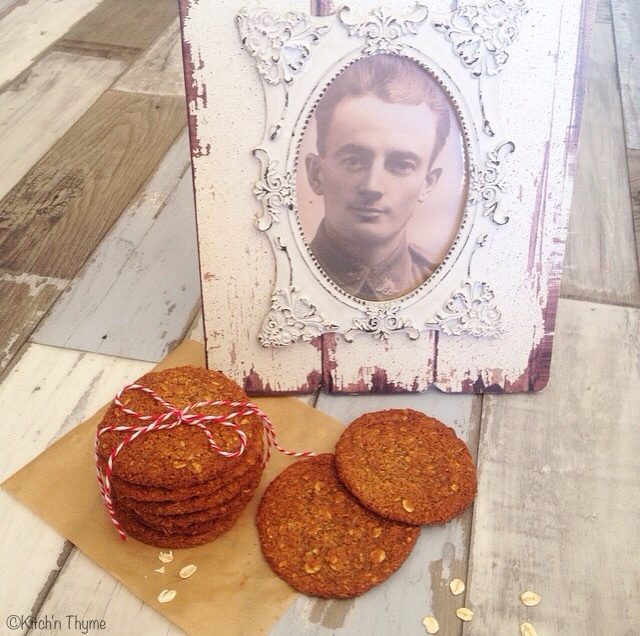
This is my beautiful traditional yet healthy take on the famous Anzac biscuit! It also has special meaning to me as I’m sure it did to my grandad (pictured) who served in the First World War.

My Great Grandad Raymond Wenban served on the Western Front in France. At the age of 22 he joined the army to serve as a Medic in one of the largest battles of World War 1. The Battle of the Somme on the Western Front in France against the Germans was one of the bloodiest battles in history where over 1,000,000 soliders were either wounded or killed.

My great grandfather was an amazing man during this battle where he nursed many many men to their death and some back to health. He even nursed many Germans also.

Being right in the line of fire as a medic it was a miracle that he came home alive! For his service he received 4 medals that are dear to my family….the family like me, that wouldn’t be here without him today!

He was a wonderful man with an amazing sense of humour and a light hearted spirit! He lived to the ripe old age of 97!

I could go on and on, but the story behind the Anzac biscuit is a special one. These biscuits first appeared in 1914 when a homemaker journal published a recipe that used the newly developed golden syrup as a preservative. This enabled the biscuits to be transported to the European battlefronts and arrive fresh, even after 6 weeks at sea! How amazing!

I wonder if my great grandfather was lucky enough to get some of these cookies sent all the way from home! I wish I had been able to ask him! Nevertheless they would have been very precious I am sure to those soldiers who did receive them from home!

I’ve used coconut nectar as a replacement for the golden syrup but you can use honey or maple syrup if vegan or even rice malt syrup.

You can make them gluten free by using gluten free oats and gluten free flour too.

They are crispy on the outside and chewy in the middle! Yum!

So enjoy these gorgeous cookies as we celebrate and remember all the amazing men and women who sacrificed their lives for the amazing country in which we live today!

LEST WE FORGET!

Healthy Traditional Anzac Biscuits (Spelt & Naturally Sweetened)
Yields 18
These are my version of a chewy traditional Anzac biscuit. Naturally sweetened, wholemeal spelt, egg free, nut free.
Write a review
Print
Prep Time
5 min
Cook Time
10 min
Total Time
15 min
Prep Time
5 min
Cook Time
10 min
Total Time
15 min
Ingredients
  1. 75g Organic Butter, cubed
  2. 1 Tbsp Water
  3. 2 Tbsp Coconut Flour Nectar or Honey
  4. 1 tsp Bicarb Soda
  5. 75g Wholemeal Spelt Flour
  6. 1 tsp Baking Powder (Aluminium Free)
  7. 90g Rolled Oats
  8. 100g Rapadura Sugar
  9. 50g Desiccated Coconut
Instructions
  1. Preheat the oven to 180°.
  2. Line 2 large baking trays with baking paper.
  3. Place the butter, water and coconut nectar into the mixing bowl and cook 3 Mins/90°/Speed 2.
  4. Add the bicarb and mix 5 Sec/Speed 3.
  5. Add all the remaining ingredients and process 10 Sec/Reverse/Speed 4.
  6. Roll tablespoons of dough into balls and place on prepared trays allowing for spreading.
  7. Bake for 10-15 minutes or until golden brown.
  8. Cool for 5 minutes on the trays before transferring to a wire rack to cool completely.
Notes
  1. You can substitute the coconut flour nectar for honey, maple syrup or rice malt syrup.
Kitch'n Thyme https://kitchnthyme.com.au/

Broccoli & Golden Beetroot Salad w. Green Goddess Dressing

Golden Beetroot & Broccoli Salad At the recent Thermomix Spectacular on the Sunshine Coast, I teamed up with my beautiful friend from over at Desperate Healthwives. We had a gorgeous simple Raw/Paleo, Nut Butter/Nut Milk stand. Along with that gorgeous Raw Macadamia Salted Caramel that I know many of you wanted to lick the plate off, we did this gorgeous fresh salad! It’s a bit of a take on the classic Thermomix Beetroot Salad. We’ve jazzed it up with gorgeous Golden Beetroots that are in season at the moment mixed with fresh spray free broccoli and of course this to die for Green Goddess Dressing! The original credit for the dressing goes to Oh She Glows. If you google green goddess dressing you can read about the history of this awesome dressing too! I’ve converted it to a recipe for the Thermomix and we have added in some fresh Coriander along with the other herbs! I use honey for a touch of sweetener, obviously if you’re vegan you can substitute with some maple syrup. It is 100% lick the bowl material!! Drizzled over this salad it’s a perfect match made in heaven! I know it sort of looks a bit like green slop on a plate, but when you taste it, you completely forget that you are eating green sludge!….Saying that, just look how vibrant green it is! Really you can’t get more ‘real’ food than that! The avocado makes it oh so creamy & smooth, yet it’s still so light….and you almost want to drink it! Enjoy!

Golden Beetroot & Broccoli Salad w Green Goddess Dressing
Serves 4
This gorgeous salad is oh so refreshing and nourishing!
Write a review
Print
Prep Time
5 min
Total Time
10 min
Prep Time
5 min
Total Time
10 min
Salad
  1. 200g Broccoli, roughly chopped
  2. 1 Medium Golden (yellow) Beetroot, peeled & quartered
  3. 1 Red Apple, cored & quartered
  4. 1/4 Red Onion
  5. 2-3 sprigs fresh Coriander, leaves only
  6. 2 Tbsp Olive Oil
  7. 1 Tbsp Lemon Juice or Apple Cider Vinegar
  8. 1/2 tsp Celtic Sea Salt
Dressing
  1. 1 Garlic Clove, peeled
  2. 150g Avocado (Approx 2 Med), peeled
  3. 3 Spring Onions (green part only)
  4. 1/2 Bunch Coriander leaves
  5. 1/2 Bunch Basil leaves
  6. 1/2 Bunch Italian Parsley leaves
  7. 60ml Extra Virgin Olive Oil
  8. 2 Tbsp Lemon Juice
  9. 1 Tbsp Apple Cider Vinegar
  10. 80ml Water
  11. 1 tsp Honey (or Maple Syrup if vegan)
  12. 1 tsp Celtic Sea Salt
  13. pinch Cayenne Pepper
Salad
  1. Place all ingredients into mixing bowl and chop 3-5 Sec/Speed 4. Scrape down the sides of the bowl and chop a further 1-2 Sec/Speed 4, or until desired consistency is achieved. Be careful not to over process or it will turn into a dip - delightful as that may be!!
  2. Serve straight away with the dressing or cover and place in the fridge until serving.
Dressing
  1. Place the garlic into the mixing bowl and chop 3 Sec/Speed 7. Scrape down the sides of the bowl.
  2. Add the remaining ingredients and process 10-15 Sec/Speed 7. If some of the dressing is left unprocessed on the sides of the bowl just scrape down the sides and process a further 3 Sec/Speed 7.
  3. Drizzle over the salad and serve extra on the side! You will be licking the plate!!
  4. Store in an airtight container in the fridge. Will keep for about 5 days.
Notes
  1. You can add more water, vinegar, or lemon depending on how runny you would like it and your personal tastebuds.
Kitch'n Thyme https://kitchnthyme.com.au/

Chocolate Almond Milk

Choco Almond Milk
 I love this!!…We love this! My little family loves it! It’s so delicious and SO easy to make! So perfect for a birthday party where either your family or your guests are dairy free. Or even if not dairy free, why not mix things up and do something different to normal dairy milk. Nuts are full of good fats, protein and good carbohydrates and make up part of a balanced diet. Also, regular bought junky chocolate flavoured milks are full of all sorts of rubbish, including preservatives, additives, colours, flavours, and refined sugars! I just love that this milk is only sweetened with a little maple syrup and is completely free of all the junk! It’s real food!

If you are concerned about the caffeine content in the raw cacao powder, consider replacing it with carob powder! Yum!

I served something similar to these at my son’s 1st birthday party! I added coconut milk which made it that little bit thicker and creamier. You can do that if you like, but honestly this milk is just perfect as is!

20 - Choc Coconut Milks

I designed a Vintage Hot Air Balloons party for him and it was A-M-A-Z-I-N-G! You can see a little bit of the cake in the picture above that I made, yes its got that sugary icing and all, but cake decorating is one of my ‘other’ little things I like to dabble in for the creativeness!….And my son hadn’t had any gluten, dairy or sugar before he was 1, so his cake was the basket, it was a GF, DF, chocolate cake, sweetened with a little honey! He LOVED it!! But more on parites in another post!!!

Choco Almond Milk w Dino Cookies

I made some of this milk last week along with these dinosaur cookies! Aren’t they just gorgeous! They are a Spelt Choc Chip, Cranberry & Macadamia cookie (my husbands favourite!) – I’ll get to the recipe soon! My little boy who is now 2 1/2 thought it was Christmas!

You can make my pure Almond Milk here.

Chocolate Almond Milk
Yields 1
Dairy-free Almond Milk turned into guilt-free Chocolate Milk! Perfect in smoothies, with cookies or for parties!
Write a review
Print
Ingredients
  1. 170g (1 Cup) Raw Almonds
  2. 1 Tbsp Coconut Oil
  3. 1 1/2 tsp Vanilla Essence
  4. ½ tsp Celtic Sea Salt
  5. 1 L Filtered Water
  6. 3 Tbsp Maple Syrup
  7. 2 Tbsp Raw Cacao Powder
Instructions
  1. Place the almonds into a bowl, cover with filtered water and leave to soak overnight (or for at least 12 hours).
  2. Drain the almonds and place into the bowl of the Thermomix and mill 7-10 Sec/Speed 9.
  3. Add the oil, vanilla, salt and water & blend 1 minute/Speed 9.
  4. Strain the milk through a nut milk bag or muslin cloth. Keep the almond pulp for throwing into cookies, cakes, biscuits etc. (You can freeze it to save for use another day too!)
  5. Pour the almond milk back into the mixing bowl and add the maple syrup and cacao. Blend 5 Sec/Speed 7.
  6. Refrigerate until chilled, then shake well before serving.
Notes
  1. Pure Almond Milk recipe here: Almond Milk
  2. Will keep in the fridge for approx. 3 days.
Kitch'n Thyme https://kitchnthyme.com.au/

Raw Salted Macadamia Caramel

Raw Salted Maca Cara 4I was driving home recently dreaming of this delicious date caramel I’d had at my friends house a couple of years ago! I didn’t have her recipe, so I came home and decided to have a play around. I wanted something with macadamias as they just lend themselves so perfectly to something so creamy and dreamy!

I also had the idea initially of making more of a sweet dip, but then my thoughts drifted to Maca powder and it’s wonderful caramel tones.  Maca powder is a great source of vitamins, energy boosting properties, has benefits for the skin, helps to increase energy, and helps with womens & mens health & reproductive health. I love chucking it into foods when I can!

So here is the result! Icky, sticky, goopy, mouth- watering, finger -licking goodness! I can guarantee you won’t be able to resist going in for a second spoonful! I gave the recipe to my best friend Jessie of Desperate Healthwives who made it straight away and thought she’d died and gone to heaven! Ha! And I must admit she took the above photo! It’s just so beautiful I had to use it!

Apples are of course the classic combo with caramel however you can use whatever fruit you desire! Apples, pears, bananas, strawberries etc all work beautifully!  You’ve all seen those caramel apples in the supermarket – sugar upon sugar! This is a little different, but we works so well and is such a wonderful alternative with only a little maple syrup to sweeten. You could reduce the maple or use honey or rice malt syrup. I tend not to be a big promoter of rice malt syrup as its so highly processed. I’ll talk more on sugars in another blog post.

Raw Salted Maca Cara 2
It’s absolutely perfect just freshly made and dipped into! However, look at what happens after you’ve left it in the fridge for a little while! Gorgeous and firmer in texture it becomes more like a spread! There is something about this that I just love! It’s smooth and rich and you can use your chosen fruit as the perfect little implement to scrape up the perfect amount! So try both ways and see which you love you the most!


Raw Salted Macadamia Caramel
Oooey gooey raw nut caramel for dipping freshly cut fruit into!
Write a review
Print
Total Time
2 min
Total Time
2 min
Ingredients
  1. 150g Raw Macadamias
  2. 2 - 3 Medjool Dates
  3. 60g (4 Tbsp) Coconut Oil
  4. 40g (2 Tbsp) Maple Syrup
  5. 1 tsp Vanilla Essence
  6. 1 tsp Maca Powder
  7. 1/8 tsp Celtic Sea Salt
Instructions
  1. Place the macadamias into the bowl of the Thermomix and mill 6 Sec/Speed 9.
  2. Scrape down the sides of the bowl and process for 10 Sec/Speed 4.
  3. Scrape down the sides again and process a further 30-40 Sec/Speed 6 or until a nice nut butter consistency forms.
  4. Add all the remaining ingredients and process 40 Sec/Speed 6-7.
  5. Serve with freshly chopped fruit such as apples, pears, strawberries, bananas etc.
  6. For a firmer texture, you can place it into the fridge for approx. 30 mins or until set firm.
Notes
  1. You can easily turn this into a Chocolate Version too by adding 2 Tbsp of Raw Cacao Powder in with all the other ingredients. Yum!
Kitch'n Thyme https://kitchnthyme.com.au/

Orange Cinnamon & Coconut ‘Hot Cross Bun’ Chocolates

Hot Cross Bun Chocolates

I just had to do something really chocolatey for Easter!! I can’t help myself creating! I wonder if there is some name for that problem! haha

These are really simple to make! You will need my Coconut Butter for these!

Hot Cross Bun Chocolates 2

And it’s a bit kitch with the crosses but how cute! Dont’ they just look adorable!

All grain free, dairy free and refined sugar free! Enjoy!

Orange Cinnamon & Coconut 'Hot Cross Bun' Chocolates
Yields 14
These are a cheeky little chocolate take off of a Hot Cross Bun! With lovely Cinnamon & Orange Easter flavours that are sure to delight! You'll need my Coconut Butter to make these!
Write a review
Print
Chocolates
  1. 200g Coconut Butter
  2. 3 Tbsp Coconut Cream
  3. 2 tsp Maple Syrup
  4. 20g Orange Juice
  5. 1 tsp Orange Zest
  6. 1/4 tsp Cinnamon
  7. 100g Organic Dark Chocolate (70%)
Crosses
  1. 50g Coconut Butter
  2. 2 tsp Maple Syrup
  3. 3 Tbsp Coconut Cream
Instructions
  1. To make the chocolates place all the ingredients except for the chocolate into the mixing bowl and mix 10 Sec/Speed 4.
  2. Place into the fridge for 30 mins -1 hour to chill. Once chilled sufficiently, roll the mix into 14 even small bit sized balls.
  3. Break the chocolate into small pieces and mill 10 Sec/Speed 9. Then melt the chocolate 2 Mins/50°/Speed 2, scraping down the sides of the bowl closer to the finish time.
  4. Pour into a shallow bowl and dip the chocolates one at a time into the chocolate to thoroughly coat, before placing onto a baking paper lined rack or tray to set. You can place them in the fridge to set a bit quicker.
  5. Once the chocolates are set, place the coconut butter, maple and coconut cream into the Thermomix and mix 10 Sec/Speed 3-4.
  6. Place into a piping bag fitted with a plain nozzle and pipe little crosses on the chocolates. Place back into the fridge to completely set, then transfer into an airtight container.
Notes
  1. I couldn't find all my piping bags when I made these, so I popped the icing into a little glad bag and cut a little hole off one corner and used that to pipe the crosses! Little more rustic but still works a treat!
  2. Don't forget you'll need my Coconut Butter to make these!
Kitch'n Thyme https://kitchnthyme.com.au/

Easter Egg Icecream Cakes – Chocolate, Date & Ginger Cake & Coconut Ginger Icecream

Easter Egg Icecream Cakes plate up
I came up with these little beauties a few weeks ago! I’d had some silicone easter egg moulds in the cupboard for a long time and I suddenly looked at them and just knew I needed to create some beautiful thing with them!!

Icecream Cakes 3

My mind started wandering and I went through many different options! Suddenly my mind flicked to icecream and I had a massive lightbulb moment of something Icecream Cake!! I got busy in my kitchen creating and what I came up with was delicious! I was/am thrilled!

Ice Cream Cakes lighter

I wanted to make them grain free, paleo, dairy free, refined sugar free, yet full of love and Easter cheer! Of course the obvious flavour at Easter is chocolate so I wanted to have a hint of that, but also something to lighten it up a little! So that’s why I’ve gone with the coconut icecream, and those warm flavours of ginger and chocolate to compliment!Easter Egg Icecream Cake close up

You can drizzle them with some raw chocolate or organic dark chocolate for a little extra decadence!

Ice Cream Cakes iced

I hope you enjoy them as much as we will be this weekend! Happy Easter

Easter Egg Icecream Cakes
Serves 12
Dairy-free, grain-free, sugar-free Easter Egg shaped Icecream Cakes! Something a little different for your easter spread!
Write a review
Print
Coconut & Ginger Icecream
  1. 400ml Coconut Cream
  2. 400ml Coconut Milk
  3. 80g Coconut Sugar
  4. 4 Organic Egg Yolks
  5. 1 tsp Vanilla Essence
  6. 20g Glace Ginger
Chocolate Date & Ginger Cakes
  1. 100g Dates
  2. 2 tsp Baking Soda
  3. 80g Almond Meal
  4. 60g Arrowroot
  5. 20g Coconut Flour
  6. 20g Cacao Powder
  7. 2 Tbsp Coconut Sugar
  8. 4 Large Organic Eggs
  9. 100g Coconut Oil
  10. 60ml Coconut Milk
  11. 40g Glace Ginger
Icecream
  1. Place the coconut cream and milk, along with coconut sugar, eggs and vanilla into the Thermomix and cook 8 Mins/90°/Speed 4.
  2. The mixture should be thickened slightly (enough to coat the back of a spoon). Pour into a bowl and place over an icebath to coo,l before placing the mixture into a a shallow container. Cover and place into the freezer for 3-4 hours or until firm but not completely frozen.
  3. Place the ginger into the bowl and chop 5 Sec/Speed 5. Set aside.
  4. Remove from the freezer and cut into small cubes. Place into the mixing bowl and blend for about 20 Sec/Speed 9. Scrape down the sides add the reserved ginger and whip a further 10 Sec/Speed 4.
  5. Spray out 2 x 6 hole (1/3 cup capacity) silicone Easter Egg moulds with coconut or olive oil then pour the icecream into the moulds and freeze for a further 1-2 hours or until firm. Remove from the moulds once frozen and place into a suitable container and place back in the freezer until ready to serve.
  6. Wash out the moulds to bake the cakes in.
Cakes
  1. Preheat the oven to 160°C.
  2. Place the ginger into the mixing bowl and chop 5 Sec/Speed 5. Set aside.
  3. To make the cakes, place the dates into a small bowl covered with boiling water and add 1 tsp of the baking soda. Leave to soften for 5 minutes.
  4. Place the flours, 1 tsp baking soda, cacao powder, sugar, eggs, coconut oil and coconut milk into the mixing bowl. Mix 10 Sec/Speed 6. Scrape down the sides of the bowl.
  5. Drain the dates of the excess water and place into the mixing bowl. Process a further 10 Sec/Speed 6.
  6. Add the ginger and process 5 Sec/Speed 6/Reverse.
  7. Place 2 x 6 hole silicone easter eggs moulds onto a large baking tray. Spray the moulds with coconut or olive oil spray. Pour the batter evenly into the 12 easter eggs moulds (1/3 cup capacity each).
  8. Bake the cakes at 160°C for 20-25 minutes or until cooked through.
  9. Once cooked, leave to cool in the moulds for 10 minutes before transferring to a wire rack to cool completely.
  10. Once the cakes are cooled, slice off the uneven edge so you end up with a flat surface and a 1/2 egg shape from the mould. Reserve those pieces for crumbling onto the plates.
  11. To assemble the cakes, crumble the reserved bits of cake onto plates and top with 1/2 icecream egg, flat side up. Then place 1/2 a cake egg on top of the icecream. You can serve as is or pour over a little organic melted chocolate (if not strictly Paleo) or homemade chocolate.
  12. I like both options! You really see the pretty pattern on the cakes without the melted chocolate, but having the melted chocolate also is very yummy!! So up to you!
Kitch'n Thyme https://kitchnthyme.com.au/

Chicken Satay Sticks w Macadamia Satay Sauce, Cucumber & Chilli Pickle & Coconut Rice

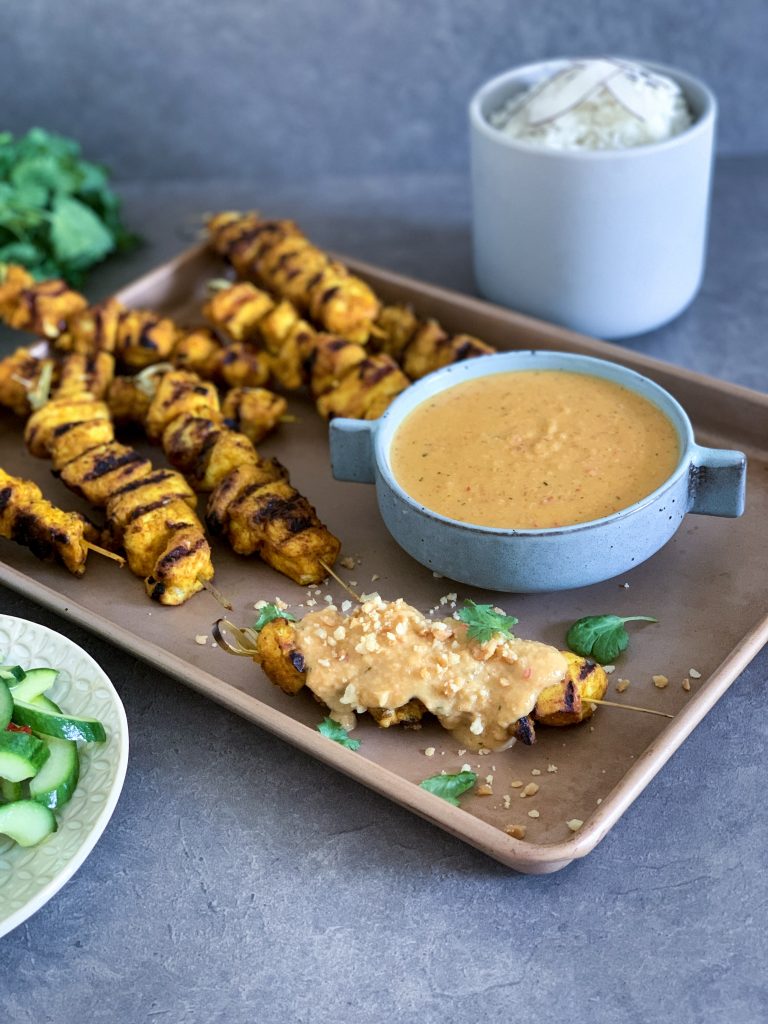
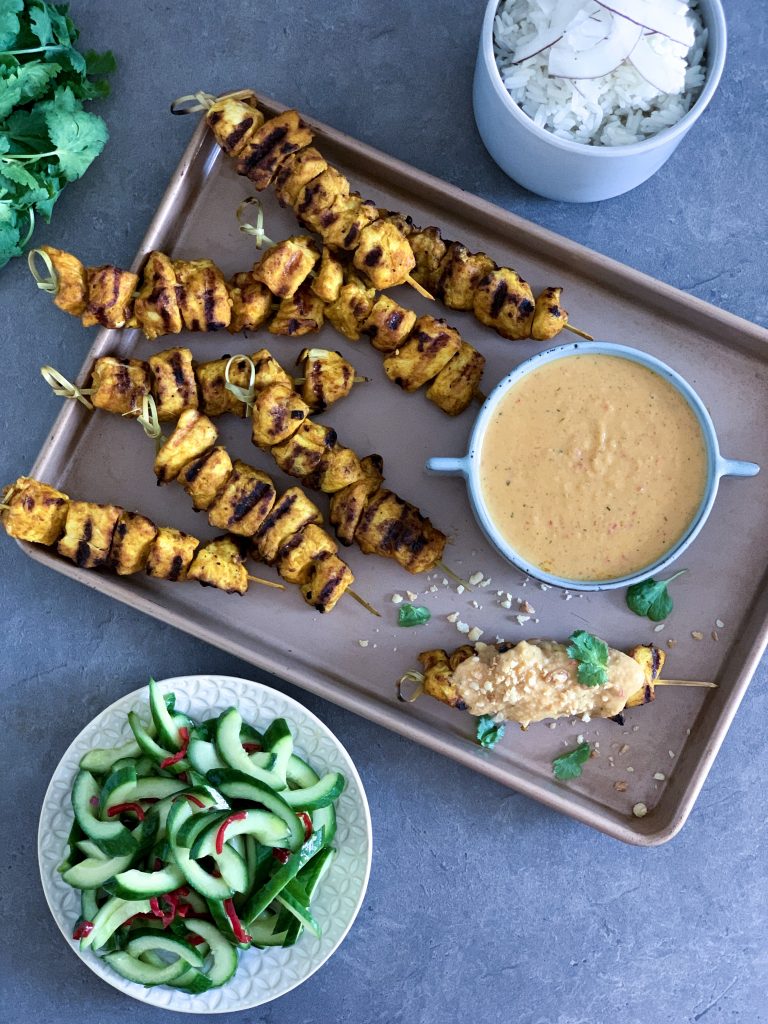
**January 2019 update!** This recipe was originally posted in March 2015. I really felt that the photos needed updating, so i’ve rephotographed the recipe. All the ingredients remain the same, however I have finally added my method for my cucumber pickle that I’ve always made along side satay sticks and my method for the BEST Coconut Rice! The story below is as it was from 4 years ago!**

As I mentioned in my Tom Kha Gai (Thai Chicken Coconut Soup) post, Thai food is a real favourite! I just love the complexity of the flavours yet the perfect balance of flavours. Saying that, this satay sauce has more of a Malaysian influence! 😂

When I travelled all around Thailand a few years ago (almost 10 yrs ago now!!!) with my husband I think I must have had Chicken Satay at almost every restaurant! I really love it! I found it quite different however to the Western versions that we are used to here in Australia. Everything is sweetened up a little more over here!

This satay sauce version of mine I developed when I worked fulltime at the health retreat. As we don’t use peanuts at the retreat, I made it with macadamias as a replacement for the peanuts! And it’s amazing!!!

Peanuts a tendency to soak up aflatoxins from fungus in the soil. This is rather questionable. Being from the legume family and not really a nut, they have quite a porous shell, making them more susceptible to soaking up pesticides and bacteria as well, just one reason why organic is ultra important. Of course, we also know of the scrutiny they receive for being so allergenic too! We don’t have any allergies in our family, however they are not something we eat very much of – more on the occasional side! If we do have them, they must be organic peanuts! And saying that I’ve recently developed the best Satay Sauce using peanuts more specifically for Vietnamese Rice Paper Rolls!

This satay sauce sauce as I said above, has some of what I would call Malaysian flavours, but I still use coconut milk, more like the Thai version rather than soy sauce.

The marinade for the chicken is super easy and just flavours that meat up a little more than just leaving it plain.

I use chicken thighs as I find them more flavoursome, however you can use chicken breast or tenderloins, but just remember to reduce the cooking time to about 2-3 minutes each side.

You can serve this dish traditionally with Cauliflower Rice for a lower carb version, or just as they are with the sauce with and the cucumber pickle!

Print

Chicken Satay Sticks w Macadamia Satay Sauce, Cucumber & Chilli Pickle & Coconut Rice

Delicious peanut free satay sauce!

  • Author: Gabrielle

Ingredients

Chicken Skewers

  • 4 Organic Chicken Thighs or 2 Chicken Breasts
  • 1 tsp Coriander
  • 1 tsp Turmeric
  • 1 tsp Sweet Paprika
  • 2 Cloves Garlic
  • 4 Eschalots
  • 1 tsp Celtic Sea Salt
  • 2 tsp Olive Oil
  • 8 medium bamboo skewers (preferably soaked in water for 20 mins)

Satay Sauce

  • 300g Macadamias
  • 2 Medium Red Onions
  • 4 Cloves Garlic
  • 2 Long Red Chillies, seeds removed
  • 2 Stalks Lemongrass
  • 100g Olive Oil
  • 2 tsp Tamarind Pulp
  • 1 Tbsp Lime Juice
  • 1 tsp Lime Zest
  • 1 Tbsp Coconut Palm Sugar
  • 2 1/2 tsp Celtic Sea Salt
  • 150-200g Coconut Milk

Coconut Rice

  • 250g Coconut Milk 
  • 220g Water 
  • 220g Jasmine Rice
  • 1/2 tsp Celtic Sea Salt 
  • 1 tsp Honey or Raw Sugar

Cucumber Pickle 

  • 2 Lebanese Cucumbers, deseeded and sliced on the diagonal
  • 1 Red Cayenne Chilli, deseeded and sliced
  • 1 Tbsp Rice Wine Vinegar
  • 1 tsp Honey
  • 1/2 tsp Celtic Sea Salt
  • 1 tsp Olive Oil 

Instructions

Chicken Skewers

  1. Chop the chicken into 3-4cm cubes and place into a large mixing bowl. Place the eschalots, garlic, spices, salt and olive oil into the Thermomix and chop 5-10 Sec/Speed 7. Add to the bowl with the chicken and stir to combine well. Let marinate for 4-6 hours or overnight.
  2. Thread 5-6 pieces onto medium sized skewers. Preheat a chargrill or barbeque grill on high. Cook the chicken for approximately 4 minutes each side or until the meat is cooked through evenly.

Sauce

  1. Preheat the oven to 180°C. Line a baking tray with baking paper and roast the macadamias for 10 minutes or until golden brown. Remove from the oven to cool slightly.
  2. Place 50g of the macadamias into the Thermomix and chop 15-20 sec/Speed 4. Set aside.
  3. Place the remainder of the nuts into the Thermomix and mill 10 Sec/Speed 9. Scrape down the sides of the bowl then process 40 Sec/Speed 4-5 until nut butter forms. Set aside.
  4. Place the onion, garlic, chilli, lemongrass and olive oil into the Thermomix and chop 10 Sec/Speed 7. Then sauté 10 Mins/100°/Speed 1.
  5. Add the all the remaining ingredients along with the reserved nut butter and cook 5 Mins/80°/Sp 1.
  6. Once cooked pour into a serving bowls and sprinkle with the reserved chopped macadamias.
  7. Serve with coconut rice or Cauliflower Rice.

Notes

  • Serve with my Cauliflower Rice for a low carb version!
  • You can double my Coconut Rice to serve more people.

Nutrition

  • Serving Size: 4

Hazelnut & Cacao Nib Bliss Balls

imageThis beautiful bliss ball recipe came about recently when I was going to make my Paleo Chocolate Mango Tart. I had planned to make a batch of bliss balls that day also. The filling for the tart was sitting in the Thermomix and upon a second glance I all of a sudden had a ‘uh huh’ moment! This would make the perfect start to some delightful bliss balls! Yummo! So the whole tart went immediately out the window! Well thankfully, not really! I added a few more things to the mix and by golly it was delicious!

I add a few medjool dates and almond meal, along with the cacao nibs which add a gorgeous crunch to each bite, and a lovely bitterness!image

For the bliss balls I’ve reduced the maple syrup a little to 80g instead of 120g in the tart filling, as I like them to be more of an energy pick me up rather than an actual treat! I’m not a big sweet tooth, so I don’t mind it a little richer. It’s up to you.

You can also add in a protein powder to give them an extra protein kick for a post workout snack or for busy mums and breastfeeding mums! They are a little more fudgey with the protein powder. Try both and see which you prefer.

I then roll them in roasted hazelnuts! I love hazelnuts with chocolate or carob. (You can definitely use carob powder for these too!) They are just so good with the extra crunch on the outside! You could leave them with no coating or use coconut perhaps.

Hazelnut & Cacao Nib Bliss Balls
Yields 50
Crunchy, nutty, creamy bliss balls! Almost a little Ferrero rocher like!
Write a review
Print
Ingredients
  1. 140g Roasted Hazelnuts
  2. 80g Coconut Oil
  3. 80g Coconut Milk
  4. 80g Maple Syrup
  5. 50g Raw Cacao Powder
  6. 1 tsp Vanilla Essence
  7. pinch salt
  8. 200g Almond Meal
  9. 4 Medjool Dates
  10. 40g Cacao Nibs
  11. 100g Protein Powder (optional)
Instructions
  1. To make the filling, place 60g of the hazelnuts into the Thermomix and mill 10 Sec/Speed 9.
  2. Add the oil, milk, maple, cacao powder, vanilla, salt and dates and cook 2 Mins/50°/Speed 3.
  3. Add the almond meal & cacao nibs (& protein powder if using) and process 10 Sec/Speed 4-5/Reverse.
  4. Refrigerate for 30 minutes to chill. Once chilled the mixture will be much easier to roll.
  5. Place the remaining 80g hazelnuts into the Thermomix and chop 15-20 Sec/Speed 4.
  6. Place into a shallow bowl for rolling. Take small spoonfuls of the chilled mixture and roll into balls. Finish by rolling in the hazelnut crumbs and refrigerate until firm.
Notes
  1. My original version didn't have protein powder in them, however you can add it if you want to boost the protein content. They are a little more fudgey in texture with the protein!
Kitch'n Thyme https://kitchnthyme.com.au/

Kale, Olive & Macadamia Tart

Kale Tart 1 I love Kale! There are so many ways you can cook Kale. From chips to smoothies, there are so many options when it comes to this brassica. I love iron rich and vitamin rich foods! Kale has become a real foodie loving vegetable and it’s not hard to see why!

This tart is a variation of my Heirloom Tomato Tart. It’s basically the same in terms of the pastry & egg mix, just a few different ingredients in the filling!Kale Tart 2 I love olives! I’m dying to go to Italy and just eat olives! Between my obsession with olives, olive oil and tomatoes, I think I should have been Italian!

The saltiness of the olives in this tart matches the kale so nicely! The crunch of the macadamias pairs so nicely with the creaminess of the cream cheese.

Same as with my Heirloom Tomato Tart the pastry is made from spelt using my old pastry ratio I learnt when I studied as a chef. It’s still really light and melts in the mouth as it’s loaded with butter!  Enjoy this beautiful autumn tart! Kale Tart 3  

Kale, Olive & Macadamia Tart
Serves 6
A delicious variation of my Heirloom Tomato Tart
Write a review
Print
PASTRY
  1. 100g Organic Wholemeal Spelt Flour
  2. 100g Organic White Spelt Flour
  3. ½ tsp Celtic Sea Salt
  4. 100g Organic Butter
  5. 40g Water
FILLING
  1. 30g Saracino Sheep Cheese
  2. 2 Tbsp Olive Oil
  3. 4 Medium Brown Onions
  4. 1 Tbsp Balsamic Vinegar
  5. 1 Tbsp Rapadura Sugar
  6. 50g Organic Butter
  7. 1/3 Bunch Organic Kale, de-veined & roughly chopped
  8. 4 Large Organic Eggs
  9. 60g Sour Cream
  10. 60ml Milk
  11. 1/2 tsp Celtic Sea Salt
  12. 100g Cream Cheese, cut into cubes
  13. 10 Kalamata Olives, pitted & sliced in halves
  14. 20g Macadamias, quartered
  15. Few sprigs Italian parsley, finely chopped
PASTRY
  1. To make the pastry place the flours, butter & salt into the Thermomix bowl. Process for 8-10 Sec/Speed 6 until the mixture just resembles breadcrumbs.
  2. Add the water and knead 10-20 Sec. Transfer the dough to a sheet of cling wrap, press together, cover in cling wrap, flatten and place into the fridge for 30 minutes to rest. Preheat the oven to 180°C.
  3. Roll out the dough to approx. 3mm thickness press into a large rectangular tart shell. Prick with a fork. Place back into the fridge for a further 15-30 mins to chill.
  4. Place a small piece of baking paper over the pastry and fill the case with pie weights. Blind bake for 15 minutes. Allow to cool before taking the pie weights out of the case.
FILLING
  1. Place the saracino sheep cheese into the Thermomix and mill 10 Sec/Speed 9. Set aside.
  2. To make the caramelised onions, heat the olive oil in a pan and add the onions. Cook the onions, stirring occasionally until very well browned. The thinner the onions are sliced the better caramelisation you will get. Add the vinegar and sugar right at the end and stir to combine. Take off the heat and set aside in a bowl.
  3. While the pan is still hot, place back on the heat, add the butter and kale and cook the kale, stirring until just wilted. It should retain it's beautiful vibrant green colour! Take off the heat and set aside.
  4. Place the eggs, sour cream, milk, & salt into the Thermomix bowl. Mix 10 Sec/Speed 4.
  5. To assemble, scatter the onions evenly over the base of the tart, follow with the cream cheese, kale, olives & macadamias.
  6. Pour over the egg mix and finish with the reserved grated cheese & parsley.
  7. Bake for 25 minutes or until just set and golden brown. Serve warm or cool.
Notes
  1. Try my Heirloom Tomato Tart
  2. You can easily make this tart dairy free by substituting the sour cream for coconut cream, the milk for almond or rice milk, and leave out the cheeses!
Kitch'n Thyme https://kitchnthyme.com.au/

Hazelnut & Macadamia Dukkah

Dukkah Dukkah is such a wonderful spice mix! Originating in the middle east, there are many different varieties, in terms of nuts used and spices used, but the basic ingredients will usually always have coriander, cumin, and pepper. Some then add fennel and other spices.

Perfect over grilled meats (fish, chicken, lamb), eggs, sprinkled over salads or open sandwiches, even over the top of a pumpkin soup! There are many uses!

I love spices and flavoursome accompaniments to a dish and this is one of them! You can play with whatever nut combo you like. This is my version, and I love it!

Please be aware that this recipe was made in the TM31 so you may need to reduce the time of this step. Watch this stage closely, being careful to not over process the nuts. You want them still to be somewhat chunky in texture.

Dukkah 2

Hazelnut & Macadamia Dukkah
Delicious on fish, chicken, poached eggs, sourdough toast etc!
Write a review
Print
Total Time
5 min
Total Time
5 min
Ingredients
  1. 2 Tbsp Coriander Seeds
  2. 2 Tbsp Cumin Seeds
  3. 1/4 tsp Black Peppercorns
  4. 80g Roasted Hazelnuts
  5. 80g Roasted Macadamias
  6. 40g Toasted Sesame Seeds
  7. 1/2 tsp Celtic Sea Salt
  8. 1/4 tsp White Pepper Powder
Instructions
  1. Add the coriander, cumin and peppercorns to the bowl of the Thermomix and dry roast 3 Mins/120°/Speed 1.
  2. Mill 20 Sec/Speed 9.
  3. Add the hazelnuts & macadamias and grind 15 Sec/Speed 4. (Please be aware that this recipe was made in the TM31 so you may need to reduce the time of this step. Watch this stage closely, being careful to not over process the nuts. You want them still to be somewhat chunky in texture.)
  4. Add the remaining ingredients and mix 6 Sec/Speed 3/Reverse.
Notes
  1. Please be aware that this recipe was made in the TM31 so you may need to reduce the time of this step. Watch this stage closely, being careful to not over process the nuts. You want them still to be somewhat chunky in texture.
Kitch'n Thyme https://kitchnthyme.com.au/