Blood Plum & Ginger Galettes with Date & Walnut Paste, Candied Orange Zest and Honey Orange Drizzle

A few weeks back I finally got to making these sweet little galettes I’ve had brewing in my head for a while! I was recently reading an article from the Gottman Institute (if you haven’t checked them out, you must do so! They share such fabulous stuff!) talking of how cooking for some can be a productive form of self expression and communication! It was like this total lightbulb moment for me as creative expression through food is absolutely my outlet and way to express myself! In fact, what some may view as slaving away in the kitchen is my kind of stress relief and almost a way to express all my feelings!!  Isn’t it amazing how we’re all so different!

So anyhow, finally getting these pretty galettes out of my system was super fulfilling! They were initially inspired by some gorgeous black blood plums at the local farmers markets! You could replace with any type of plum or any stone fruit for that matter. All stone fruits go so so beautifully with ginger! It’s definitely a favourite combo of mine! Peach & Ginger Crumble is a firm favourite in my home, especially as my 6 yer old son just loves anything ginger!

With the pastry, if you’re in a hurry, you can skip the 30 minute chilling of the pastry. It’s not ideal as the pastry is better off having some time for the glutens to relax which helps it not to shrink in the oven, (and also gives a better texture on the pastry) but with a rustic tart like these, they’re pretty forgiving, unlike in a tart case where if it shrinks and there’s no sides on your tart, you’re in trouble! 🤪

You’ll also notice I use spelt flour again in this pastry! In my kitchen, the only flour you’ll find is spelt. I replace all plain flour for spelt. It’s a more ancient variety of wheat and has been less tampered with making it easier to digest. Some folks that have intolerance’s to wheat can often eat spelt and feel ok. So it’s my go to! 

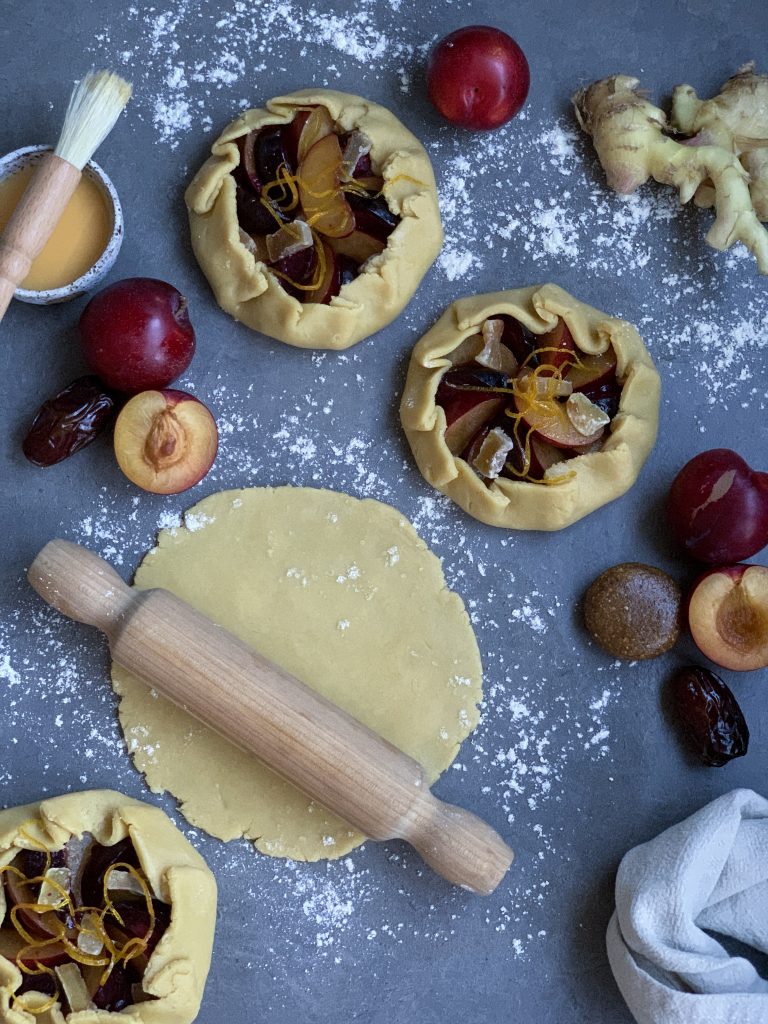
The date & walnut paste is SO SO good! It’s a fairly firm paste, so rolling into a ball and then flattening in your hand is the easiest way to use it. When I tasted it, I immediately envisioned a delicious bliss ball right there! You could use all almonds or all walnuts in the paste but the combo of the two I think is just delicious, and the roasted almonds really make it! Yum! 

I couldn’t decide whether to call these Galettes or Crostata’s! Basically one is French and the other Italian –  meaning a free-form or rustic tart! I opted for French Galette’s but both sound really as delicious as each other in my head so go ahead and call them whatever your heart desires! 😅

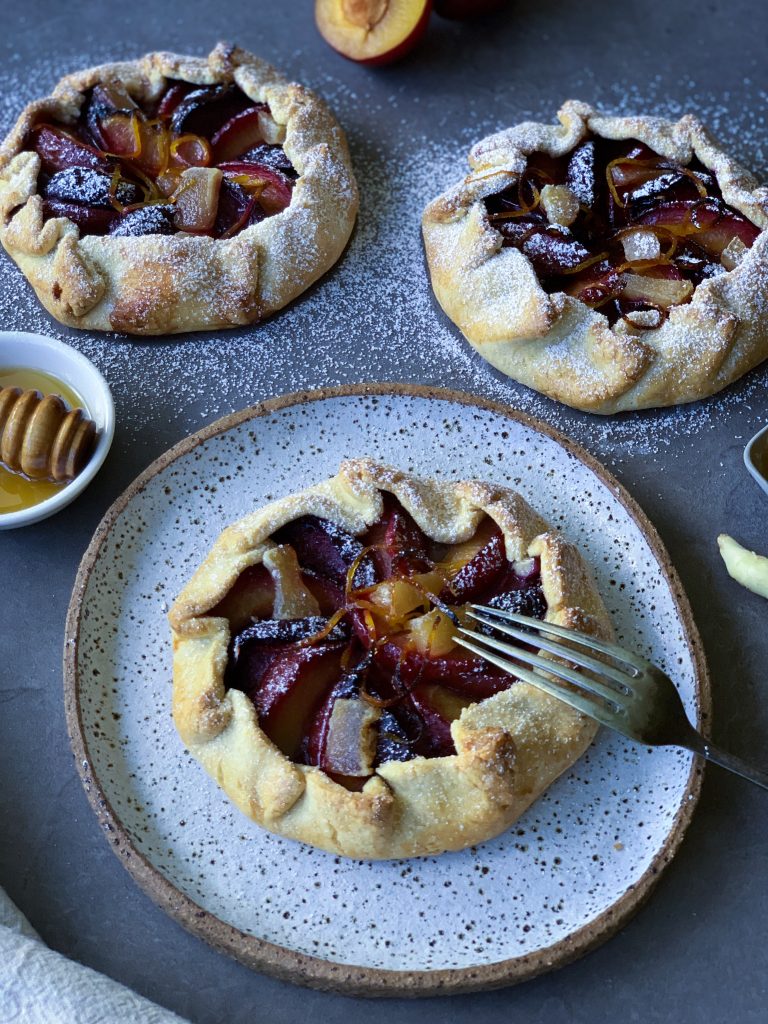
But whatever you do, make sure to jump into your kitchen and get some of these little beauties in the oven before the end of the summer stone fruit season! YUM YUM YUM!

Gabrielle xx

Print

Blood Plum & Ginger Galettes with Date & Walnut Paste, Candied Orange Zest and Honey Orange Drizzle

Fruity, zesty galettes enveloped in delicous buttery golden pastry! 

  • Author: Gabrielle - Kitch'n Thyme
  • Prep Time: 20 Minutes
  • Cook Time: 30 Minutes
  • Total Time: 50 minutes
  • Yield: 4

Ingredients

8-10 Blood or Yellow Plums, seeds removed, cut into eighths

20g Crystallised Ginger, sliced, extra for topping

Raw Sugar, for scattering

Vanilla Icecream, to serve

Spelt Shortcrust Pastry:

60g Organic Raw Sugar

250g Organic White Spelt Flour

100g Organic Butter 

2 Organic Egg Yolks, plus 1 beaten Egg for eggwash

2 Tbsp Iced Water

Date & Walnut Paste:

40g Walnuts

20g Roasted Almonds

60g Dried Dates 

40g Crystallised Ginger  

Candied Orange Zest:

1/4 Orange, zested

2 Tbsp Honey

1 Tbsp Water

Instructions

  1. To make the pastry, place the sugar into the Thermomix and mill 10 Seconds/Speed 9. Add the flour & butter and process for 10 Seconds/Speed 6 or until the mixture resembles breadcrumbs. Add the egg yolks, and water and knead 10-20 seconds or until the dough just comes together.
  2. Using the Thermomat or a lightly floured surface bring the dough together to form a ball. Flatten and wrap the dough in cling film and place in the fridge for 30 minutes to rest.
  3. Take a rack out of the oven and place an oven Thermomat on it. (If you don’t have a Thermomat, line a large baking tray with baking paper). Preheat the oven to 180ºC.
  4. Portion the chilled dough into 4 equal picese and roll the dough out on a lightly floured surface to be 2-3mm thick or about 15cm in diameter. Place into an oven Thermomat or line a baking tray with baking paper and place on the tray.
  5. To make the paste, place the nuts, dates & ginger into the Thermomix and process together 10 Seconds. Speed 8. Divide the paste into 4, roll each piece into a rough ball shape and flatten out with the palm of your hand and place in the middle of the pastry round, leaving a 3cm border of pastry. (Use your fingers to further flatten and neaten if necessary).
  6. Arrange the plums nicely on top of the paste and top with a few pieces of the ginger to finish. 
  7. Gently lift the pastry up over the plums, pleating as you go. Brush pastry edges with beaten egg and scatter raw sugar all over the galettes & bake until golden (20-25 minutes).
  8. To make the candied orange zest, remove zest from the orange with a vegetable peeler, keeping pieces long. If there’s any white pith, remove it using a paring knife, then cut into a fine julienne using a very sharp knife.
  9. Place the honey, water and orange peel into the Thermomix and cook 5 Mins/100°/Speed 2.
  10. Take the candied orange zest out of the syrup and set aside. Pour the syrup into a little serving bowl or jug.
  11. Top the galettes with the candied orange zest, a drizzle of orange syrup and serve warm with vanilla icecream. 

Notes

  • You can substitute the plums for nectarines, peaches or apricots!
  • The paste can be made with all almonds or all walnuts, but the mix of the 2 nuts is very delicious especially as the almonds are roasted!

Paleo Chocolate Raspberry Tarts (Gluten Free, Primal)

Choc Raspb Tarts 2So I can’t really remember the first time I made these delightful tarts, however I do remember one of the most recent times when I made them! It was for my sons 3rd birthday last year! To set the scene a little, I decided to buy year passes to our local zoo, and take along a picnic lunch, a perfect simple birthday cake and these pretty little things!

Well that particular day turned out to be a scorching 30°C day! I got up early before it was that hot, baked a delicious flourless 2 tier chocolate cake, my old recipe that I used to do every week at the health retreat. I topped it with a beautiful dairy free chocolate ganache. Not realising how hot the day would be I poured it on, decorated it with all manner of adorable edible flowers, chocolate shards, raspberries, strawberries and blueberries! It looked a real picture!!….But if only I had one! In it went into the container…we packed up and off we went to the zoo. Off we went into the zoo to catch the croc show and low and behold what did I leave in the car, but the cake!!!!!!

Back to the car after only what seemed like 1/2 an hour and I grabbed that little darling, opened it’s lid….and what did I find??? A great big puddle of slidden, sloppy, melted, ganache drenched decadent deliciousness!!! And with that we sang Happy Birthday Z!! It almost seemed unbelievable, but I assure you there was no fixing that leaning tower of cake puddle! My dearest friends who know how perfectionistic I am, gave me an extra tight squeeze, helped me realise it wasn’t the end of the world…almost…and we just slapped it onto our plates…not it wasn’t even sliceable! What we ate was something delicious, despite its unfavourable looks!

That night I brought the remainder home, chucked it into the Thermomix and chopped it all up, then rolled it into balls and froze them. Oh my word, how a seemingly total disaster can be turned into pure delight. This was one of them! Fudgy, rich, and ultra delicious!
Choc Raspb Tarts
What did end up as pretty as a picture and a total hit were these awesome Choc Raspberry Tarts!!

It’s acutally the filling of the Paleo Chocolate Mango Tart with the base of the Lemon Tart combined with seasonal raspberries on top! Blueberries on top would be just as delish!

So here you are! Enjoy!


Paleo Chocolate Raspberry Tarts
Yields 18
Delicious healthy nutella-like filling topped with juicy sweet raspberries!
Write a review
Print
Prep Time
15 min
Cook Time
15 min
Total Time
40 min
Prep Time
15 min
Cook Time
15 min
Total Time
40 min
Sweet Shortcrust Pastry
  1. 50g Coconut Palm Sugar
  2. 150g Almond Meal
  3. 50g Coconut Flour
  4. 30g Arrowroot
  5. 100g Organic Butter
  6. 1/2 Lemon, zested
  7. 1 Organic Egg, lightly beaten
Filling
  1. 60g Hazelnuts, roasted
  2. 80g Coconut Oil
  3. 80g Coconut Milk
  4. 120g Maple Syrup (approx. 5 Tbsp)
  5. 50g Raw Cacao Powder
  6. 1 tsp Vanilla Essence
  7. pinch salt
  8. 250g Fresh Raspberries
Pastry
  1. Place the sugar into the Thermomix bowl and mill 10 Sec/Speed 9.
  2. Add the almond meal, coconut flour, arrowroot, butter and lemon zest to the bowl and blend 10 Sec/Speed 6.
  3. Add the egg and Knead 15 Sec.
  4. Wrap in plastic wrap, flatten, and place in the refrigerator for 30 minutes to chill.
  5. Preheat the oven to 160°C.
  6. Once the dough is chilled, roll out to 2-3mm thickness between 2 sheets of baking paper.
  7. Peel off the top sheet of baking paper, and using an 8cm round pastry cutter, cut 18 circles from the pastry. You may need to re-roll to get the 18 circles.
  8. Place the cut circles back into the fridge for 5 mins to firm slightly before pressing into 7cm fluted tart shells. Neatly trim the tops and if there are any tares, just use a little of the excess dough to carefully patch it, being careful to maintain an even thickness.
  9. Bake in the preheated oven for 15 minutes or until golden brown.
  10. Remove from the oven, let sit in the moulds for 5-10 minutes before removing to a wire rack to cool completely.* (They will feel very soft as soon as you take them out of the oven but as they cool, the base will harden. If the underside of the bases still feels a little damp once cool, you can turn them upside down and return to the oven for 5 or so minutes to dry out a little further.)
Filling
  1. If you need to roast the nuts, place onto a baking tray and roast for 10-15 minutes on 180°C. Let cool before using your hands to rub the nuts together to get rid of the skins.
  2. Place the hazelnuts into the Thermomix and mill 10 Sec/Speed 9.
  3. Add all the remaining ingredients and cook 2 Mins/50°/Speed 3.
  4. Pour the filling into the cooled tart shells and set in the fridge for 30 mins before topping each tart with 3 raspberries and returning to the fridge to set firm.
Notes
  1. *They will feel very soft as soon as you take them out of the oven but as they cool, the base will harden. If the underside of the bases still feels a little damp once cool, you can turn them upside down and return to the oven for 5 or so minutes to dry out a little further.
  2. *This is the same filling as I use in my Paleo Chocolate Mango Tart
  3. *This is the same base as I use in my Lemon Tart
Kitch'n Thyme https://kitchnthyme.com.au/

Lemon Tart (Gluten Free & Refined Sugar Free, Primal)

Lemon Tart

Who doesn’t love a good citrus tart?

Such a beautiful French dessert that is the perfect way to end any meal or on any afternoon tea menu!

This beautiful creation of mine is one of my husbands favourite! He is an absolute lover of lemon!

I’ve always made it with my Sweet Spelt Shortcrust, however I’m somewhat trying to lower any gluten content for a few reasons at the moment. So I’ve made a delicious Paleo crust that is a really lovely compromise!
Lemon Tart 2
The filling is delectably smooth! It used to take me a long time over the stove to whisk it so constantly and I love that the Thermomix makes it so much quicker and I don’t have to watch it! If you like a lemon tart with a lot of lemon curd then double the curd to make it thicker.

It’s important to use a mild flavoured honey in this as a strong honey can easily over power that beautiful lemon flavour that we want to hero! 😉

Because I use butter in the curd it isn’t completely Paleo, but you just can’t have a lemon tart without butter!!! I absolutely love good fats, and I can’t bare to cook without them! They have amazing health benefits! More on that in another post though!

I hope you enjoy this is as much as we do!

Lemon Tart
Yields 8
The most perfectly smooth, naturally sweetened, tangy and delectable Lemon Tart ever!
Write a review
Print
Prep Time
1 hr
Cook Time
20 min
Total Time
1 hr 20 min
Prep Time
1 hr
Cook Time
20 min
Total Time
1 hr 20 min
Sweet Shortcrust Pastry
  1. 50g Coconut Palm Sugar
  2. 150g Almond Meal
  3. 50g Coconut Flour
  4. 30g Arrowroot
  5. 100g Organic Butter
  6. 1/2 Lemon, zested
  7. 1 Organic Egg, lightly beaten
Filling
  1. 200g Lemon Juice, strained
  2. 200g Organic Butter
  3. 150g Organic Honey
  4. 1 1/2 Lemons, zested
  5. 1 Tbsp Cornflour
  6. 5 Organic Eggs
Pastry
  1. Place the sugar into the Thermomix bowl and mill 10 Sec/Speed 9.
  2. Add the almond meal, coconut flour, arrowroot, butter and lemon zest to the bowl and blend 10 Sec/Speed 6.
  3. Add the egg and Knead 15 Sec.
  4. Wrap in plastic wrap, flatten, and place in the refrigerator for 30 minutes to chill.
  5. Preheat the oven to 160°C and spray a 26cm tart case with oil spray.
  6. Once the dough is chilled, roll out to 5mm thickness between 2 sheets of baking paper.
  7. Peel off the top sheet of baking paper, and transfer pastry to prepared tart case and peel the bottom sheet of baking paper off, pushing the pastry down gently to fit the case evenly. If there are any tares, just use a little of the excess dough to carefully patch it, being careful to maintain an even thickness.
  8. Place back into the fridge to chill for 15 minutes before baking for 15 minutes.
  9. Remove from the oven and cool.
Filling
  1. Place the juice, butter, honey and zest into the bowl of the Thermomix and heat 3 Mins/60°/Speed 2.
  2. Mix 50 Sec/Speed 3, adding the cornflour first, then the eggs 1 at a time through the hole in the mixing bowl lid. Once the eggs are completely incorporated, cook for 8 Mins/80°/Speed 3.
  3. Pour into the cooled tart case and gently agitate it the case to even the filling mixture out. Set aside to cool and then place into the fridge to set completely.
  4. Once set, approx. 1 hr, cut into slices and serve with fresh cream or yoghurt.
Notes
  1. Make sure to use a mild flavour honey so that it doesn't over power the flavour!
Kitch'n Thyme https://kitchnthyme.com.au/

Kale, Olive & Macadamia Tart

Kale Tart 1 I love Kale! There are so many ways you can cook Kale. From chips to smoothies, there are so many options when it comes to this brassica. I love iron rich and vitamin rich foods! Kale has become a real foodie loving vegetable and it’s not hard to see why!

This tart is a variation of my Heirloom Tomato Tart. It’s basically the same in terms of the pastry & egg mix, just a few different ingredients in the filling!Kale Tart 2 I love olives! I’m dying to go to Italy and just eat olives! Between my obsession with olives, olive oil and tomatoes, I think I should have been Italian!

The saltiness of the olives in this tart matches the kale so nicely! The crunch of the macadamias pairs so nicely with the creaminess of the cream cheese.

Same as with my Heirloom Tomato Tart the pastry is made from spelt using my old pastry ratio I learnt when I studied as a chef. It’s still really light and melts in the mouth as it’s loaded with butter!  Enjoy this beautiful autumn tart! Kale Tart 3  

Kale, Olive & Macadamia Tart
Serves 6
A delicious variation of my Heirloom Tomato Tart
Write a review
Print
PASTRY
  1. 100g Organic Wholemeal Spelt Flour
  2. 100g Organic White Spelt Flour
  3. ½ tsp Celtic Sea Salt
  4. 100g Organic Butter
  5. 40g Water
FILLING
  1. 30g Saracino Sheep Cheese
  2. 2 Tbsp Olive Oil
  3. 4 Medium Brown Onions
  4. 1 Tbsp Balsamic Vinegar
  5. 1 Tbsp Rapadura Sugar
  6. 50g Organic Butter
  7. 1/3 Bunch Organic Kale, de-veined & roughly chopped
  8. 4 Large Organic Eggs
  9. 60g Sour Cream
  10. 60ml Milk
  11. 1/2 tsp Celtic Sea Salt
  12. 100g Cream Cheese, cut into cubes
  13. 10 Kalamata Olives, pitted & sliced in halves
  14. 20g Macadamias, quartered
  15. Few sprigs Italian parsley, finely chopped
PASTRY
  1. To make the pastry place the flours, butter & salt into the Thermomix bowl. Process for 8-10 Sec/Speed 6 until the mixture just resembles breadcrumbs.
  2. Add the water and knead 10-20 Sec. Transfer the dough to a sheet of cling wrap, press together, cover in cling wrap, flatten and place into the fridge for 30 minutes to rest. Preheat the oven to 180°C.
  3. Roll out the dough to approx. 3mm thickness press into a large rectangular tart shell. Prick with a fork. Place back into the fridge for a further 15-30 mins to chill.
  4. Place a small piece of baking paper over the pastry and fill the case with pie weights. Blind bake for 15 minutes. Allow to cool before taking the pie weights out of the case.
FILLING
  1. Place the saracino sheep cheese into the Thermomix and mill 10 Sec/Speed 9. Set aside.
  2. To make the caramelised onions, heat the olive oil in a pan and add the onions. Cook the onions, stirring occasionally until very well browned. The thinner the onions are sliced the better caramelisation you will get. Add the vinegar and sugar right at the end and stir to combine. Take off the heat and set aside in a bowl.
  3. While the pan is still hot, place back on the heat, add the butter and kale and cook the kale, stirring until just wilted. It should retain it's beautiful vibrant green colour! Take off the heat and set aside.
  4. Place the eggs, sour cream, milk, & salt into the Thermomix bowl. Mix 10 Sec/Speed 4.
  5. To assemble, scatter the onions evenly over the base of the tart, follow with the cream cheese, kale, olives & macadamias.
  6. Pour over the egg mix and finish with the reserved grated cheese & parsley.
  7. Bake for 25 minutes or until just set and golden brown. Serve warm or cool.
Notes
  1. Try my Heirloom Tomato Tart
  2. You can easily make this tart dairy free by substituting the sour cream for coconut cream, the milk for almond or rice milk, and leave out the cheeses!
Kitch'n Thyme https://kitchnthyme.com.au/