Chilli Con Carne

Chilli Con Carne upgraded
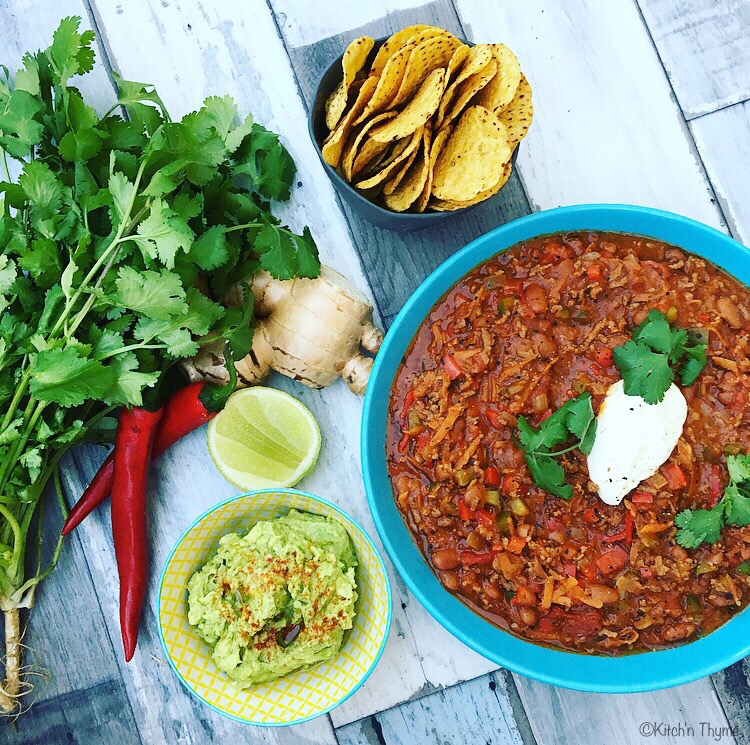
This dish brings back many memoires for me! Growing up, my mum used to make a delicious vegetarian version. It was such a staple in our house and one that I remember fondly!

I’ve added in a few things and made it more traditional with the organic beef, but essentially it still has all those same hearty flavours that remind you of home! 

Some people put cinnamon in chilli con carne. I personally don’t, but you are more than welcome to add some in if you like. I absolutely love cinnamon, but am not a huge fan of too much in savoury dishes like this!

There are all different consistencies to the perfect chilli, mine isn’t runny, but it’s not super thick either.

I use Mexe-beans (Pinto beans) rather than Red Kidney Beans and I don’t drain them. The liquid is just water, spices and salt, (no sugar or nasty flavourings), so I add it in for that perfect consistency and extra flavour. You can use Red kidney beans if you like, but I find them a bit more floury than Pinto beans. 

I also love the basil and oregano that I put in mine! It adds a beautiful flavour! I tend to not make it too hot with the chilli. 1-2 is enough for me as this suits my little boys taste buds too! But feel free to increase the chilli if you like your food hotter! 

Chilli Con Carne upgraded 2

It’s starting to get cooler now, and this beauty is the perfect winter warmer! 

So what are you waiting for?!!  Go cook it! Go right now!! 

Chilli Con Carne
Serves 4
My take on this classically perfect winter warmer!
Write a review
Print
Prep Time
5 min
Cook Time
30 min
Total Time
35 min
Prep Time
5 min
Cook Time
30 min
Total Time
35 min
Ingredients
  1. 2 tsp Cumin Seeds
  2. 2 tsp Coriander Seeds
  3. 1/4 tsp Black Peppercorns
  4. 1 Large Carrot, cut into 3-4cm lengths
  5. 1 Green Capsicum, quartered & deseeded
  6. 1 Red Capsicum, quartered & deseeded
  7. Few sprigs Fresh Coriander, inclu stems and roots
  8. 2 Medium Brown Onions, halved
  9. 3cm Knob Ginger
  10. 2 Cloves Garlic
  11. 1-2 Long Red Cayenne Chillies, adjust to taste
  12. 1/8-1/4 tsp Cayenne Pepper
  13. 2 Tbsp Extra Virgin Olive Oil
  14. 500g Organic Beef, partially frozen, cut into pieces
  15. 1 Tbsp Dried Basil
  16. 1 Tbsp Dried Oregano
  17. 400g Can Mexe Beans, Red Kidney Beans or Black Beans
  18. 2 x 400g Can Organic Chopped Tomatoes
  19. 4 Tbsp Organic Tomato Paste
  20. 2 tsp Celtic Sea Salt
Instructions
  1. Place the spices into the mixing bowl and dry roast 2 Mins/120°/Speed 1. Allow to cool slightly then insert measuring cup and mill 1 Min/Speed 9. Transfer into a bowl and set aside.
  2. Without cleaning the bowl, place half of the beef into mixing bowl and chop Turbo/0.5Sec/3 Times to mince. Transfer to the bowl with the spices and repeat the same mincing process with the remaining beef before adding to the bowl with the beef and spices.
  3. Without rinsing the bowl, place the carrot, capsicums and coriander into mixing bowl and chop 5 Sec/Speed 4. Transfer into the bowl with the spices and set aside.
  4. Place brown onion, ginger, garlic, red chillies, cayenne pepper and olive oil into mixing bowl and chop 3 Sec/Speed 7. Scrape down sides of mixing bowl with spatula and sauté 6 Mins/120°/Speed 1, placing simmering basket instead of measuring cup onto mixing bowl lid.
  5. Insert the butterfly. Add the beef mince, spice and carrot/capsicum mix, basil & oregano and cook 10 Mins/100°/Reverse/Speed 1.
  6. Add the mexe beans (or kidney beans), chopped tomatoes, tomato paste, and salt. Cook 10 Mins/90°/Reverse/Speed 1, placing simmering basket instead of measuring cup on to mixing bowl lid.
  7. Serve with corn chips, guacamole, sour cream or your favourite sides!
Notes
  1. *You can use Organic Beef Mince however it does tend to really mince it further. If time permits, I suggest making your own mince!
  2. *If you prefer a slightly thicker consistency only add 1 x 400g Can Organic Tin Tomatoes.
  3. *For Paleo & Ketogenic, omit the beans and serve with cauliflower chips or rice or other suitable option.
Kitch'n Thyme https://kitchnthyme.com.au/

Chicken Satay Sticks w Macadamia Satay Sauce, Cucumber & Chilli Pickle & Coconut Rice

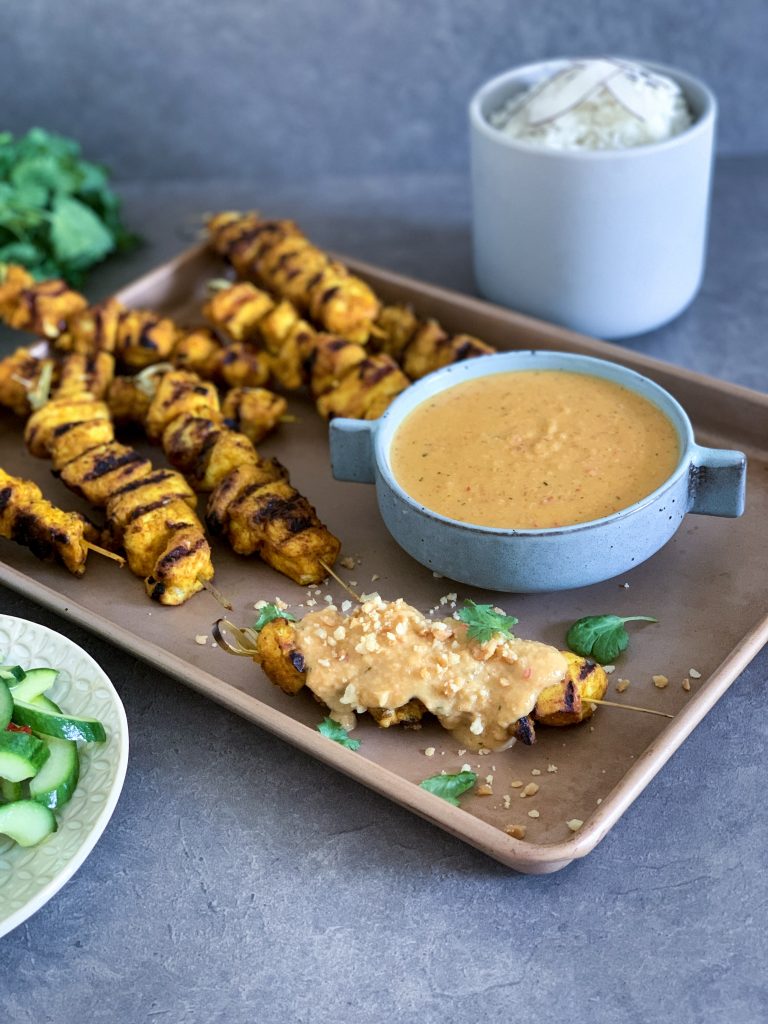
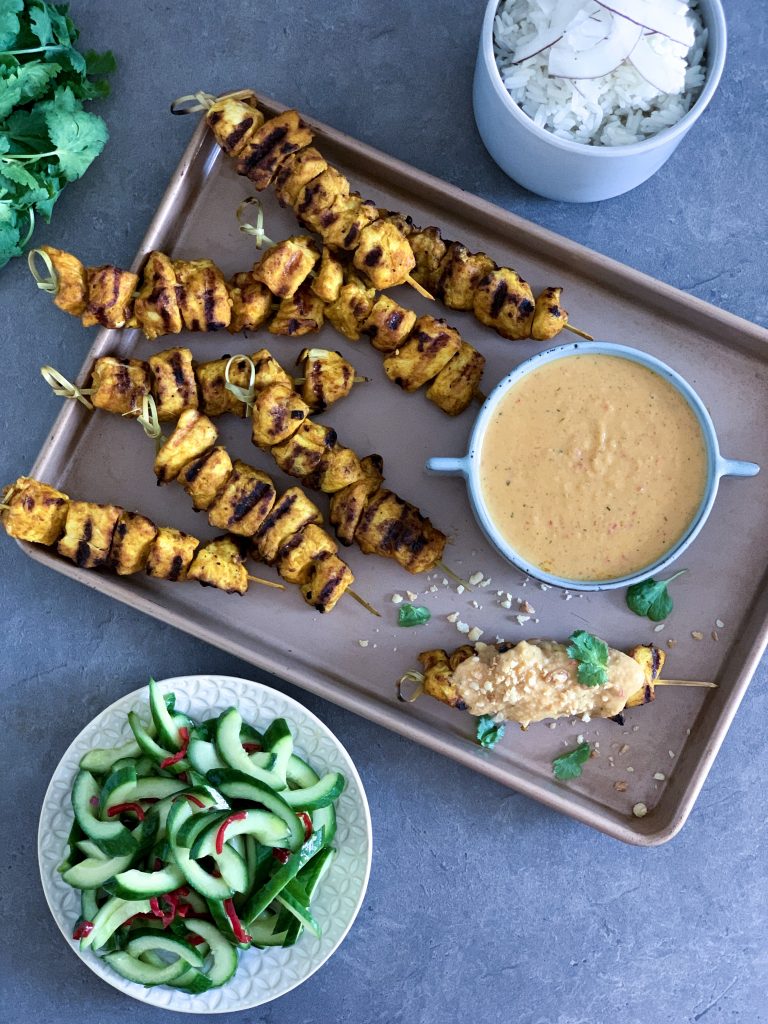
**January 2019 update!** This recipe was originally posted in March 2015. I really felt that the photos needed updating, so i’ve rephotographed the recipe. All the ingredients remain the same, however I have finally added my method for my cucumber pickle that I’ve always made along side satay sticks and my method for the BEST Coconut Rice! The story below is as it was from 4 years ago!**

As I mentioned in my Tom Kha Gai (Thai Chicken Coconut Soup) post, Thai food is a real favourite! I just love the complexity of the flavours yet the perfect balance of flavours. Saying that, this satay sauce has more of a Malaysian influence! 😂

When I travelled all around Thailand a few years ago (almost 10 yrs ago now!!!) with my husband I think I must have had Chicken Satay at almost every restaurant! I really love it! I found it quite different however to the Western versions that we are used to here in Australia. Everything is sweetened up a little more over here!

This satay sauce version of mine I developed when I worked fulltime at the health retreat. As we don’t use peanuts at the retreat, I made it with macadamias as a replacement for the peanuts! And it’s amazing!!!

Peanuts a tendency to soak up aflatoxins from fungus in the soil. This is rather questionable. Being from the legume family and not really a nut, they have quite a porous shell, making them more susceptible to soaking up pesticides and bacteria as well, just one reason why organic is ultra important. Of course, we also know of the scrutiny they receive for being so allergenic too! We don’t have any allergies in our family, however they are not something we eat very much of – more on the occasional side! If we do have them, they must be organic peanuts! And saying that I’ve recently developed the best Satay Sauce using peanuts more specifically for Vietnamese Rice Paper Rolls!

This satay sauce sauce as I said above, has some of what I would call Malaysian flavours, but I still use coconut milk, more like the Thai version rather than soy sauce.

The marinade for the chicken is super easy and just flavours that meat up a little more than just leaving it plain.

I use chicken thighs as I find them more flavoursome, however you can use chicken breast or tenderloins, but just remember to reduce the cooking time to about 2-3 minutes each side.

You can serve this dish traditionally with Cauliflower Rice for a lower carb version, or just as they are with the sauce with and the cucumber pickle!

Print

Chicken Satay Sticks w Macadamia Satay Sauce, Cucumber & Chilli Pickle & Coconut Rice

Delicious peanut free satay sauce!

  • Author: Gabrielle

Ingredients

Chicken Skewers

  • 4 Organic Chicken Thighs or 2 Chicken Breasts
  • 1 tsp Coriander
  • 1 tsp Turmeric
  • 1 tsp Sweet Paprika
  • 2 Cloves Garlic
  • 4 Eschalots
  • 1 tsp Celtic Sea Salt
  • 2 tsp Olive Oil
  • 8 medium bamboo skewers (preferably soaked in water for 20 mins)

Satay Sauce

  • 300g Macadamias
  • 2 Medium Red Onions
  • 4 Cloves Garlic
  • 2 Long Red Chillies, seeds removed
  • 2 Stalks Lemongrass
  • 100g Olive Oil
  • 2 tsp Tamarind Pulp
  • 1 Tbsp Lime Juice
  • 1 tsp Lime Zest
  • 1 Tbsp Coconut Palm Sugar
  • 2 1/2 tsp Celtic Sea Salt
  • 150-200g Coconut Milk

Coconut Rice

  • 250g Coconut Milk 
  • 220g Water 
  • 220g Jasmine Rice
  • 1/2 tsp Celtic Sea Salt 
  • 1 tsp Honey or Raw Sugar

Cucumber Pickle 

  • 2 Lebanese Cucumbers, deseeded and sliced on the diagonal
  • 1 Red Cayenne Chilli, deseeded and sliced
  • 1 Tbsp Rice Wine Vinegar
  • 1 tsp Honey
  • 1/2 tsp Celtic Sea Salt
  • 1 tsp Olive Oil 

Instructions

Chicken Skewers

  1. Chop the chicken into 3-4cm cubes and place into a large mixing bowl. Place the eschalots, garlic, spices, salt and olive oil into the Thermomix and chop 5-10 Sec/Speed 7. Add to the bowl with the chicken and stir to combine well. Let marinate for 4-6 hours or overnight.
  2. Thread 5-6 pieces onto medium sized skewers. Preheat a chargrill or barbeque grill on high. Cook the chicken for approximately 4 minutes each side or until the meat is cooked through evenly.

Sauce

  1. Preheat the oven to 180°C. Line a baking tray with baking paper and roast the macadamias for 10 minutes or until golden brown. Remove from the oven to cool slightly.
  2. Place 50g of the macadamias into the Thermomix and chop 15-20 sec/Speed 4. Set aside.
  3. Place the remainder of the nuts into the Thermomix and mill 10 Sec/Speed 9. Scrape down the sides of the bowl then process 40 Sec/Speed 4-5 until nut butter forms. Set aside.
  4. Place the onion, garlic, chilli, lemongrass and olive oil into the Thermomix and chop 10 Sec/Speed 7. Then sauté 10 Mins/100°/Speed 1.
  5. Add the all the remaining ingredients along with the reserved nut butter and cook 5 Mins/80°/Sp 1.
  6. Once cooked pour into a serving bowls and sprinkle with the reserved chopped macadamias.
  7. Serve with coconut rice or Cauliflower Rice.

Notes

  • Serve with my Cauliflower Rice for a low carb version!
  • You can double my Coconut Rice to serve more people.

Nutrition

  • Serving Size: 4

Kale, Olive & Macadamia Tart

Kale Tart 1 I love Kale! There are so many ways you can cook Kale. From chips to smoothies, there are so many options when it comes to this brassica. I love iron rich and vitamin rich foods! Kale has become a real foodie loving vegetable and it’s not hard to see why!

This tart is a variation of my Heirloom Tomato Tart. It’s basically the same in terms of the pastry & egg mix, just a few different ingredients in the filling!Kale Tart 2 I love olives! I’m dying to go to Italy and just eat olives! Between my obsession with olives, olive oil and tomatoes, I think I should have been Italian!

The saltiness of the olives in this tart matches the kale so nicely! The crunch of the macadamias pairs so nicely with the creaminess of the cream cheese.

Same as with my Heirloom Tomato Tart the pastry is made from spelt using my old pastry ratio I learnt when I studied as a chef. It’s still really light and melts in the mouth as it’s loaded with butter!  Enjoy this beautiful autumn tart! Kale Tart 3  

Kale, Olive & Macadamia Tart
Serves 6
A delicious variation of my Heirloom Tomato Tart
Write a review
Print
PASTRY
  1. 100g Organic Wholemeal Spelt Flour
  2. 100g Organic White Spelt Flour
  3. ½ tsp Celtic Sea Salt
  4. 100g Organic Butter
  5. 40g Water
FILLING
  1. 30g Saracino Sheep Cheese
  2. 2 Tbsp Olive Oil
  3. 4 Medium Brown Onions
  4. 1 Tbsp Balsamic Vinegar
  5. 1 Tbsp Rapadura Sugar
  6. 50g Organic Butter
  7. 1/3 Bunch Organic Kale, de-veined & roughly chopped
  8. 4 Large Organic Eggs
  9. 60g Sour Cream
  10. 60ml Milk
  11. 1/2 tsp Celtic Sea Salt
  12. 100g Cream Cheese, cut into cubes
  13. 10 Kalamata Olives, pitted & sliced in halves
  14. 20g Macadamias, quartered
  15. Few sprigs Italian parsley, finely chopped
PASTRY
  1. To make the pastry place the flours, butter & salt into the Thermomix bowl. Process for 8-10 Sec/Speed 6 until the mixture just resembles breadcrumbs.
  2. Add the water and knead 10-20 Sec. Transfer the dough to a sheet of cling wrap, press together, cover in cling wrap, flatten and place into the fridge for 30 minutes to rest. Preheat the oven to 180°C.
  3. Roll out the dough to approx. 3mm thickness press into a large rectangular tart shell. Prick with a fork. Place back into the fridge for a further 15-30 mins to chill.
  4. Place a small piece of baking paper over the pastry and fill the case with pie weights. Blind bake for 15 minutes. Allow to cool before taking the pie weights out of the case.
FILLING
  1. Place the saracino sheep cheese into the Thermomix and mill 10 Sec/Speed 9. Set aside.
  2. To make the caramelised onions, heat the olive oil in a pan and add the onions. Cook the onions, stirring occasionally until very well browned. The thinner the onions are sliced the better caramelisation you will get. Add the vinegar and sugar right at the end and stir to combine. Take off the heat and set aside in a bowl.
  3. While the pan is still hot, place back on the heat, add the butter and kale and cook the kale, stirring until just wilted. It should retain it's beautiful vibrant green colour! Take off the heat and set aside.
  4. Place the eggs, sour cream, milk, & salt into the Thermomix bowl. Mix 10 Sec/Speed 4.
  5. To assemble, scatter the onions evenly over the base of the tart, follow with the cream cheese, kale, olives & macadamias.
  6. Pour over the egg mix and finish with the reserved grated cheese & parsley.
  7. Bake for 25 minutes or until just set and golden brown. Serve warm or cool.
Notes
  1. Try my Heirloom Tomato Tart
  2. You can easily make this tart dairy free by substituting the sour cream for coconut cream, the milk for almond or rice milk, and leave out the cheeses!
Kitch'n Thyme https://kitchnthyme.com.au/

Chicken Stroganoff

Chicken Stroganoff

 This fabulous dish is such a classic! I remember learning this at college when I studied to become a chef….it was something I always remembered, however was never really into. Why? Because I grew up never eating dairy! Weird I know! But my mum was a hippy type person or so I always labelled her! Instead we were eating cashew creams and sunflower cheeses and sprouts and kefir! Those things I will leave to another post!…..However, sour cream has grown on me majorly, and since I tend to advocate a lower carbohydrate, higher fat diet, this dish makes for a wonderful Ketogenic dinner.

I can see why my mum did limit my dairy intake for many reasons, one being that my tolerance to dairy is quite low. My husband can handle dairy quite well, however we still like to balance our dairy consumption. Since this is one of his favourite dishes, I do tend to make it as a treat rather than a staple on the weekly menu. I could make it completely Paleo by using coconut cream in place of cream, however it would be more of a curry! Not quite the same, but go ahead if you are completely Paleo!

I leave the traditional wine out. I know its flavour and all, and I’m not adverse to using wine in cooking when it cooks off, however to keep the carbs low, I don’t use it, and seriously it really doesn’t need it! It’s just delicious and super flavoursome without!

My spin uses Turmeric. I know its completely untraditional but I love that I can get turmeric into my family here! Besides being a wonderful flavour booster, turmeric is proven to reduce the risk of dementia, combats inflammatory diseases, helps fight colds and flus, and helps indigestion and weightloss as well as many other things! I know it’s only what – a teaspoon? But every little bit is better than nothing, and I will always make use of an opportunity to increase the nutritional content of the food I feed my family!

I use fresh Thyme as I really love it….it’s one of my favourite herbs! Just so delicate and aromatic – I just have a special little thing for it! But you could use some Italian parsley to finish it off perhaps.

We eat it with my Cauliflower Rice. Just make the rice plain without the capsicum and coriander. The cauliflower rice works a treat with this dish and you feel so good after eating it, especially if at night.

Enjoy!

Chicken Stroganoff
My take on this delicious staple! Served with Cauliflower Rice. Reader Naomi says: "Flavour was bang on! Having for dinner again tonight, our 8 year old loves it!" - July 2016, The 4 Blades Magazine
Write a review
Print
Ingredients
  1. 1 Large Brown Onion
  2. 2 Cloves Garlic
  3. 30g Olive Oil
  4. 1 tsp Turmeric
  5. 1 tsp Smoked Paprika
  6. 1 Tbsp Vegetable Stock Paste
  7. 1/2 tsp Celtic Sea Salt
  8. 1 Chicken Breast, cut into 3cm cubes
  9. 250g Button Mushrooms, chopped into 1/4's
  10. 300ml Organic Pure Cream or Coconut Cream
  11. 4 Sprigs Fresh Thyme Leaves
Instructions
  1. Place the onion and the garlic into the Thermomix and chop roughly 3 Sec/Speed 7.
  2. Scrape down the sides of the bowl and add the oil and spices and sauté 10 Mins/100°/Speed 1.
  3. Insert the butterfly. Add the salt, stock paste, chicken & mushrooms and cook 2 Mins/100°/Speed 2/Reverse.
  4. Add the cream and the fresh thyme and cook 15 Mins/100°/Speed 1/Reverse/MC Removed.
  5. Serve warm with Cauliflower Rice.
Kitch'n Thyme https://kitchnthyme.com.au/

Tom Kha Gai -Thai Chicken Soup

Tom Kha Gai Soup 

For many years we’ve attended a beautiful local Thai restaurant in Noosa. My husband and I always used to love our occasions where we would share this delightful Thai soup called Tom Kha Gai. It was so warming and soothing with its brothy feel and being infused with the rich spicy Thai flavours of lemongrass, ginger, garlic, kaffir lime & coriander.

I decided that I had to make it at home! And it had to be really really like the original in the restaurant! After much research and many many batches and tweakings I came up with the following. My husband thinks its pretty fantastically close to the original! I was VERY excited as he is a real food critic!

I love soup. I even like soup when it’s not winter! It’s been pouring rain here in Queensland this week and it just seemed fitting for dinner tonight. We had some friends for dinner and it went down a treat!

My husband often lectures at nights and this is perfect for him if he is hungry when he gets home late. It’s very low carb and easy on the digestion. You can add vermicelli to it, however I prefer to keep it grain free and keep the carbs that little bit lower…and I just don’t think it needs it!

Enjoy!

Tom Kha Gai (Thai Chicken Soup
Serves 4
Warming, coco-nutty, delicious soup with all the punchy Thai flavours! "Fantastic Thai soup. Great mix of flavours with a good hit of chilli." Bec of The 4 Blades Magazine, July 2016
Write a review
Print
Prep Time
5 min
Cook Time
28 min
Prep Time
5 min
Cook Time
28 min
Ingredients
  1. 800ml Bone Broth (or Chicken Stock)
  2. 800ml Coconut Cream (2 Cans)
  3. 1 1/2 tsp Celtic Sea Salt
  4. 6 Kaffir Lime Leaves
  5. 6 Coriander Roots and stalks, washed thoroughly
  6. 2 Stalks Lemongrass, halved and bruised
  7. 4cm Knob Ginger, sliced thinly
  8. 2 Cloves Garlic, bruised
  9. 2 Chicken Breast, halved in thickness
  10. 250g Button Mushrooms
  11. 125g Cherry Tomatoes, halved
  12. 4 Spring Onions, cut into 4cm batons
  13. 1 Long Red Chilli, finely diced
  14. 1 Tbsp Sesame Oil
  15. 2 tsp Fish Sauce
  16. Fresh Coriander to serve
Instructions
  1. Place the chicken stock, coconut cream and salt into the Thermomix. Position the basket in place and add the lime leaves, coriander, lemongrass, ginger, garlic and chicken breast. Cook for 18 Mins/90°/Speed 3.
  2. Lift the basket out of the Thermomix with the spatula and discard the aromatics. Check that the chicken is cooked, and take it out of the basket and set aside to cool slightly.
  3. Insert the butterfly into the Thermomix and add the mushrooms, tomatoes, and white stems of the spring onions and cook 8 Mins/90°/Speed 3/Reverse.
  4. Add the green pieces of spring onions, chilli, sesame oil and fish sauce and cook for a further 2 Mins/90°/Speed 3/Reverse.
  5. Shred the chicken with a fork and add to serving bowls. Pour the hot broth over the top.
  6. Garnish with coriander and serve.
Kitch'n Thyme https://kitchnthyme.com.au/

Thai Chicken Rissoles

Thai Chicken Rissoles best 3These are an absolute staple in our house! I make these for my husbands lunches. With a great big salad, these are the perfect meal. They are very easy to make, are a great source of protein, and are also packed with veges.

My little boy also loves them, and I love that they are full of hidden vegetables! Onions, garlic and ginger for immune building and nuts for added texture and good fats.

I leave the chillies in, even for my little boy. He has been used to eating spicy foods since he was little, as I want him to enjoy a wide variety from a young age. The long red cayenne chillies aren’t that hot, but you can leave them out if your child is sensitive to spicy foods!

You will notice that I have diced the onions and garlic and capsicum and panfried them first. This probably comes down to my OCD, as I like some things to be precise! You can chop them in the Thermomix if you couldn’t be bothered to dice yourself. I cook them off in a fry pan before adding to the mix as I don’t want them to make the mix watery. You also get nice caramelisation in a pan which adds loads of flavour!

These are great also as a dinner option served with roasted/steamed vegetables.  

Thai Chicken Rissoles best 2

Thai Chicken Rissoles
Yields 35
Perfect for lunchboxes! Packed with veges, chicken and aromatics, these are a perfect source of good carbs, protein & good fats! Reader Channy says: This is such a flavour-filled recipe, and so simple to make! This would be amazing served cold with a fresh salad on a warm summer night. I see this becoming a household fave!" - The 4 Blades Magazine July 2016
Write a review
Print
Prep Time
20 min
Cook Time
15 min
Total Time
35 min
Prep Time
20 min
Cook Time
15 min
Total Time
35 min
CURRY PASTE
  1. 6 Kaffir Lime Leaves (stalk removed)
  2. 2 stalks Lemon Grass (white part only)
  3. 1/4 bunch Coriander (inclu roots & stalks)
  4. 5cm knobs Ginger
  5. 1/2 Lime, zested
  6. 2 Red Cayenne Chillies, de-seeded
RISSOLES
  1. 4 tablespoons Olive Oil, plus extra for pan frying
  2. 2 Large Red Onions, finely diced
  3. 2 cloves Garlic, finely chopped
  4. 1 Red Capsicum, finely chopped
  5. 1kg Organic Chicken Breasts, roughly chopped into 3-4cm pieces
  6. 2 Zucchinis
  7. 2 Carrots
  8. 100g Cashews
  9. 100g Macadamias
  10. 4 Spring Onions, thinly sliced
  11. 2 Organic Egg, lightly beaten
  12. 1 Tbsp Celtic Sea Salt
  13. 1 Tbsp Fish Sauce
  14. Gluten Free Breadcrumbs or Almond Meal (for crumbing)
CURRY PASTE
  1. Roughly chop all the ingredients into 1-2 cm pieces. Then add to the Thermomix bowl and process 5-10 Sec/Speed 7. Transfer to a large mixing bowl.
RISSOLES
  1. Bring a large fry pan to medium heat. Add 2 Tbsp of the olive oil, the finely diced onion & garlic and sauté till golden brown. Add to the large mixing bowl with the curry paste. Repeat the process with the remaining olive oil and capsicum and add to the large mixing bowl.
  2. Add the chicken, 500g at a time, to the Thermomix and process 5 Sec/Speed 5. Transfer to the large mixing bowl also.
  3. Roughly chop the carrot and zucchini into 3-4cm pieces and add to the Thermomix bowl. Chop 10 Sec/Speed 4. Add to the mixing bowl.
  4. Add the nuts to the Thermomix bowl and chop 12 Sec/Speed 4. Add to the mixing bowl.
  5. Add the spring onions and give the mix a good stir at this point before adding all the remaining ingredients.
  6. Heat a large fry pan over medium heat. Add some olive oil (Be careful not to smoke the oil). Roll the mix into rissole shapes & coat with breadcrumbs or almond meal. It is quite a loose mix, so handle them with care. Add to the pan and cook for 2-4 mins each side or until golden brown and cooked through. Transfer onto a paper towel lined cooling rack. Serve warm with a fresh salad or vegetables & garlic mayo or thai tomato relish.
Notes
  1. Refrigerate for 3 days or freeze for future use.
Kitch'n Thyme https://kitchnthyme.com.au/

Chicken Fajitas

Chicken Fajitas upgrade

My delicious Chicken Fajitas is a family favourite! It’s simple and yummy and something my little ones love too! You can very easily just eat it without the tortillas for a lower carb option as well!
Chicken Fajitas upgrade 2

Chicken Fajitas
Serves 4
These delicious Chicken Fajitas pack a punch in flavour and if you plan ahead and make the Tortillas earlier it can be a quick 30 minute meal!
Write a review
Print
Prep Time
25 min
Cook Time
30 min
Total Time
1 hr
Prep Time
25 min
Cook Time
30 min
Total Time
1 hr
SPELT TORTILLAS
  1. 200g Wholemeal Spelt Flour
  2. 200g Spelt Flour
  3. 1 teaspoon Celtic Salt
  4. 1 teaspoon Baking Powder
  5. 80g Olive Oil
  6. 200g Water
GRILLED CHICKEN
  1. 4 Tbsp Olive Oil
  2. 2 Organic Chicken Breasts, thinly sliced
  3. 2 Red Onions, sliced into wedges
  4. 1/2 Red Capsicum, thinly sliced
  5. 1/2 Yellow Capsicum, thinly sliced
  6. 1/2 Green Capsicum, thinly sliced
  7. 1 tsp Ground Cumin
  8. 1 tsp Ground Coriander
  9. 1 tsp Smoked Paprika
  10. 1 tsp Celtic Salt
FRESH SALSA
  1. 2 Lebanese Cucumbers, finely diced
  2. 4 Roma Tomatoes, finely diced
  3. 1/2 Red Onion, finely diced
  4. 1/4 Bunch Coriander, roughly chopped
  5. 1/4 tsp Ground Coriander
  6. 1/2 tsp Celtic Salt
  7. 2 Tbsp Olive Oil
  8. 1 Tbsp Lime Juice
GUACAMOLE
  1. 2 Ripe Avocados
  2. 1 Garlic Clove
  3. 1/2 Lemon, juiced
  4. 1/4 - 1/2 teaspoon Celtic Salt
  5. Paprika, for sprinkling on top
  6. 250ml Sour Cream, for serving
SWEET PEPPERS (OPTIONAL)
  1. 500g Mixed Sweet Peppers
  2. 4 Tbsp Olive or Coconut Oil
  3. 1/2 - 1 teaspoon Celtic Salt
TORTILLAS
  1. Place the flour, baking powder & salt into the Thermomix. Mix 5 Sec/Speed6. Add the water and olive oil and knead 20 Sec. Let rest for 10 minutes.
  2. Divide the dough into 10 portions. Roll out on a floured surface to 8-10 inch rounds.
  3. In a large non-stick frypan, cook the tortillas for 1 minute each side or until lightly browned. Keep warm.
GRILLED CHICKEN
  1. Heat the oil in a large fry pan and add the onion. Fry until beginning to caramelise. Add the capsicum and fry a little longer. Then add the chicken along with all the spices and salt. Cook turning for 3-5 minutes until all the chicken is cooked through. Set aside and keep warm. (You can do this step on the BBQ if you have one for a beautiful charred result or on a griddle pan).
FRESH SALSA
  1. Place all the diced salsa ingredients into a bowl and just before serving add the ground coriander, fresh coriander, lemon, olive oil and salt. Toss to combine.
GUACAMOLE
  1. Place the garlic into the Thermomix bowl and chop 3 Sec/Speed 5. Scrape down the sides of the bowl, add all the other ingredients and process 10-15 Sec/Speed 5.
SWEET PEPPERS
  1. Heat the oil in a large fry pan. Add the peppers and cook for 2-3 minutes or until just softened. Sprinkle with salt and serve.
  2. To assemble the Fajitas, grab a tortilla and top with chicken, salsa, guacamole, peppers & sour cream. Roll up and eat! Yum yum yum!!!
Kitch'n Thyme https://kitchnthyme.com.au/

Heirloom Tomato Tart


This beautiful tomato tart is one of my absolute favourites and a true crowd pleaser! It’s summery, fresh and tastes delicious!

The pastry is made from spelt using my old pastry ratio I learnt when I studied as a chef. It’s still really light and melts in the mouth as it’s loaded with butter!

The caramelised onions add so much delectable flavour to this summery tart! Bringing out the sweetness of the onions compliments the sweetness of the heirloom tomatoes so perfectly!

You can replace the Saracino sheep cheese with parmesan or leave it out if avoiding dairy. To make it completely dairy free, leave out the feta or ricotta and swap the milk for almond milk (or your choice of dairy free milk) and the sour cream for coconut cream. It will work just as beautifully!

I’ve always had an obsession with heirloom tomatoes and I’m so glad I live close to Noosa where I can get the most amazing ones from the local farmers market! Their unusual shapes and devine colours along with their amazing sweetness just make them delectable! And what could make these tomatoes more perfect than fresh basil, pepper and sea salt! Yum

Remember to share your creations with me too. Just hashtag #kitchnthyme or tag me @kitchnthyme  on Instagram or of course post your photo to my facebook wall! I love to see what you’re cooking!


Print

Heirloom Tomato Tart

If you are as obsessed with heirloom tomatoes as I am, you will be sure to love this!

  • Author: Gabrielle Tobin
  • Prep Time: 00:15
  • Cook Time: 00:25
  • Total Time: 40 minutes
  • Yield: 8

Ingredients

PASTRY

  • 100g Organic Wholemeal Spelt Flour
  • 100g Organic White Spelt Flour
  • ½ tsp Celtic Sea Salt
  • 100g Organic Butter
  • 40g Water

FILLING

  • 30g Saracino Sheep Cheese
  • 2 Tbsp Olive Oil
  • 4 Medium Brown Onions
  • 1 Tbsp Balsamic Vinegar
  • 1 Tbsp Rapadura Sugar
  • 4 Large Organic Eggs
  • 60g Sour Cream
  • 60ml Milk
  • 1/2 tsp Celtic Sea Salt
  • ½ Bunch Onion Chives
  • 100g Ricotta or Feta Cheese
  • 500g Mixed Heirloom Tomatoes, sliced
  • Sweet Red or Green Basil, leaves
  • Balsamic Reduction, for drizzling

Instructions

PASTRY

  1. To make the pastry, place the flours, butter & salt into the Thermomix bowl. Process for 8-10 Sec/Speed 6 until the mixture just resembles breadcrumbs.
  2. Add the water and knead 10-20 Sec. Transfer the dough to a sheet of cling wrap, press together, cover in cling wrap, flatten and place into the fridge for 30 minutes to rest. Preheat the oven to 180°C.
  3. Using the Thermomat or a lightly floured surface roll the dough to approx. 3mm thick and carefully place into and press to fit a round 10 inch/26cm tart tin. Prick with a fork. Place back into the fridge for a further 15-30 mins to chill.
  4. Place a small piece of baking paper over the pastry and fill the case with pie weights or dried legumes. Blind bake for 15 minutes. Allow to cool before taking the weights out of the case.

FILLING

  1. Place the cheese into the Thermomix and mill 10 Sec/Speed 9. Set aside.
  2. To make the caramelised onions, heat the olive oil in a pan and add the onions. Cook the onions, stirring occasionally until very well browned. The thinner the onions are sliced the better caramelisation you will get. Add the vinegar and sugar right at the end and stir to combine. Take off the heat and set aside.
  3. Place the eggs, sour cream, milk, salt & chives into the Thermomix bowl. Mix 10 Sec/Speed 4.
  4. To assemble, scatter the onions evenly over the base of the tart, follow with the dollops of the ricotta, pour over the egg mix and finish with the reserved grated cheese.
  5. Bake for 25 minutes or until just set. Let cool slightly.
  6. Place the tomatoes on top, mixing the colours. Top with fresh basil, sprinkle with salt, pepper and generously drizzle with olive oil and balsamic reduction.

Nutrition

  • Serving Size: 6