Coconut & Strawberry Granola


Coconut & Strawb Granola
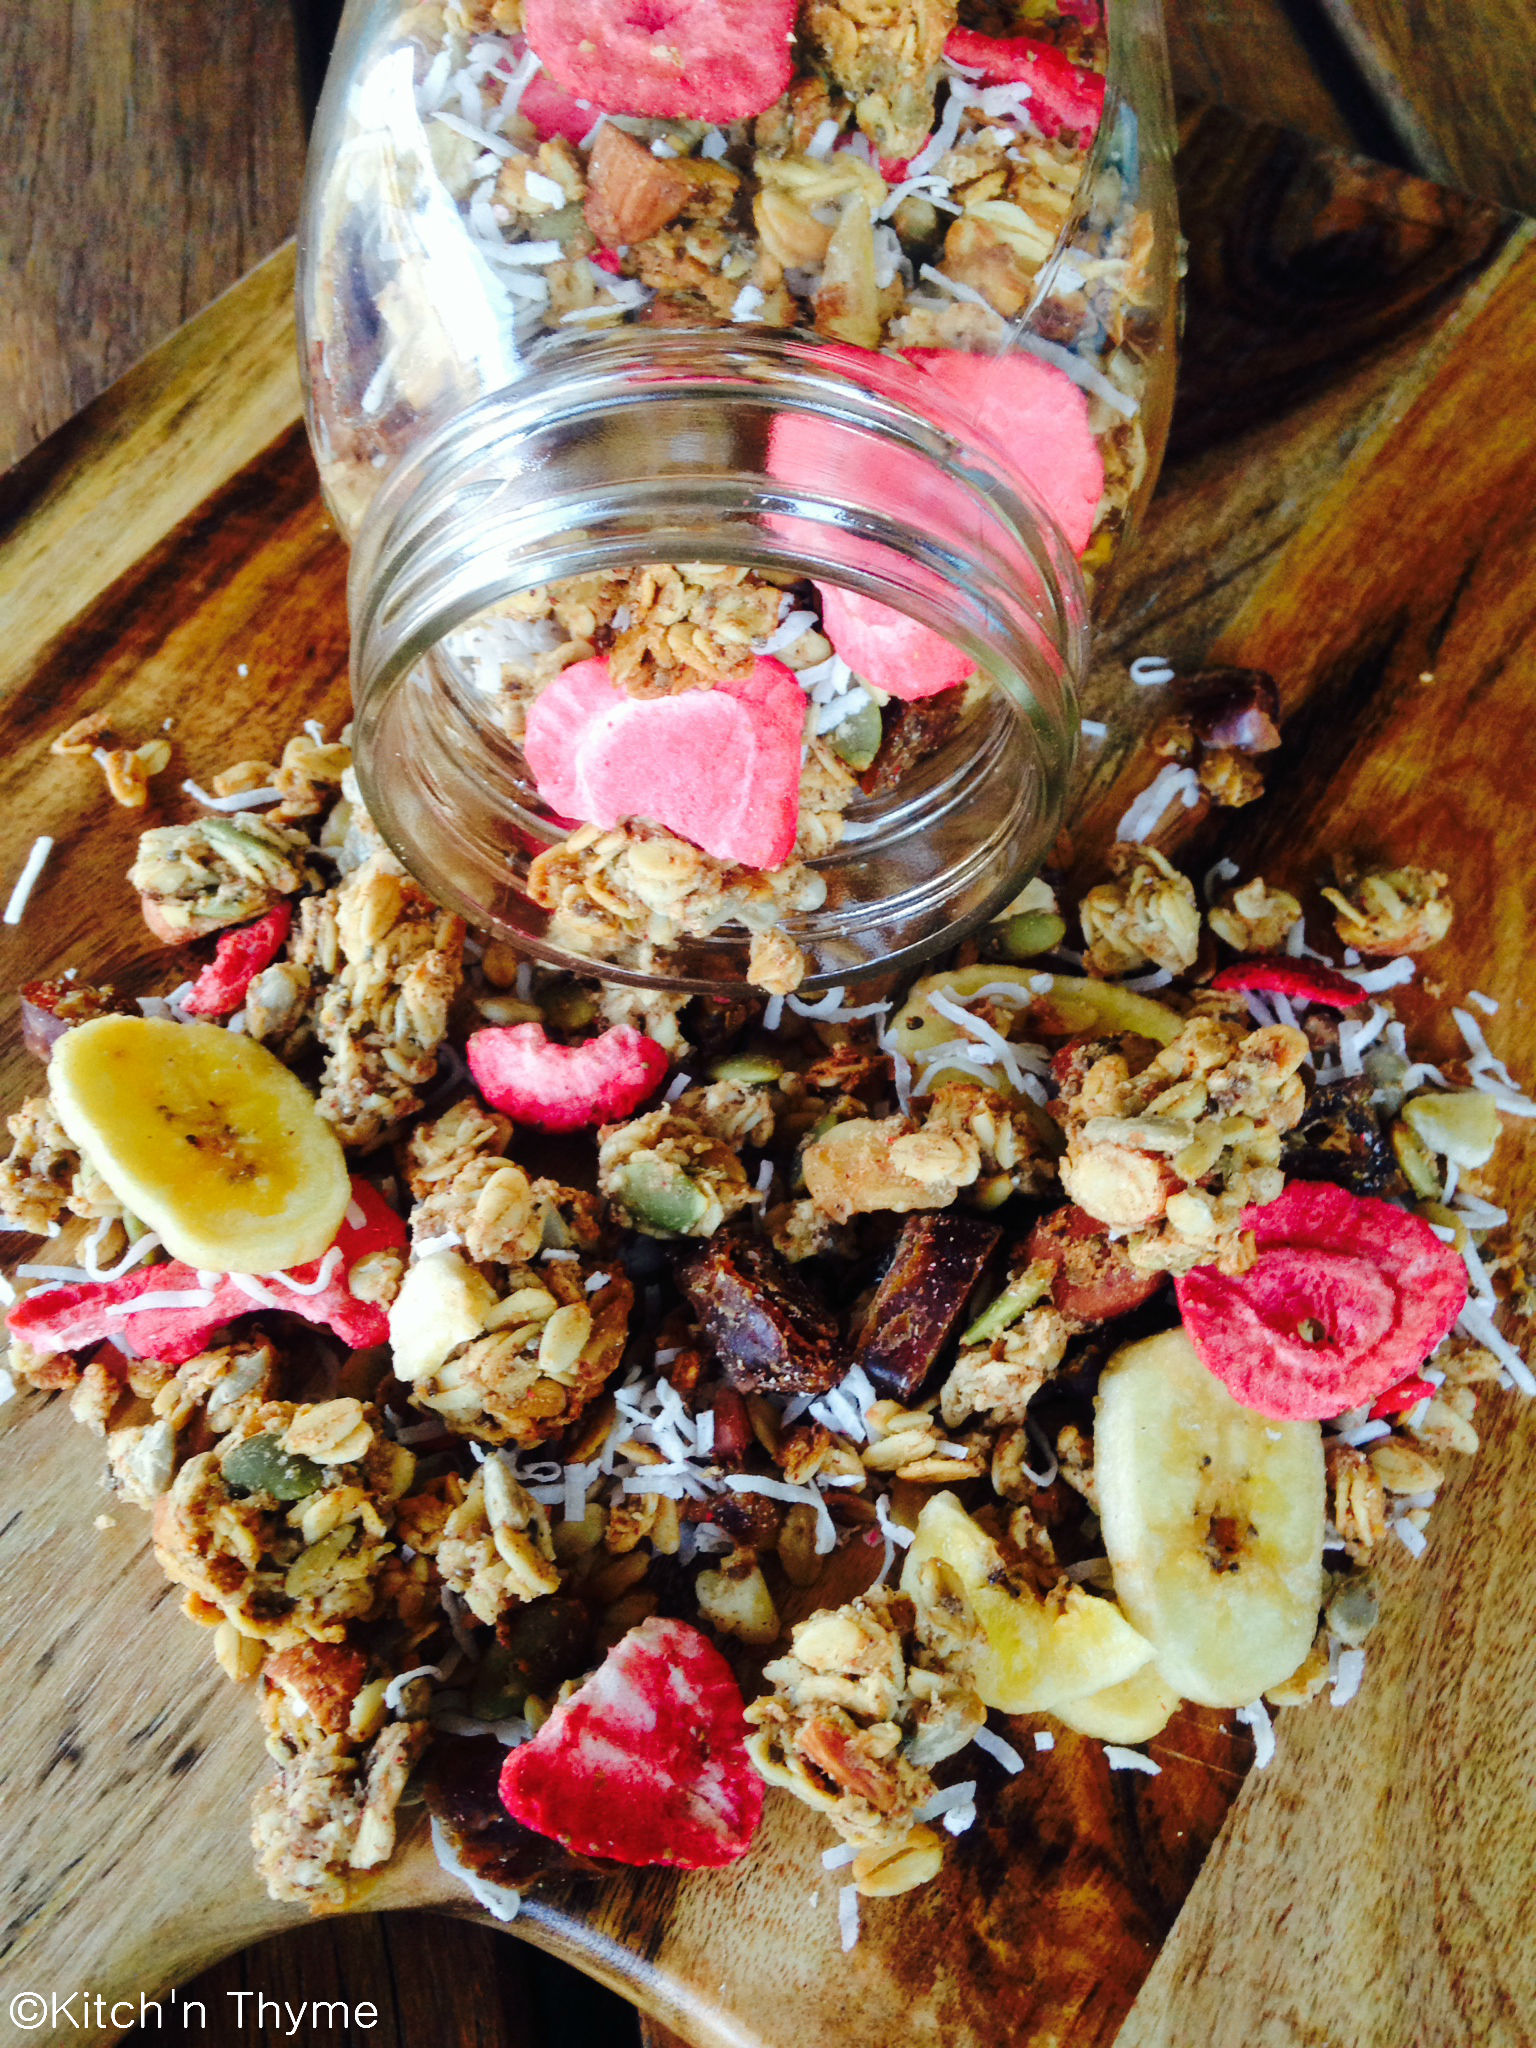
Rather than muesli, this is delicious chunky, crispy, crunchy Granola! Sound good? Then this is for you! Homemade granola is wonderful to have in the house. My memory drifts to when I was a little girl and stood there stirring huge bowls of it! It can be a delicious healthy alternative to sugar laden cereals and great for mornings when you are on the go! The benefit to making it yourself is that you know exactly what has gone into it. Many of the store bought varieties are really high in sugars (especially granolas) and contain unhealthy oils/fats and unnecessary fillers, preservatives and numbers!

This granola is really easy and quick to make. Making it at home gives the you freedom to control what goes into it too. Every fortnight I try to have at least 1-2 food prepping days, which sets us up well with ready-to-eat foods.  These are the sorts of things I will cook on these days. This is a really big batch, it will make around 2.5kg. Depending on the size of your family it should last you a good number of weeks!

I sweeten it with apple sauce and honey. The apple sauce is just apples cooked and blitzed into sauce in 8 minutes with the Thermomix – no other things added! By using apple sauce over apple juice you are eating the fruit in its whole state, with all the fiber, and not just the sugar! The apple sauce also helps to create that chunky granola texture. I always use good quality organic raw honey. Whilst heat treated honey looks prettier and has a longer shelf life, many of the natural minerals, enzymes and antioxidants have been destroyed in the intensive processing. The pollen which is also filtered out has an array of health benefits too. So I always advocate local, raw honey.

Dried fruits contain concentrated amounts of sugars so I try to only put 1 to 2 varieties of dried fruits in. These are a couple of my favourite combinations below. The addition of nuts and seeds enhances the protein content and delights the tastebuds! Even though the nuts are in the mixture I cook, I do pre-roast the almonds first, because I find you get a better roast on them, when roasted first on their own. You can roast them at 180° for 10-15 minutes.

Play around with the ingredients and make your own varieties using the flavours that you love. Enjoy!

Coconut & Strawberry Granola
Delicious chunky, crispy, crunchy Granola! Top with yoghurt and a drizzle of honey for a yummy breakfast!
Write a review
Print
Prep Time
15 min
Cook Time
30 min
Total Time
45 min
Prep Time
15 min
Cook Time
30 min
Total Time
45 min
Ingredients
  1. 1.2kg Organic Rolled Oats
  2. 100g Quinoa Flakes
  3. 100g Activated Buckwheat Kernels (optional)
  4. 100g Almond Milk Pulp (or Almond Meal)
  5. 50g Black Chia Seeds
  6. 100g Pepitas (or Pumpkin Seeds)
  7. 150g Sunflower Seeds
  8. 1 Tbsp Cinnamon
  9. 2 tsp Pimento
  10. 120g Macadamias
  11. 120g Roasted Almonds
  12. 400g Apple Sauce
  13. 300g Organic Butter
  14. 250g Honey
  15. 2 tsp Vanilla Essence
  16. 20g Freeze-dried Strawberries
  17. 100g Shredded Coconut or Coconut Chips
  18. 150g Dates (roughly chopped)
  19. 100g Banana Chips (naturally sweetened)
Instructions
  1. Preheat the oven to 180°. Line large baking trays with baking paper and set aside.
  2. Place the oats, flakes, buckwheat, almond meal, seeds, & spices into a very large mixing bowl. Stir to combine.
  3. Place the nuts into the Thermomix bowl and chop roughly 0.5 Second/Speed 6.
  4. Place the apple sauce, butter, honey & vanilla into the Thermomix and cook 2 Mins/50°/Speed 3. Pour this wet mixture over the dry ingredients and using your hands coat all the dry ingredients well.
  5. Place handfuls onto the baking trays, slightly clumping it in your hands as you go. Spread it out fairly thinly and evenly over your trays, and bake for 30-35 minutes, giving a quick stir halfway through.
  6. Remove from the oven and cool on the trays before placing back into the mixing bowl and tossing with the strawberries, coconut and dates.
  7. Once completely cooled, place into airtight containers or jars and store in a cool, dry place for 2-3 weeks.
Kitch'n Thyme https://kitchnthyme.com.au/

Breakfast Bombs

image
Looking for an alternative to the ‘ol bowl of cereal for breakfast?? Well these are a whole lot better than a bowl full of cereal! Think crispy, fudgey, and smooth!These little bombs are packed with loads of seeds, nuts, butter and coconut oil and are sure to go down a treat!

They have some organic crispy cereal in them and are loaded with all sorts of little superfood boosters. Filled with antioxidants found in the goji berries and the raw cacao, these foods help to stop free radicals damaging the cells.

The good fats from the coconut, butter and nuts are so important for growth development and cell function. They can also be used as a fantastic source of energy, especially for kids!

When my little ones aren’t feeling like eggs or other savoury options, these are fantastic alternative – he loves them!

You can press the mix into a tin and slice it up for something different too! They are best eaten straight from the fridge, as they will get softer as they sit out.

Breakfast Bombs
Yields 15
Write a review
Print
Prep Time
10 min
Cook Time
10 min
Total Time
20 min
Prep Time
10 min
Cook Time
10 min
Total Time
20 min
Ingredients
  1. 120g Cashews or Cashew Butter
  2. 50g Organic Butter
  3. 20g Coconut Oil
  4. 50g Maple Syrup
  5. 10g Raw Cacao Powder
  6. 50g Organic Brown Rice Crispies or Organic Brown Rice Chocolate Koala Crisp! (I use Natures Path brand from Iherb.
  7. 30g Organic Corn Flakes (Fruit Juice Sweetened) - I use Natures Path brand from Iherb
  8. 20g Almond Milk Pulp (or Almond Meal)
  9. 10g Shredded Coconut
  10. 10g Goji Berries
  11. 20g Black Chia Seeds
  12. 10g Sunflower Seeds
  13. 5g Pepitas
Instructions
  1. Roast the cashews for 10 minutes at 180°C or until golden brown.
  2. Place into the Thermomix and mill 10 Sec/Speed 9. Scrape down the edges of the bowl, then process 1 Min/Speed 4. Scrape down the edges of the bowl again and process a further 10 Sec/Speed 6 or until a nut butter consistency is achieved.
  3. Add the butter, oil, maple, and raw cacao to the nut butter and cook 3 Mins/50°/Speed 3.
  4. Add all the remaining ingredients and process 3-5 Sec/ Speed 5, or until it looks similar to a bliss ball consistency, but with some of the cereal still in tact and visible.
  5. Roll into decent sized balls and place into a container lined with baking paper. Refrigerate until set.
Kitch'n Thyme https://kitchnthyme.com.au/

Healthy White ‘Chocolates’

 Here are the much anticipated Christmas ‘chocolates’!! So simple and easy to make, yet so pretty and good for you!


Healthy White Chocolates

You will need my Coconut Butter recipe to make these. Using part coconut butter and part cacao butter gives them a little more texture and a delicious nutty flavour. Cacao butter is also very strong in flavour, so the coconut butter tames it down a little too.

I found these really cheap silicon chocolate moulds at IKEA. They were about $1 or $2 and work a treat!Chocolate Moulds

You can use rice malt syrup in this recipe, however I try to balance my use of this sweetener due to it being so highly processed. In this instance I go for honey. If you choose raw honey, which I always recommend, it is that one step closer to nature and where it came from! It has been through minimal processing and is still full of antioxidants and cleansing properties for our bodies. Honey has been used for thousands of years for medicinal purposes. However, if you are after a more subtle flavour you could use maple syrup which also gives a lovely flavour. Keep an eye out for my more in depth blog post on sweeteners which I’ll put up in the new year!

Play around with whatever nuts and flavour combos you like. I’ve done them before with freeze-dried Raspberries & Blueberries (as pictured above). It is just delightful and the red & blue colours also look very Christmassy! I love the texture of freeze-dried berries. They are super light, yet the sweetness and vibrant colours are still preserved! Yum! I order my freeze-dried berries (you’ll notice I use them in a few other things too) online at iHerb and they are fairly cheap. My lovely client who came for a cooking lesson the other day loved the berry one just as much, if not more!

White Chocolates - Berry Continue reading →

Berry-Delicious Dairy Free Custard Tart

image

I got 1kg of blueberries for $10 last week from my farmer’s market and since we had a large gathering of people in our home, it was the perfect opportunity to make these tarts!

You will need my Almond Milk to make this gorgeous tart. You would barely know this custard is dairy free. It is just delicious! I feel so good eating it, and feeding it to my family, knowing that it is only sweetened with honey, and full of nutty, coconut goodness.

image

Traditionally, you glaze the top of the tart with a sugar glaze to give it shine, but I choose to leave that off. I think it still looks pretty beautiful without it.

This is such a wonderful recipe to get the children involved with too! Have them decorate the berries on top with their own wonderful design!

image

Berry-Delicious Dairy Free Custard Tart
Serves 8
A deliciously healthy, fruity, custardy, crumbly, tart to delight your tastebuds! DF
Write a review
Print
SHORTCRUST PASTRY
  1. 100g Rapadura Sugar
  2. 1/2 Lemon, rind
  3. 150g Wholemeal Spelt Flour
  4. 150g Unbleached Spelt Flour
  5. 150g Organic Butter
  6. 1 Egg
  7. 1/2 tsp Vanilla Essence
CREME PATISSIERE
  1. 250ml Almond Milk
  2. 250ml Coconut Milk
  3. 1 Vanilla Bean, seeds scraped
  4. 4 Egg Yolks
  5. 100g Honey
  6. 50g Cornflour
  7. 25g Organic Butter (optional)
  8. 500g Fresh Strawberries & Blueberries
CREME PATISSIERE
  1. Place all the creme patisserie ingredients into the bowl of the Thermomix and cook 12 minutes/90°Speed 3.
  2. Pour into a bowl and directly cover the mixture with cling wrap to prevent the forming of a skin. Chill for at least 4 hours, or over night.
SHORTCRUST PASTRY
  1. Place the sugar and the lemon rind into the Thermomix bowl. Mill 10 sec/Speed 9. Add the flour and butter and process for 10 sec/speed 6 or until the mixture resembles breadcrumbs. Add the egg and vanilla and knead 10-20 seconds or until the dough just comes together.
  2. Using the Thermomat or a lightly floured surface bring the dough together to form a ball. Flatten & wrap the dough in cling film and place in the fridge for 30 mins to rest. Preheat the oven to 180°C.
  3. Roll pastry, using a rolling pin, on a lightly floured surface, to be 3mm thick. and press into a large round tart shell.
  4. Place back into the fridge for a 30 minutes to chill.
  5. Place a small piece of baking paper over the pastry and fill the case with pie weights. Blind bake for 15 minutes. Allow to cool before taking the pie weights out of the case. Set aside until ready to use.
ASSEMBLY
  1. Take the crème patisserie out of the fridge. It will be quite firm set at this stage, so place it back into the bowl of the Thermomix and process 5 Sec/Speed 6.
  2. Pour into the prepared pastry case and top decoratively with sliced strawberries and blueberries. Serve.
Notes
  1. During assembly, if the custard looks too runny to hold up the fruit on top, place the custard filled tart back in the fridge for 30 mins-1 hr to set up for the fruit.
Kitch'n Thyme https://kitchnthyme.com.au/

Saracino Roast Tomatoes

Roast Toms 2 ©These delightfully golden, winey, gummy, sticky, sweet & juicy tomatoes will be set to impress your whole family! They are the perfect compliment to any egg breakfast! I have a real obsession with tomatoes and these fulfil it!

I have for many years never liked going to a buffet where I’m served barely cooked, flavour-lacking roast tomatoes!! I need flavour!

You can go quite generously with all the flavourings! The oils that lie on the tray after baking are so delicious for drizzling over poached eggs, so don’t throw them away!

The sheep cheese is just delicious and often far less reactive for those that pose intolerances to regular cows dairy.

Enjoy!

Saracino Roast Tomatoes
Serves 4
These are so deliciously tasty! A little gummy, winey, sweet, intense and sticky! Yum!
Write a review
Print
Prep Time
5 min
Cook Time
25 min
Total Time
30 min
Prep Time
5 min
Cook Time
25 min
Total Time
30 min
Ingredients
  1. 4 Roma Tomatoes
  2. 1 tsp Garlic Powder
  3. 1 tsp Onion Powder
  4. sprinkle Celtic Sea Salt
  5. 2 sprigs Fresh Thyme
  6. 50g Saracino Sheep Cheese (grated)
  7. drizzle Extra Virgin Olive Oil
Instructions
  1. Preheat the oven to 180°C and line a baking tray with baking paper.
  2. Slice the top and the bottoms off the tomatoes. Try not to chop too much off the tomatoes, but rather just make a flat base on each, so they will sit flat on a tray. Cut the tomatoes in half horizontally and place cut side up on the tray.
  3. Sprinkle all the tomatoes with the garlic, onion, & salt. Pull the thyme leaves off the stems and sprinkle on the tomatoes. Generously drizzle with olive oil & top with the grated sheep cheese.
  4. Place into the oven and roast for 25 minutes. Serve hot with your favourite egg breakfast or in a beautiful fresh pasta dish for dinner!
Kitch'n Thyme https://kitchnthyme.com.au/

Thai Chicken Rissoles

Thai Chicken Rissoles best 3These are an absolute staple in our house! I make these for my husbands lunches. With a great big salad, these are the perfect meal. They are very easy to make, are a great source of protein, and are also packed with veges.

My little boy also loves them, and I love that they are full of hidden vegetables! Onions, garlic and ginger for immune building and nuts for added texture and good fats.

I leave the chillies in, even for my little boy. He has been used to eating spicy foods since he was little, as I want him to enjoy a wide variety from a young age. The long red cayenne chillies aren’t that hot, but you can leave them out if your child is sensitive to spicy foods!

You will notice that I have diced the onions and garlic and capsicum and panfried them first. This probably comes down to my OCD, as I like some things to be precise! You can chop them in the Thermomix if you couldn’t be bothered to dice yourself. I cook them off in a fry pan before adding to the mix as I don’t want them to make the mix watery. You also get nice caramelisation in a pan which adds loads of flavour!

These are great also as a dinner option served with roasted/steamed vegetables.  

Thai Chicken Rissoles best 2

Thai Chicken Rissoles
Yields 35
Perfect for lunchboxes! Packed with veges, chicken and aromatics, these are a perfect source of good carbs, protein & good fats! Reader Channy says: This is such a flavour-filled recipe, and so simple to make! This would be amazing served cold with a fresh salad on a warm summer night. I see this becoming a household fave!" - The 4 Blades Magazine July 2016
Write a review
Print
Prep Time
20 min
Cook Time
15 min
Total Time
35 min
Prep Time
20 min
Cook Time
15 min
Total Time
35 min
CURRY PASTE
  1. 6 Kaffir Lime Leaves (stalk removed)
  2. 2 stalks Lemon Grass (white part only)
  3. 1/4 bunch Coriander (inclu roots & stalks)
  4. 5cm knobs Ginger
  5. 1/2 Lime, zested
  6. 2 Red Cayenne Chillies, de-seeded
RISSOLES
  1. 4 tablespoons Olive Oil, plus extra for pan frying
  2. 2 Large Red Onions, finely diced
  3. 2 cloves Garlic, finely chopped
  4. 1 Red Capsicum, finely chopped
  5. 1kg Organic Chicken Breasts, roughly chopped into 3-4cm pieces
  6. 2 Zucchinis
  7. 2 Carrots
  8. 100g Cashews
  9. 100g Macadamias
  10. 4 Spring Onions, thinly sliced
  11. 2 Organic Egg, lightly beaten
  12. 1 Tbsp Celtic Sea Salt
  13. 1 Tbsp Fish Sauce
  14. Gluten Free Breadcrumbs or Almond Meal (for crumbing)
CURRY PASTE
  1. Roughly chop all the ingredients into 1-2 cm pieces. Then add to the Thermomix bowl and process 5-10 Sec/Speed 7. Transfer to a large mixing bowl.
RISSOLES
  1. Bring a large fry pan to medium heat. Add 2 Tbsp of the olive oil, the finely diced onion & garlic and sauté till golden brown. Add to the large mixing bowl with the curry paste. Repeat the process with the remaining olive oil and capsicum and add to the large mixing bowl.
  2. Add the chicken, 500g at a time, to the Thermomix and process 5 Sec/Speed 5. Transfer to the large mixing bowl also.
  3. Roughly chop the carrot and zucchini into 3-4cm pieces and add to the Thermomix bowl. Chop 10 Sec/Speed 4. Add to the mixing bowl.
  4. Add the nuts to the Thermomix bowl and chop 12 Sec/Speed 4. Add to the mixing bowl.
  5. Add the spring onions and give the mix a good stir at this point before adding all the remaining ingredients.
  6. Heat a large fry pan over medium heat. Add some olive oil (Be careful not to smoke the oil). Roll the mix into rissole shapes & coat with breadcrumbs or almond meal. It is quite a loose mix, so handle them with care. Add to the pan and cook for 2-4 mins each side or until golden brown and cooked through. Transfer onto a paper towel lined cooling rack. Serve warm with a fresh salad or vegetables & garlic mayo or thai tomato relish.
Notes
  1. Refrigerate for 3 days or freeze for future use.
Kitch'n Thyme https://kitchnthyme.com.au/

Coconut Butter


Coconut ButterCoconut Butter – What a brilliant alternative for those avoiding dairy! It is uniquely different to coconut oil in that it is made from the dried flesh of coconuts. Sometimes it is marketed as coconut oil, however they are two different things. Coconut butter contains the oil as well as the coconut flesh. It’s uses are endless. Much much cheaper to make than to buy and takes all of 4 minutes in the Thermomix.

Coconut Butter was one of the 1st things I made in my Thermomix as my sister-in-law had been trying to make coconut butter in her food processor (as had I in a commercial food processor at work!) and it was taking us about 10-20 minutes! I just chucked a bag of shredded coconut in and wanted to see what would happen – well how fast it was!! I rang my sister-in-law straight away! She was not completely convinced on the machine, until of course I went to visit and she saw it make such light work of this butter!

The heat during the cooking process is important as it will help to get the oils working in the coconut a little quicker. Even if you don’t set the Thermomix to 37°, it will reach this temperature being on for 3 minutes anyway, but will be a little quicker if you select it from the start. This method will give you a great puree consistency, but don’t expect a completely smooth result like dairy butter.

I use shredded coconut, but coconut chips work really well too. I find the more oily your coconut, the better the result, thus I find either shredded or chips better than desiccated.

You will need this coconut butter recipe to make my Choc Peppermint Creams.

Coconut Butter
A wonderful alternative for those who can't have butter! Makes 500ml (2 cups).
Write a review
Print
Prep Time
4 min
Prep Time
4 min
Ingredients
  1. 500g Shredded Coconut
Instructions
  1. Place the coconut into the bowl of the Thermomix and mill 1 minute/Speed 8.
  2. Scrape down the sides of the bowl. Continue processing for a further 2 minutes/37°/Speed 6.
  3. Scrape down the sides of the bowl and blend a further 1 minute/Speed 7.
  4. Store in an airtight container out of the fridge. If refrigerated it will set quite hard.
Kitch'n Thyme https://kitchnthyme.com.au/

Almond Milk

Almond MilkWhat a wonderful alternative to cow’s milk. This almond milk is really easy to make! It is completely raw, the almonds have been activated and with the addition of celtic sea salt which contains many vital trace minerals and the good fat of coconut oil, this is a winner for health benefits.

Activating the almonds is really important. It deactivates the enzyme inhibitors, helping us to be able to digest them much more easily and it brings the nuts to life!Soaking-Almonds-©-265x300

You will notice that I add a small amount of maple syrup. I do this whether I am making it for sweet or savoury use. It brings out the flavour of the almonds and doesn’t taste sweet as it’s such a small amount. You could use honey or rice malt syrup if you preferred. 

The addition of sunflower lecithin is optional. The milk will separate after a few hours in the fridge due to the fat from the nuts not emulsifying with the water. Lecithin is a fat emulsifier so it is the perfect solution. There is much question over soy lecithin, so when I learnt about sunflower lecithin you can imagine my delight. It will keep the milk homogenised and give it even more of a creamy texture!

Straining-Milk-225x300Above I’m straining the milk through a muslin cloth or nutmilk bag.

When I weaned my little boy off breastmilk I used this milk to replace his 1-2 daytime feeds. He just loved it. (As almond milk is not a complete meal replacement of breastmilk or formula for an infant or baby please be aware that my little boy was already eating a substantial well balanced diet by this stage. The almond milk was an addition to his diet.)

And perhaps you should go try my Chocolate Almond Milk too! Perfect for parties or as a yummy treat!

Almond Milk
Makes 1 Litre A wonderful super easy to make nut milk! Perfect as a Dairy Free option! You can then use for cakes, cookies, savouries etc! Or turn into Chocolate Milk or Choc Banana Milk or Raspberry or Strawberry Milk etc.
Write a review
Print
Ingredients
  1. 170g (1 Cup) Raw Almonds
  2. 1 Tbsp Coconut Oil
  3. 1 Tbsp Maple Syrup
  4. 1 tsp Vanilla Essence
  5. ½ tsp Celtic Sea Salt
  6. 1 tsp Sunflower Lecithin (optional)
  7. 1 L Filtered Water
Instructions
  1. Place the almonds into a bowl, cover with filtered water and leave to soak overnight (or for at least 12 hours).
  2. Drain the almonds and place into the bowl of the Thermomix and mill 7-10 Sec/Speed 9.
  3. Add all the remaining ingredients & blend 1 minute/Speed 9.
  4. Strain the milk through a nut milk bag or muslin cloth.
  5. Refrigerate and serve.
Notes
  1. You can decrease the amount of nuts used. The amount I use here makes for a really rich & creamy milk, however you can reduce this. I would tend to use a minimum of 100g raw nuts(approx. a heaped 1/2 cup) to 1 Litre of water. Remember also that once the raw nuts have been soaked they will weigh less than unsoaked raw nuts. So make sure you weigh your nuts before soaking!
  2. Nut milk will keep for approximately 3 days. It is suitable for the freezer too.
Kitch'n Thyme https://kitchnthyme.com.au/

Kale Chips

img_0950

So who’s tried these things?? A wonderful craze of the healthy foodie world! What a seriously brilliant snack though! My 22 month old has been munching on them since around 1 (when it’s ok to introduce collards), and he just loves them! I find it such a fun way of introducing healthy snacks for kids and there are just so many varieties you can make! You just need to get creative!

I spent quite some time playing around with different oven temperatures until I found what I think is the perfect temp! (You can of course use a dehydrator, but this is how you do it in an oven). Some say 200º, others 180º, but I kept finding it was so tricky to not let them burn. I mean only slightly brown on the edges, but I didn’t like the slight bitter flavour that even a brown edge gives. I also love the vibrant green colour of kale and want to preserve that as much as possible! So 150º degrees does it for me! They always come out vibrant green, with no brown edges and are beautiful light crispy ‘chips’.

img_0951

You will notice that it is such a small amount of oil used. It’s really important not to drown the kale in oil as they won’t dry out and get that slightly crispy texture if you use too much. It’s also important to rub it all in as much as possible so you don’t end up with some really drenched leaves and some leaves that completely miss out!

Kale Chips
Delicious crispy guilt-free clean eating chips!!!...Even the kids will love them!
Write a review
Print
Prep Time
5 min
Cook Time
10 min
Total Time
15 min
Prep Time
5 min
Cook Time
10 min
Total Time
15 min
Ingredients
  1. 1 Bunch Kale (Curly Green or Cavalo Nero)
  2. 2 tsp Olive Oil
  3. 2 tsp Savoury Yeast Flakes
  4. 1 tsp Garlic Powder
  5. 1 tsp Onion Powder
  6. sprinkle Celtic Sea Salt
Instructions
  1. Preheat the oven to 150ºC. Line some large baking trays with baking paper and set aside.
  2. Take all the kale off the stalks, being careful not to rip the leaves too much. Wash the kale thoroughly and spin dry.
  3. Break the leaves into small 'chip' size pieces.
  4. Place into a large bowl along with all the other ingredients. Gently massage the oil and powders into the leaves of the kale, making sure that all the surface areas of the leaves are covered.
  5. Lay the kale leaves on the baking trays, leaving gaps between the leaves so they have room to crisp up. Too close and they will stay soggy.
  6. Place into the oven and cook for 8-10 minutes (or until crisp), turning them with tongs once during this time.
  7. Remove from the oven and leave to cool.
  8. Store in an airtight container or jar for 3-5 days.
Kitch'n Thyme https://kitchnthyme.com.au/

Cauliflower Rice – Coriander & Capsicum

Cauliflower Rice C

Cauliflower Rice is becoming really popular at the moment – actually everything ‘cauliflower’ is taking off! And why not? Gone are the days of just using this underestimated vegetable for gratin! It’s such a versatile vege as well as cheap, low carb and yummy!!

I’ve tried a fair few ways of making ‘cauli’ rice, and this is my favourite. Frying it gives it such a lovely nutty texture and it doesn’t go soft or mushy. It really does resemble rice so well. You can use coconut oil or ghee to fry, however in this case I really love the flavour of the olive oil.

This is such a winner with children! It’s easy to disguise the vegetable and is super yummy! When I’ve made this at my work, I’ve had guests comment that they thought it was real rice! So a winner with all ages!

You can play around with all different flavours for cauli rice, but this is one of my favourites! I will share some of my other favourites too.

Cauliflower Rice – Coriander & Capsicum

Ingredients

  • 1 Medium Cauliflower
  • 2 tablespoons Olive Oil
  • 1 Medium Red Onion (sliced into thin wedges)
  • 1 Large Red Capsicum (julienned)
  • 1 teaspoon Celtic Sea Salt
  • 1/2 bunch Fresh Coriander

Directions

1. Roughly chop the cauliflower into 5-6 cm chunks. Place into the bowl of the Thermomix and chop 3 Seconds/Speed 5. You want it to look the texture of rice. Be careful to not chop it too fine!
2. Heat the oil in a large frypan. Be careful not to over heat the oil however, as you don't want it to reach smoking point, but you want it hot enough to sear the cauliflower nicely.
3. Add the onion and capsicum and fry off until nicely caramelised.
4. Add the cauliflower and salt and brown off. Keep tossing the cauliflower to brown it all off nicely, but not mushy. It should have a nice nutty, rice type texture.
5. Once cooked, take off the heat. Quickly toss through the coriander, transfer to a serving bowl and serve.