Paleo Pumpkin & Walnut Chocolate Chip Cookies

photo
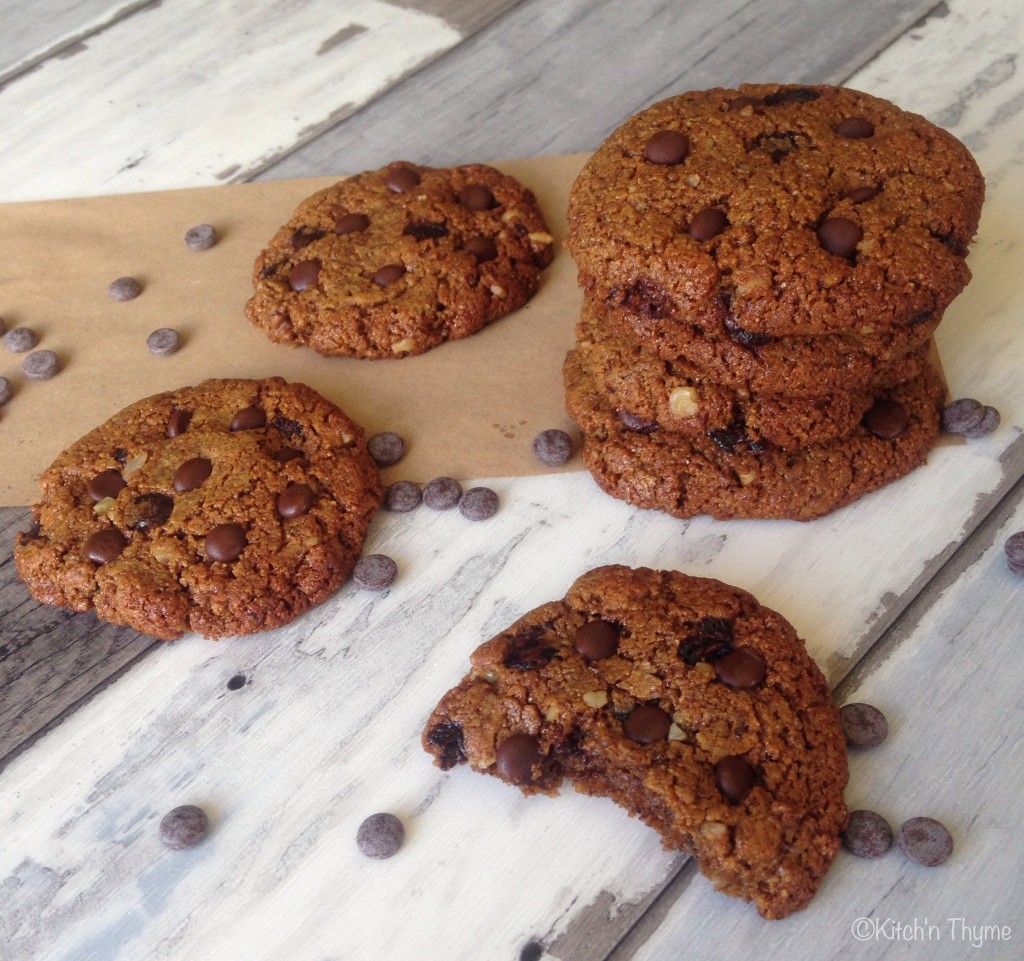
I’m soooooo excited!!! After countless experiments I finally present to you my humble Paleo Pumpkin & Walnut Chocolate Chip Cookies!

I have tried so many different things! A multitude of flours, sweeteners & fats! At one stage I had what my nieces and nephews termed a “Moofie”! A cross between a cookie and a muffin! I almost ran with that as they were delicious, but not 100% what I was looking for! I was looking for a crispy, golden, crunchy PALEO cookie! What I will say is that they will go softer once they are stored, but they are still deliciously beautiful! Just eat them fresh on the day of baking if you want that beautiful crispy texture!

I tried many different prototypes with almond meal but it wasn’t until I had an epic light bulb moment and decided to try them with almond butter. It came about because I was thinking of adding walnut butter to the mix for flavour! I suddenly realised nut butter might be the secret! Roasted almond butter. And oh, you can’t imagine the joy when I pulled out perfectly ‘normal’ looking cookies out of the oven! They were golden, and looked crispy! I just about dove in right there to try them! Once they had cooled sufficiently so I wouldn’t get burnt,  I snatched one right then and there!….Wow! Something magical had happened! The almond butter had done it! I was so elated! After all my attempts with many complex ratios and multiple ingredients, I ended up with a delightful cookie from the simplest of ingredients! There is really not much to these cookies at all! I am ridiculously excited to share this beautiful recipe with you! I’ve added no extra oils to the cookies. It rely’s completely on that from the almond butter. Because the almonds are roasted, this also helps to release even more of those beautiful oils from the nuts, which is why no other oil is needed.

To make you own almond butter, just place about 450-500g roasted almonds in the Thermomix and mill 10 Sec/Speed 9. Scrape down the sides and process for about 1 minute/Speed 8 or until a beautiful butter consistency is achieved!

As I love to do, I wanted vegetables in them, in particular pumpkin, firstly because I think its a perfect match (chocolate & pumpkin), and to increase the nutritional benefit! I mean, if I’m going to give these to my family, I will still always want a treat to be of some benefit! Hiding a vegetable in a cookie so that no one will ever know is perfect! My little boy just loves them! I still talk about the fact that even good treats we need to balance with lots of vegetables and proteins etc, and I try to teach him the difference between a bought cookie and one that mummy makes! Mummy’s have a healthier sweetener, and a small amount at that, and nuts that will make him strong etc!

I’ve used about 100g pumpkin puree in this recipe. You can actually increase the pumpkin to 200g with no problems. They are just a little more crunchy with 100g, whereas with 200g they are a little more moist in the middle! Completely up to you! If you have a whole lot of pumpkin to use, go the whole 200g! I just steamed the pumpkin in the Thermomix for about 15 minutes/Varoma/Speed 2, then pureed for about 5 Sec/Speed. I steamed about 300g. Depending on the pumpkin it will probably reduce by 1/3.

The walnuts just make them! After all, pumpkin and walnuts is such a beautiful marriage. But you could use whatever nut you fancy!

I hope you enjoy these cookies as much as we are!

photo0

Paleo Pumpkin & Walnut Chocolate Chip Cookies
Yields 28
A deliciously moist, subtly spicy pumpkin cookie!
Write a review
Print
Prep Time
10 min
Cook Time
15 min
Prep Time
10 min
Cook Time
15 min
Ingredients
  1. 120g Coconut Palm Sugar
  2. 450g Roasted Almond Butter
  3. 2 Organic Eggs
  4. 1/4 tsp Cinnamon
  5. 1/8 tsp Allspice
  6. 1 tsp Bicarb Soda
  7. 100g Pumpkin Puree
  8. 50g Chocolate Chips (naturally sweetened, dairy free)
  9. 50g Walnuts (roughly chopped)
Instructions
  1. Preheat the oven to 180°C. Line large baking trays with baking paper or lay your oven Thermomat on a tray.
  2. Place the sugar into the Thermomix and mill 10 Sec/Speed 9.
  3. Add the almond butter, the eggs, spices, bicarb, & pumpkin and mix 10 Sec/Speed 5.
  4. Add the chocolate chips and walnuts and mix a further 10 Sec/Speed 5.
  5. Once combined, place Tbsp sized amounts onto your baking sheet. Flatten out a little with your fingers to form a more flattened disc.
  6. Place into the hot oven and bake for 10-15 minutes or until the edges turn golden brown.
  7. Remove from the oven and whilst warm top with a few extra chocolate chips if you desire.
  8. Let cool on the trays for 5-10 minutes, before transferring to a cooling rack to cool completely.
  9. Store in an airtight container.
Kitch'n Thyme https://kitchnthyme.com.au/

Chicken Stroganoff

Chicken Stroganoff

 This fabulous dish is such a classic! I remember learning this at college when I studied to become a chef….it was something I always remembered, however was never really into. Why? Because I grew up never eating dairy! Weird I know! But my mum was a hippy type person or so I always labelled her! Instead we were eating cashew creams and sunflower cheeses and sprouts and kefir! Those things I will leave to another post!…..However, sour cream has grown on me majorly, and since I tend to advocate a lower carbohydrate, higher fat diet, this dish makes for a wonderful Ketogenic dinner.

I can see why my mum did limit my dairy intake for many reasons, one being that my tolerance to dairy is quite low. My husband can handle dairy quite well, however we still like to balance our dairy consumption. Since this is one of his favourite dishes, I do tend to make it as a treat rather than a staple on the weekly menu. I could make it completely Paleo by using coconut cream in place of cream, however it would be more of a curry! Not quite the same, but go ahead if you are completely Paleo!

I leave the traditional wine out. I know its flavour and all, and I’m not adverse to using wine in cooking when it cooks off, however to keep the carbs low, I don’t use it, and seriously it really doesn’t need it! It’s just delicious and super flavoursome without!

My spin uses Turmeric. I know its completely untraditional but I love that I can get turmeric into my family here! Besides being a wonderful flavour booster, turmeric is proven to reduce the risk of dementia, combats inflammatory diseases, helps fight colds and flus, and helps indigestion and weightloss as well as many other things! I know it’s only what – a teaspoon? But every little bit is better than nothing, and I will always make use of an opportunity to increase the nutritional content of the food I feed my family!

I use fresh Thyme as I really love it….it’s one of my favourite herbs! Just so delicate and aromatic – I just have a special little thing for it! But you could use some Italian parsley to finish it off perhaps.

We eat it with my Cauliflower Rice. Just make the rice plain without the capsicum and coriander. The cauliflower rice works a treat with this dish and you feel so good after eating it, especially if at night.

Enjoy!

Chicken Stroganoff
My take on this delicious staple! Served with Cauliflower Rice. Reader Naomi says: "Flavour was bang on! Having for dinner again tonight, our 8 year old loves it!" - July 2016, The 4 Blades Magazine
Write a review
Print
Ingredients
  1. 1 Large Brown Onion
  2. 2 Cloves Garlic
  3. 30g Olive Oil
  4. 1 tsp Turmeric
  5. 1 tsp Smoked Paprika
  6. 1 Tbsp Vegetable Stock Paste
  7. 1/2 tsp Celtic Sea Salt
  8. 1 Chicken Breast, cut into 3cm cubes
  9. 250g Button Mushrooms, chopped into 1/4's
  10. 300ml Organic Pure Cream or Coconut Cream
  11. 4 Sprigs Fresh Thyme Leaves
Instructions
  1. Place the onion and the garlic into the Thermomix and chop roughly 3 Sec/Speed 7.
  2. Scrape down the sides of the bowl and add the oil and spices and sauté 10 Mins/100°/Speed 1.
  3. Insert the butterfly. Add the salt, stock paste, chicken & mushrooms and cook 2 Mins/100°/Speed 2/Reverse.
  4. Add the cream and the fresh thyme and cook 15 Mins/100°/Speed 1/Reverse/MC Removed.
  5. Serve warm with Cauliflower Rice.
Kitch'n Thyme https://kitchnthyme.com.au/

Paleo Chocolate Mango Tart with Cardamon Crust

Make the most of summer mangoes with this guilt free creamy decadent chocolate fruit tart! 

**January 2019 update!** This recipe was originally posted in February 2015. I really felt that the photos needed updating, so i’ve rephotographed the recipe. All the ingredients remain the same, but I’ve slightly increased the filling ingredients. The story below is as it was from 4 years ago!**

This delightful chocolate tart came about a few weeks ago when I realised I was about to walk out the door empty handed to a meeting where all involved were meant to be bringing a bite to eat!

I had an abundance of ripe mangoes in my fruit bowl fresh from the property of the health retreat we work on!…..Bowen mangoes and all! Massive, juicy, sweet, full of flavour!  My husband knows how much I love mangoes, so he picked me a couple of huge bags of them! I was stoked!  

I had to make something delicious to honour these beautiful possessions! I immediately dreamed up this gorgeous tart and got busily to work in my kitchen! After an amazingly successful quick stint in the kitchen, this emerged! I did a little happy dance!

The subtly aromatic cardamon crust pairs so beautifully with the mango!

The chocolate filling is very rich, but the mango just lightens it up beautifully! I absolutely love fruit focussed desserts so this is definitely my kind of indulgence! The natural beauty of fruit is Superb!

This tart is so everything free that perhaps I’m even happy for my kiddies to have a little slice for breakfast! 🙈🙊

Play around with the fruit…it’s delicious with raspberries!…here’s the recipe for those! Paleo Chocolate Raspberry Tarts. And it would be equally delightful with any other berries!

Enjoy! Gabrielle 👩‍🍳

Print

Paleo Chocolate Mango Tart

Make the most of summer mangoes with this guilt free creamy decadent chocolate fruit tart! 

  • Author: Gabrielle Tobin
  • Prep Time: 00:10
  • Cook Time: 00:22
  • Total Time: 32 minutes
  • Yield: 8
  • Category: Dessert

Ingredients

BASE:

240g Almonds

160g Brazil Nuts

1 Egg

2 Tbsp Coconut Oil

1 Tbsp Maple Syrup

3/4 – 1 tsp Ground Cardamon 

1 tsp Vanilla Bean Paste or Essence

pinch salt

FILLING:

160g Hazelnuts, roasted

120g Coconut Oil

120g Coconut Milk

180g Maple Syrup (approx. 5 Tbsp)

75g Raw Cacao Powder

1 tsp Vanilla Bean Paste or Essence

pinch salt

TOPPING:

3-4 Large Mangoes, sliced thinly

Instructions

CRUST

  1. Preheat the oven to 180°C. Lightly spray a 26cm round tart shell with oil spray.
  2. Place the almonds and the brazils into the Thermomix and mill 10 Sec/Speed 9.
  3. Add the remaining ingredients and process 5-10 Sec/Speed 5 or until the mixture comes together.
  4. Turn the mixture out onto a sheet of baking paper and roughly bring together to form a ball. Place another sheet of baking paper on top and flatten. Using a rolling pin, roll the mixture out to approximately 3mm thickness. Roll in different directions, to ensure even thickness.
  5. Gently peel off the top sheet of baking paper. Lift up the crust, by the bottom sheet of baking paper and gently flip the crust side over a rolling pin. Place it over the tart shell evenly and gradually roll the rolling pin away, easing the crust into the shell.
  6. Peel off the baking paper and if you have any broken spots you can easily patch it with your hands, and a little left over crust if necessary. If you find this difficult to do without breaking the crust, you can press the mixture into your tart case.
  7. Trim the edges neatly, then place a round of baking paper over the base followed by baking beads or chickpeas. Blind bake for 10 minutes. Remove the baking weights and bake for a further 10 mins. Remove from the oven and cool completely.

FILLING

  1. To make the filling, place 120g of the hazelnuts into the Thermomix and mill 10 Sec/Speed 9.
  2. Add all the remaining ingredients and cook 2 Mins/50°/Speed 3.
  3. Using a knife, chop the remaining 40g hazelnuts in halves. (You can do this in the Thermomix, however I prefer to have this quite precise, as it’s really nice biting into the whole chunks of hazelnuts.) Add to the Thermomix and mix 5 Sec/Speed 2/Reverse.
  4. Pour the filling into the cooled tart shell and set in the fridge for 1 hr or so until firm.
  5. Top decoratively with the sliced mango and serve straight away.

Notes

  • You can make the tart shell and fill with the filling a day ahead but top with the mango just before serving so it is nice and fresh!
  • Refrigeration Time: 1 Hour


Tom Kha Gai -Thai Chicken Soup

Tom Kha Gai Soup 

For many years we’ve attended a beautiful local Thai restaurant in Noosa. My husband and I always used to love our occasions where we would share this delightful Thai soup called Tom Kha Gai. It was so warming and soothing with its brothy feel and being infused with the rich spicy Thai flavours of lemongrass, ginger, garlic, kaffir lime & coriander.

I decided that I had to make it at home! And it had to be really really like the original in the restaurant! After much research and many many batches and tweakings I came up with the following. My husband thinks its pretty fantastically close to the original! I was VERY excited as he is a real food critic!

I love soup. I even like soup when it’s not winter! It’s been pouring rain here in Queensland this week and it just seemed fitting for dinner tonight. We had some friends for dinner and it went down a treat!

My husband often lectures at nights and this is perfect for him if he is hungry when he gets home late. It’s very low carb and easy on the digestion. You can add vermicelli to it, however I prefer to keep it grain free and keep the carbs that little bit lower…and I just don’t think it needs it!

Enjoy!

Tom Kha Gai (Thai Chicken Soup
Serves 4
Warming, coco-nutty, delicious soup with all the punchy Thai flavours! "Fantastic Thai soup. Great mix of flavours with a good hit of chilli." Bec of The 4 Blades Magazine, July 2016
Write a review
Print
Prep Time
5 min
Cook Time
28 min
Prep Time
5 min
Cook Time
28 min
Ingredients
  1. 800ml Bone Broth (or Chicken Stock)
  2. 800ml Coconut Cream (2 Cans)
  3. 1 1/2 tsp Celtic Sea Salt
  4. 6 Kaffir Lime Leaves
  5. 6 Coriander Roots and stalks, washed thoroughly
  6. 2 Stalks Lemongrass, halved and bruised
  7. 4cm Knob Ginger, sliced thinly
  8. 2 Cloves Garlic, bruised
  9. 2 Chicken Breast, halved in thickness
  10. 250g Button Mushrooms
  11. 125g Cherry Tomatoes, halved
  12. 4 Spring Onions, cut into 4cm batons
  13. 1 Long Red Chilli, finely diced
  14. 1 Tbsp Sesame Oil
  15. 2 tsp Fish Sauce
  16. Fresh Coriander to serve
Instructions
  1. Place the chicken stock, coconut cream and salt into the Thermomix. Position the basket in place and add the lime leaves, coriander, lemongrass, ginger, garlic and chicken breast. Cook for 18 Mins/90°/Speed 3.
  2. Lift the basket out of the Thermomix with the spatula and discard the aromatics. Check that the chicken is cooked, and take it out of the basket and set aside to cool slightly.
  3. Insert the butterfly into the Thermomix and add the mushrooms, tomatoes, and white stems of the spring onions and cook 8 Mins/90°/Speed 3/Reverse.
  4. Add the green pieces of spring onions, chilli, sesame oil and fish sauce and cook for a further 2 Mins/90°/Speed 3/Reverse.
  5. Shred the chicken with a fork and add to serving bowls. Pour the hot broth over the top.
  6. Garnish with coriander and serve.
Kitch'n Thyme https://kitchnthyme.com.au/

Paleo Lunchbox Squares – Pear & Coconut

Paleo Slice © Coming into the New Year, mums will be beginning to think about school lunches all too soon! But it needn’t be stressful! With these delicious bars, children should feel happily surprised when they open their lunchboxes! 

They are gluten free, dairy free, egg free, refined sugar free and super easy to make!

Sweetened with just a little honey and the dried fruit they are a great little snack! I made these a few years ago and now that I have a family they are the perfect thing to have ready made in the cupboard! My little boy really enjoys them!

You can cut them into long muesli bar type shapes, but I’ve gone for something a little different! You can also double the mixture if you want them a bit thicker. They are quite chewy when made the way pictured, and a little more ‘cakey’ if made thicker.

Play around with the flavours. you could add cranberry and  pistachios or chocolate chips (naturally sweetened) etc. Paleo Slice  2 ©

Paleo Lunchbox Squares
Yields 12
Golden, crunchy, guilt-free lunchbox squares.
Write a review
Print
Ingredients
  1. 30g Dried Apple
  2. 30g Dried Pear
  3. 80g Almonds
  4. 20g Shredded Coconut
  5. 20g Pepitas
  6. 40g Sunflower Seeds
  7. 1 tsp Vanilla Essence
  8. 40g Coconut Oil
  9. 40g Honey
Instructions
  1. Preheat the oven to 170°C. Line a small rectangular slice tin with baking paper and set aside.
  2. Place the apple & pear into the Thermomix and chop 2 Sec/Speed 9. Set aside.
  3. Place the almonds into the Thermomix and mill 10 Sec/Speed 9.
  4. Add the remaining ingredients, including the reserved apple and pear and process 10 Sec/Speed 6/Reverse.
  5. Once mixture has come together place into the baking tray and pat down evenly with a spatula.
  6. Bake for 20 minutes or until golden brown. Cool in the tray for 5 minutes, then completely on a wire rack before cutting into squares.
Kitch'n Thyme https://kitchnthyme.com.au/

Christmas Iceblocks – Kale & Strawberry

© Christmas Iceblocks

These delightful iceblocks are so easy to make! And fancy hiding some Kale in there that the kids will never spot! 

I use the thick set coconut cream from very high fat tinned coconut cream. The Nakula Organic brand has about 62% fat ratio so I can get 250g from 1 tin. Depending on the brand you use, you may need to use 2 tins of coconut cream to get the amount needed.

For a hot summery Christmas afternoon, these pretty blocks are set to delight! Saying Christmas all over, they will surely lighten the palette and refresh everyone after a big Christmas lunch! 

You can use whatever sweetener you prefer. There is very little sweetener in each block, i love that! Enjoy!….And Merry Christmas!!

Christmas Iceblocks
Yields 8
Perfectly 'Christmas' iceblocks with hidden kale!
Write a review
Print
Strawberry Layer
  1. 250g Strawberry's
  2. 25g Raw Honey
  3. 1 tsp Lemon Juice
Coconut Layer
  1. 1 Can Coconut Cream (set in fridge for at least 6 hours)
  2. 20g Honey
Green Kiwi Kale Layer
  1. 40g Kale (trimmed & de-veined)
  2. 1/2 Avocado
  3. 2 Kiwi Fruits
  4. 20g Honey
  5. 20g Coconut Cream
  6. 8 Iceblock Moulds (I used a 6 Star Mould for these and refilled them to make the last 2)
Strawberry Layer
  1. For the strawberry layer, place the strawberries, honey and lemon juice into the Thermomix and blend 10-20 Sec/Speed 7.
  2. Pour into moulds and place into the freezer to set for an hour. Once almost set, insert a popsicle stick into the ice block, leaving enough sticking out the top for people to hold onto once finished.
Coconut Layer
  1. Once the coconut cream has set, open the tin and scoop out all the thick cream off the top and place into the Thermomix. You will eventually reach a more liquid watery fluid. Save this for smoothies. You should end up with 250g thick coconut cream. Insert the butterfly and whip 1 Min/Speed 4. Add the honey and mix just a few seconds to combine on Speed 4.
  2. Pour evenly into the moulds and then place back into the freezer to set for at least 1-2 hours.
Green Kiwi Kale Layer
  1. Place the kale into the Thermomix and blend 5 Sec/Speed 8.
  2. Add the avocado, kiwis, honey & coconut cream and blend 10 Sec/Speed 5.
  3. Pour into the moulds as the final layer and leave in the freezer to completely set.
  4. Once set, take out of the moulds and serve as a refreshing treat for a hot Australian Christmas!
Kitch'n Thyme https://kitchnthyme.com.au/

Spice Roasted Mixed Nuts

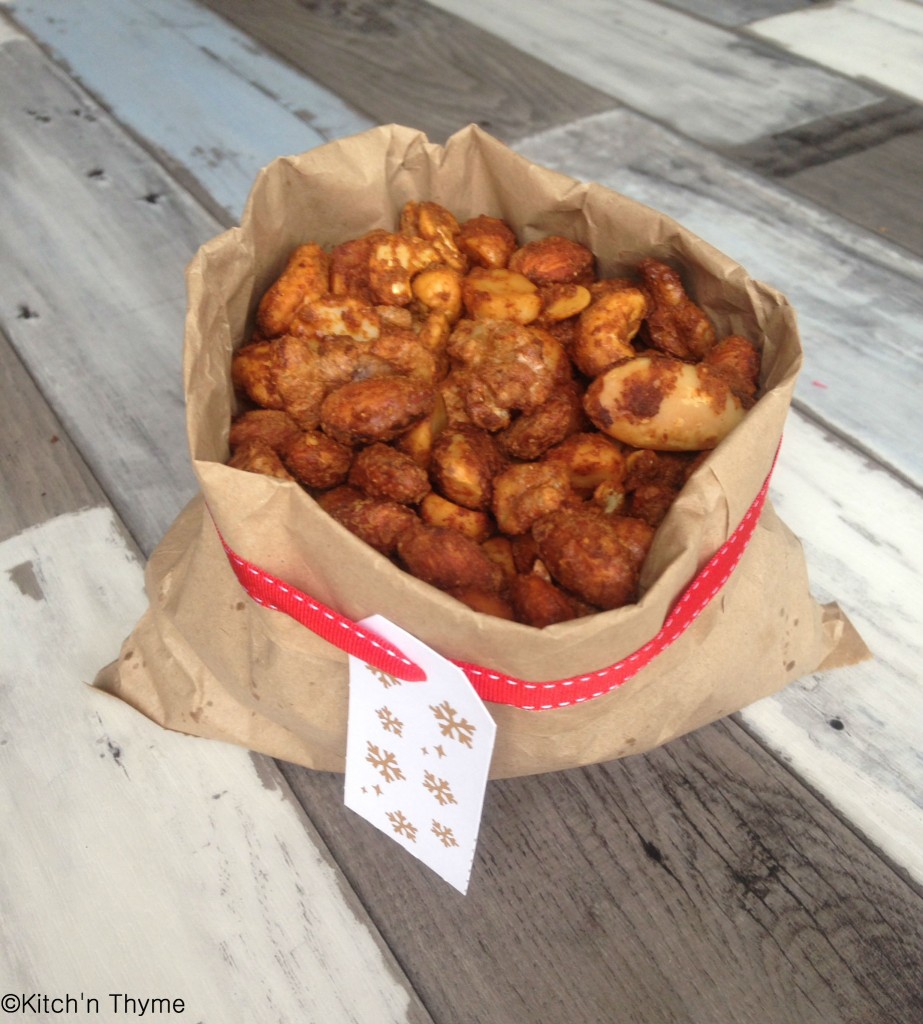
I’ve been making these little gems for years now! These gorgeous nuts are just so more-ish!! Once you eat a couple you can’t help but go back for a whole handful! You won’t ever need to buy those flavoured nuts in the supermarket again!

They make gorgeous little gifts in little glass jars with ribbons wrapped around, or just served as an hors de oeuvre at any big gathering or celebration! Or perhaps the perfect side to when you have people over for celebratory drinks! You’

I use a range of different nuts! Whatever you have in the cupboard will work, but I do find some of the nicest are macadamias, cashew, almonds, walnuts, pecans etc. I will say that I don’t usually buy the packets of ‘mixed nuts’ though as the walnuts, pecans and hazelnuts all seem to go rancid quicker than cashews and macadamias do, so they tend to stale the whole packet! Instead, I buy my nuts in bulk and keep them in the fridge or freezer to extend their shelf life. 

You’ll notice I use egg white and you might be wondering why! Well it’s because the egg white helps all the spices stick nicely to the nuts and not fall off! Genius really!!

I do use some coconut or rapadura sugar. This isn’t necessary but it does add a nice sweetness and balance of flavour. If you are avoiding sugars just leave it out. 

Spicy Roasted Mixed Nuts
Delicious golden crunchy spicy bites!
Write a review
Print
Prep Time
5 min
Cook Time
15 min
Total Time
20 min
Prep Time
5 min
Cook Time
15 min
Total Time
20 min
Ingredients
  1. 1 Eggwhite
  2. 20g Rapadura or Coconut Sugar
  3. 2 tsp Cumin
  4. 1 tsp Coriander
  5. 2 tsp Garlic Powder
  6. 2 tsp Onion Powder
  7. 1 tsp Paprika
  8. Sprinkle of Cinnamon
  9. 1/2 tsp Celtic Sea Salt
  10. 2 tsp Tamari (optional)
  11. 1-2 Tbsp Olive Oil
  12. 125g Macadamias
  13. 125g Cashews
  14. 125g Almonds
  15. 125g Walnuts
  16. 125g Pecans
  17. 125g Hazelnuts
Instructions
  1. Line a large baking tray with baking paper and pre-heat the oven to 180º.
  2. Place the egg white in the Thermomix. Add the butterfly and whip 40 Sec/Speed 4 or just until soft peaks form.
  3. Add sugar, spices, salt, tamari, and oil and mix with the butterfly still in 3 Sec/Speed 3.
  4. Leave the butterfly in and add the nuts and mix 10 Sec/Speed 1.5/Reverse.
  5. Place evenly on the baking trays and roast for 15 minutes at 180º, stirring occasionally throughout the cooking process.
  6. Once cooled store in an airtight container.
Kitch'n Thyme https://kitchnthyme.com.au/

Superfood Christmas Rocky Road

© Rocky Road 1Super delicious, fluffy, nutty, chocolatey mess thats so traditional at Christmas time!

Well how about that with a healthy spin on it? One of the things this Rocky Road is enriched with is Maca powder that has vitamins, energy boosting properties, benefits for the skin, helps to increase energy, and helps with womens & mens health & reproductive health. 

Another great superfood is chia seeds. Being high in nutrients, antioxidants, protein and Omega 3 fatty acids, I love to throw them into treats when I can!

Then the Marshmallows are filled with liquid chlorophyll and beetroot! How wonderful! Natural colouring at it’s best! No numbers needed! 

I use Organic (70%) Dark Chocolate in the Rocky Road. You can do it with Cacao Butter, but it will have a low melt temperature.

I toast the coconut chips just in the oven on a baking tray for a few minutes on 180º. It adds a really rich, nutty flavour. 

Once again, my love of freeze-dried berries comes into play! The raspberries help to cut through the sweet of the chocolate and give a nice tart effect!   © Rocky Road 2  
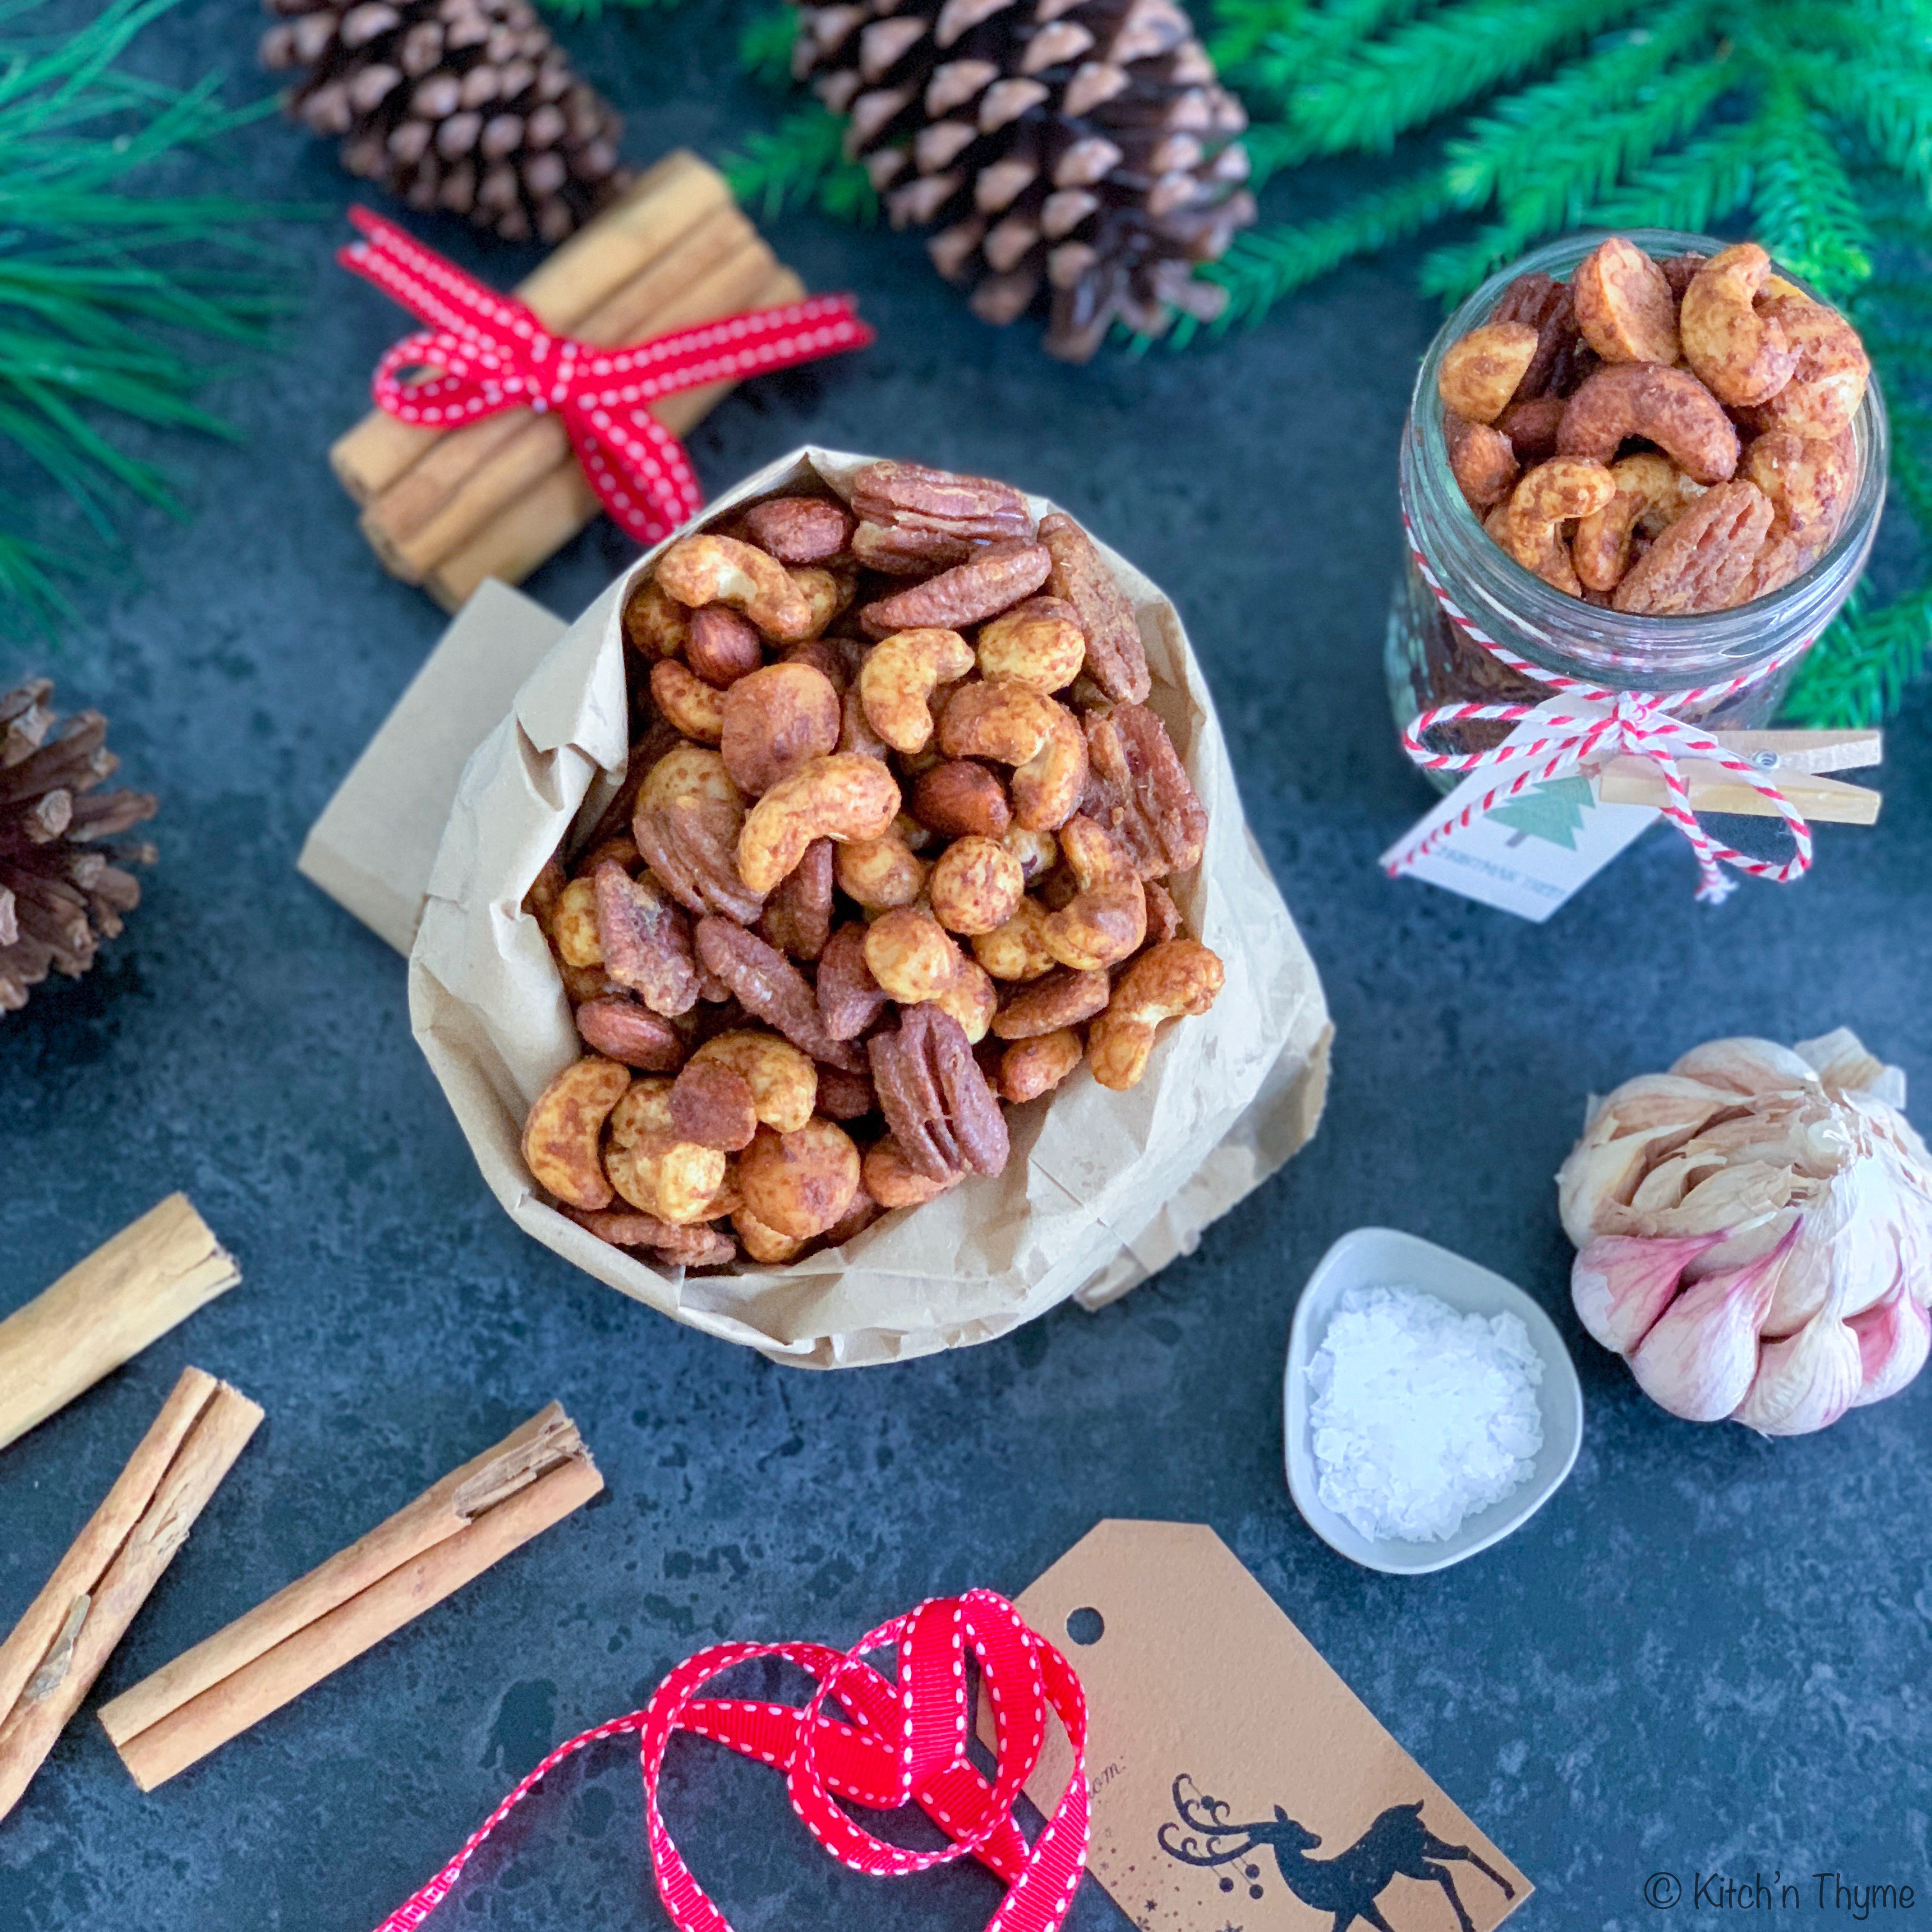
Perhaps you could enjoy this delicious treat with a glass of your favourite milk!  

Healthy Christmas Rocky Road
Yields 24
A delicious superfood Rocky Road!
Write a review
Print
Prep Time
5 min
Cook Time
5 min
Total Time
10 min
Prep Time
5 min
Cook Time
5 min
Total Time
10 min
Ingredients
  1. 300g Organic Dark Chocolate (70%), broken into 3-4cm pieces.
  2. 40g Organic Butter
  3. 200g Marshmallows
  4. 100g Mixed Nuts (I used roasted Almonds & Macadamias)
  5. 20g Cranberries (unsweetend)
  6. 1tsp Maca Powder
  7. 10g Chia Seeds
  8. 35g Toasted Coconut Chips
  9. 5g Freeze-dried Raspberries
Instructions
  1. Place the chocolate into the Thermomix and mill 10 Sec/Speed 9.
  2. Add the butter then mix and melt 4 Mins/50º/Speed 3.
  3. Add all the remaining ingredients and mix gently 1-3 Sec/Speed 2/Reverse.
  4. Place into a baking paper lined rectangle slice tray and place into the fridge to set. Cut into squares and serve.
Notes
  1. Here is my healthy Marshmallows recipe.
Kitch'n Thyme https://kitchnthyme.com.au/

Healthy Honey Marshmallows

Just LOOK at this colour!!!! It’s NATURAL!!!! Amazing right!!!?????

Using the gorgeous Unicorn Superfoods powders makes it SO easy to create these super fun colours with no nasties attached but rather adding health benefits!! Blue SPIRULINA helps to increase energy and metabolism, boosts immunity and may even improve digestion. Pink PATAYA or DRAGONFRUIT is high in fiber, rich in antioxidants and promotes a healthy gut whilst nourishing hair and skin! You can use Beetroot powder which I have done in the past, but I find the pink pataya gives a more vibrant colour! I love a treat that also has some nutritional benefit to it! Don’t you?!!

Using sustainably sourced gelatine, and honey over sugar, these marshmallows are a great option for a healthy treat, especially at Christmas! I used to use the Great Lakes Pure Protein Gelatin (from iHerb) but now I use a beautiful Australian Grass Fed Gelatin from Nutra Organics. It’s got a really mild aroma and works perfectly!
Gelatin is very beneficial for digestive issues, joint recovery, and helps to promote healthy skin, hair and nails.

Store bought varieties of marshmallows are full of preservatives, sugars, flavours and who knows what else! With these you can have peace of mind that you know exactly what has gone into them. Using honey is a much better option than sugar, however the benefits of raw honey are non existent once heated, and like any sweet treat, it still turns into sugar in the body. However, as part of a balanced diet, and for a special occasion, these are great! I feel good about my children eating something which is somewhat fortified with health benefiting ingredients at the same time as being a treat!


For treats like this, the Thermomix 5 is just brilliant for its accurate temperatures. How fantastic being able to heat it to exactly 120ºC without having to stand there over the stove with a candy thermometer! I get to walk away!

©Marshmallow 2

Play around with your own flavours and colours! How about these pretty Christmas colours! How gorgeous and festive would these look on the table for Christmas!…….And the exciting thing is that I have a delicious Healthy (Superfood enriched) Rocky Road recipe coming to you before Christmas!! Stay tuned!   

Healthy Marshmallows
Yields 50
Naturally coloured, fluffy, naturally sweetened marshmallows!
Write a review
Print
Prep Time
5 min
Cook Time
15 min
Total Time
20 min
Prep Time
5 min
Cook Time
15 min
Total Time
20 min
Ingredients
  1. 185ml Warm Water
  2. 260g Honey
  3. 3 Tbsp Gelatin (grass-fed, unflavoured)
  4. 1 tsp Vanilla Essence
  5. Coconut oil for cutting
Pink Colour
  1. 1 Tbsp Beetroot Juice or 1 tsp Beetroot Powder or 1 Tbsp Pink Dragonfruit Juice or 1 tsp Dragonfruit Powder
Green Colour
  1. 1 Tbsp Liquid Chlorophyll
Instructions
  1. Place 60ml of the water along with the honey into the Thermomix and cook 8-10 Mins/120º/Speed 2, and you may like to place the simmering basket on top of the lid to replace the MC for this step.(If you have a TM31 cook at Varoma temperature).
  2. Whilst that is cooking, combine the other 125ml of warm water with the gelatin in a small bowl. (The easiest way to do this is to rain the gelatine into the water in a steady stream whilst whisking in simultaneously with the other hand. The quicker you get the gelatine incorporated the easier it is.)
  3. When the honey mixture is cooked, let it cool to 70º.
  4. Then add the gelatin mix and stir 1 Min/Speed 2.
  5. Insert the butterfly and whip 10 Mins/Speed 4.
  6. In the last 30 seconds add the vanilla.
  7. Separate 2/3 of the mixture into 2 separate bowls (for colouring) and pour the remaining 1/3 (white colour) into a baking paper lined container to set.
Pink Marshmallows
  1. Powder Method: Stir in the beetroot or dragonfruit powder until well combined and desired colour is achieved. Then pour into a baking paper lined container to set.
  2. Juice Method: Place 1/4 of a small beetroot or dragonfruit into the Thermomix and blend 3 Sec/Speed 7. Scrape down the sides of the bowl and add 2 tsp water. (No need to add water if using the dragonfruit.) Give a quick whiz to combine, then strain the juice into a bowl. Add 1 Tbsp of the juice to the marshmallows and fold through. Then pour into a baking paper lined container to set.
Green Marshmallows
  1. Fold through the liquid chlorophyll and pour into a baking paper lined container to set.
  2. They will need at least 1-2 hours to set. (You can also pop them in the fridge if you need them to set quickly!)
  3. Once set, remove from containers and cut neatly into squares or cut into marshmallow rounds (using a well oiled small round pastry cutter).
  4. Toss in tapioca starch or cornflour for a traditional look. Don't be tempted to roll them in icing sugar. They sweat and become far too wet!
  5. Store in an airtight container for 3-5 days.
Kitch'n Thyme https://kitchnthyme.com.au/

Chocolate & White Mulberry Granola

Choc Mulberry GranolaRather than muesli, this is delicious chunky, crispy, crunchy Granola! Sound good? Then this is for you! Homemade granola is wonderful to have in the house. My memory drifts to when I was a little girl and stood there stirring huge bowls of it! It can be a delicious healthy alternative to sugar laden cereals and great for mornings when you are on the go! The benefit to making it yourself is that you know exactly what has gone into it. Many of the store bought varieties are really high in sugars (especially granolas) and contain unhealthy oils/fats and unnecessary fillers, preservatives and numbers!

This granola is really easy and quick to make. Making it at home gives the you freedom to control what goes into it too. Every fortnight I try to have at least 1-2 food prepping days, which sets us up well with ready-to-eat foods.  These are the sorts of things I will cook on these days. This is a really big batch, it will make around 2.5kg. Depending on the size of your family it should last you a good number of weeks!

I sweeten it with apple sauce and honey. The apple sauce is just apples cooked and blitzed into sauce in 8 minutes with the Thermomix – no other things added! By using apple sauce over apple juice you are eating the fruit in its whole state, with all the fiber, and not just the sugar! The apple sauce also helps to create that chunky granola texture. I always use good quality organic raw honey. Whilst heat treated honey looks prettier and has a longer shelf life, many of the natural minerals, enzymes and antioxidants have been destroyed in the intensive processing. The pollen which is also filtered out has an array of health benefits too. So I always advocate local, raw honey.

Dried fruits contain concentrated amounts of sugars so I try to only put 1 to 2 varieties of dried fruits in. These are a couple of my favourite combinations below.

The addition of nuts and seeds enhances the protein content and delights the tastebuds! Even though the nuts are in the mixture I cook, I do pre-roast the almonds first, because I find you get a better roast on them, when roasted first on their own. You can roast them at 180° for 10-15 minutes.

I’m sharing a couple of my favourite combinations, but you can play around with the ingredients and make your own varieties using the flavours that you love. Enjoy!

Chocolate & White Mulberry Granola
Delicious chunky, crispy, crunchy Granola! Top with yoghurt and a drizzle of honey for a yummy breakfast!
Write a review
Print
Prep Time
15 min
Cook Time
30 min
Total Time
45 min
Prep Time
15 min
Cook Time
30 min
Total Time
45 min
Ingredients
  1. 1.2kg Organic Rolled Oats
  2. 100g Quinoa Flakes
  3. 100g Activated Buckwheat Kernels (optional)
  4. 100g Almond Milk Pulp (or Almond Meal)
  5. 50g Black Chia Seeds
  6. 100g Pepitas (or Pumpkin Seeds)
  7. 150g Sunflower Seeds
  8. 1 Tbsp Cinnamon
  9. 2 tsp Pimento
  10. 120g Macadamias
  11. 120g Roasted Almonds
  12. 500g Apple Sauce
  13. 300g Organic Butter
  14. 250g Honey
  15. 60g Raw Cacao Powder
  16. 1 tsp Vanilla Essence
  17. 50-100g White Mulberries
  18. 100g Coconut Chips
  19. 150g Dates (roughly chopped)
  20. 100g Chocolate Chips - Rapadura Sweetened (optional)
Instructions
  1. Preheat the oven to 180°. Line large baking trays with baking paper and set aside.
  2. Place the oats, flakes, buckwheat, almond meal, seeds, & spices into a very large mixing bowl. Stir to combine.
  3. Place the nuts into the Thermomix bowl and chop roughly 0.5 Second/Speed 6.
  4. Place the apple sauce, butter, honey & vanilla into the Thermomix and cook 2 Mins/50°/Speed 3. Pour this wet mixture over the dry ingredients and using your hands coat all the dry ingredients well.
  5. Place handfuls onto the baking trays, slightly clumping it in your hands as you go. Spread it out fairly thinly and evenly over your trays, and bake for 30-35 minutes, giving a quick stir halfway through.
  6. Remove from the oven and cool on the trays before placing back into the mixing bowl and tossing with the mulberries, coconut, dates and chocolate chips.
  7. Once completely cooled, place into airtight containers or jars and store in a cool, dry place for 2-3 weeks.
Kitch'n Thyme https://kitchnthyme.com.au/