Choc Cranberry Crunch Slice

Choc Cranberry Crunch Slice

Gluten Free! Dairy Free! Refined Sugar Free & ‘almost’ Raw!!! This is such a winner and is just yummo!

This delicious slice is perfect for any morning or afternoon tea. It is almost raw, except for the roasted almonds. You can keep the almonds raw for the filling if desired, however the roasted flavour adds amazing dimension to this slice
A classic style raw but THIN almond date base, a delicious coconut caramel almond cranberry filling and a raw chocolate topping! Delicious! And you get that chocolate fix without the guilt!

One of the tricks I find to raw desserts is to keep the ‘biscuit’ base nice and  THIN or it overpowers the flavour of the whole slice and texture isn’t quite right. It all needs to balance nicely.

The coconut caramel filling is just SO creamy and yum! With roasted almonds and cranberries added it’s just perfect!

The chocolate layer is technically still raw as it isn’t heated over 40 degrees. And it is pure raw chocolate goodness with raw cacao butter and raw cacao powder! My favourite raw cacao butter is Absolute Organics brand. Health food stores or some IGA’s stock it. It’s beautifully creamy and mellow in flavour.

The chocolate layer is free of any nasty additives and sweeteners, and full of loads of antioxidants and good fats! This is a fabulous one for kids. My kids devour it!!

Print

Choc Cranberry Crunch Slice

A delicious crunchy, nutty chocolate fix without the guilt!

  • Author: Gabrielle Tobin - Kitch'n Thyme

Ingredients

Base

  • 230g Raw Almonds
  • 150g Dates
  • 10g Shredded Coconut
  • 60g Maple Syrup
  • 35g Coconut Oil

Coconut Caramel Nut Filling

  • 240g Coconut Butter
  • 40g Coconut Oil
  • 160g Maple Syrup
  • 150g Roasted Almonds, halved
  • 40g Dried Cranberries
  • 1 tsp Vanilla Essence
  • pinch celtic salt

Chocolate Layer

  • 225g Raw Cacao Butter
  • 50g Raw Cacao Powder
  • 50g Maple syrup
  • 2 tsp vanilla Essence
  • pinch celtic salt

Cacao Nibs, for topping (optional)

Dried Cornflowers, for topping (optional)

Instructions

Base Layer

  1. Spray and line a 9×13″ rectangle slice tray with baking paper, allowing for an overhang on the sides to easily remove the slice after setting time. (Try to make the baking paper as neat as possible on the sides, creasing the paper where necessary to make it sit flat. The straighter the baking paper sides, the neater the edges of your slice will be.) Set aside.
  2. Place all the base ingredients into the bowl of the Thermomix and process for 10-15 Seconds/ Speed 7. 
  3. Press the mixture evenly into the lined slice tray and refrigerate for 30 minutes to set (or freeze for 15 minutes).

Coconut Caramel Nut Layer

  1. Place the coconut butter, coconut oil, maple syrup and vanilla into the bowl of the Thermomix and melt 1-2 Mins/50°/Speed 3.
  2. Add the chopped almonds, cranberries & salt and mix together 5 Seconds/Speed 3/Reverse.
  3. Once combined, pour the mixture evenly over the set base. Return to the fridge for a further 30 minutes to set (or the freezer for 15 minutes.)

Chocolate Layer

  1. Place the cacao butter into the bowl of the Thermomix and mill 10-15 Seconds/Speed 9.
  2. Melt the cacao butter for 10 minutes/37°/Speed 2 scraping down the sides of the bowl and around the blades closer to the finish time.
  3. Add the cacao powder, maple syrup, vanilla & salt and continue cooking for a further 5 minutes/37°/Speed 2.
  4. Pour over the slice as the final layer. Refrigerate for 10 minutes, then sprinkle with cacao nibs and dried flower petals just as the chocolate is beginning to set (make sure the topping is beginning to set – if you top with the decorations too early, they will all sink into the chocolate filling) then refrigerate a further 20 minutes or until set. Chop into small squares and serve.


Choc Peppermint Creams


These delicious cookies are an absolute winner with my friends! Chocolate, peppermint, and a much healthier alternative to the original – what’s not to love!! You will need my Coconut Butter recipe to make these cookies.

Choc Peppermint Creams
Yields 20
Delicious melt-in-the-mouth little morsels!
Write a review
Print
Prep Time
15 min
Cook Time
10 min
Prep Time
15 min
Cook Time
10 min
COOKIE DOUGH
  1. 100g Organic Dark Chocolate
  2. 150g Organic Butter, softened
  3. 120g Rice Malt Syrup
  4. 90g Rapadura Sugar
  5. 230g Unbleached Spelt Flour, sifted
  6. 25g Raw Cacao powder, sifted
  7. 1 tsp Bicarb Soda, sifted
PEPPERMINT CREAM FILLING
  1. 75g Cashews
  2. 75g Macadamias
  3. 160g Coconut Butter
  4. 30g Rice Malt Syrup
  5. 1 tsp Vanilla Essence
  6. 6 Drops Peppermint Essential Oil
COOKIE DOUGH
  1. Preheat the oven to 180°C and line a large baking tray with baking paper. Place the chocolate into the bowl of the Thermomix and chop briefly 2 times/Turbo speed. Set aside.
  2. Place the butter, rice malt syrup & sugar into the bowl of the Thermomix and cream 30 seconds/Speed 5.
  3. Add the flour, cacao powder, and bicarb and mix 10 Seconds/Speed 6.
  4. Add the chopped chocolate and mix 5 Seconds/Speed 5/Reverse.
  5. Place small tablespoons (approx. 15g) sized balls onto a tray lined with baking paper & bake for 8-10 minutes. It will make approximately 40 individual cookies (about 20 sandwiched peppermint creams). Cool on a wire rack.
PEPPERMINT CREAM FILLING
  1. Place the cashews and macadamias into the bowl of the Thermomix and process for approximately 1 minute/Speed 8 or until nut butter consistency is achieved.
  2. Add the coconut butter, rice malt syrup, vanilla and peppermint oil and process for a further 10 Seconds/Speed 5. Place filling in the fridge for 15 or so minutes to chill.
ASSEMBLY
  1. Once chilled, roll tablespoon sized amounts into a ball and press onto the flat underside of a cookie. Top with another cookie to create a sandwich. Serve.
Notes
  1. NB. They will keep in an airtight container for 3 or so days, however I like to keep mine in the fridge. They will go all fudgy once in the fridge.
Kitch'n Thyme https://kitchnthyme.com.au/

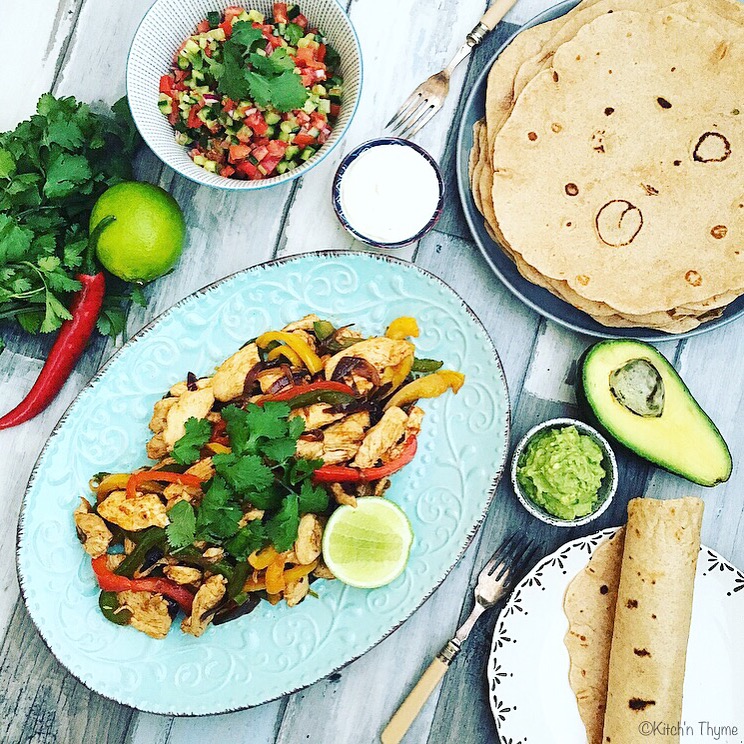
Chicken Fajitas

Chicken Fajitas upgrade

My delicious Chicken Fajitas is a family favourite! It’s simple and yummy and something my little ones love too! You can very easily just eat it without the tortillas for a lower carb option as well!
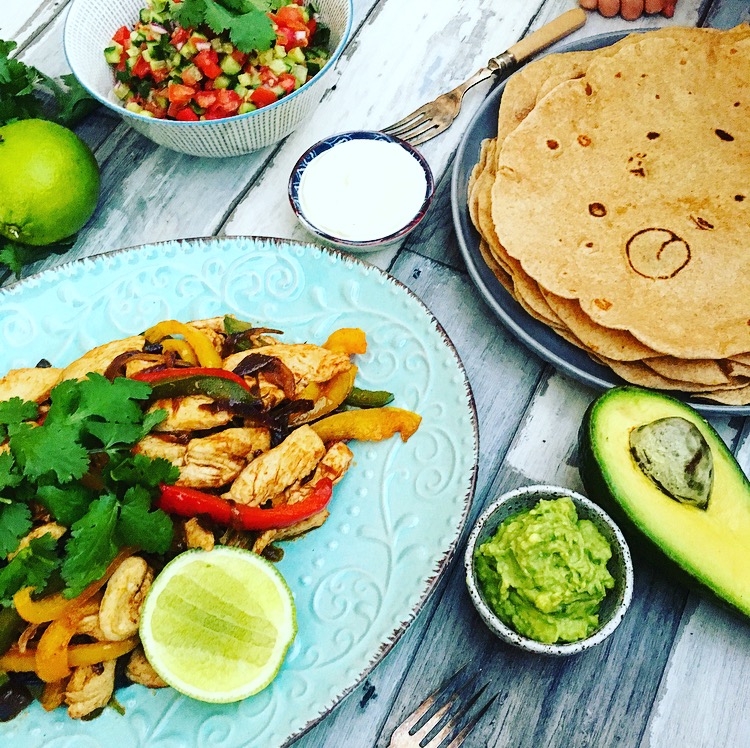
Chicken Fajitas upgrade 2

Chicken Fajitas
Serves 4
These delicious Chicken Fajitas pack a punch in flavour and if you plan ahead and make the Tortillas earlier it can be a quick 30 minute meal!
Write a review
Print
Prep Time
25 min
Cook Time
30 min
Total Time
1 hr
Prep Time
25 min
Cook Time
30 min
Total Time
1 hr
SPELT TORTILLAS
  1. 200g Wholemeal Spelt Flour
  2. 200g Spelt Flour
  3. 1 teaspoon Celtic Salt
  4. 1 teaspoon Baking Powder
  5. 80g Olive Oil
  6. 200g Water
GRILLED CHICKEN
  1. 4 Tbsp Olive Oil
  2. 2 Organic Chicken Breasts, thinly sliced
  3. 2 Red Onions, sliced into wedges
  4. 1/2 Red Capsicum, thinly sliced
  5. 1/2 Yellow Capsicum, thinly sliced
  6. 1/2 Green Capsicum, thinly sliced
  7. 1 tsp Ground Cumin
  8. 1 tsp Ground Coriander
  9. 1 tsp Smoked Paprika
  10. 1 tsp Celtic Salt
FRESH SALSA
  1. 2 Lebanese Cucumbers, finely diced
  2. 4 Roma Tomatoes, finely diced
  3. 1/2 Red Onion, finely diced
  4. 1/4 Bunch Coriander, roughly chopped
  5. 1/4 tsp Ground Coriander
  6. 1/2 tsp Celtic Salt
  7. 2 Tbsp Olive Oil
  8. 1 Tbsp Lime Juice
GUACAMOLE
  1. 2 Ripe Avocados
  2. 1 Garlic Clove
  3. 1/2 Lemon, juiced
  4. 1/4 - 1/2 teaspoon Celtic Salt
  5. Paprika, for sprinkling on top
  6. 250ml Sour Cream, for serving
SWEET PEPPERS (OPTIONAL)
  1. 500g Mixed Sweet Peppers
  2. 4 Tbsp Olive or Coconut Oil
  3. 1/2 - 1 teaspoon Celtic Salt
TORTILLAS
  1. Place the flour, baking powder & salt into the Thermomix. Mix 5 Sec/Speed6. Add the water and olive oil and knead 20 Sec. Let rest for 10 minutes.
  2. Divide the dough into 10 portions. Roll out on a floured surface to 8-10 inch rounds.
  3. In a large non-stick frypan, cook the tortillas for 1 minute each side or until lightly browned. Keep warm.
GRILLED CHICKEN
  1. Heat the oil in a large fry pan and add the onion. Fry until beginning to caramelise. Add the capsicum and fry a little longer. Then add the chicken along with all the spices and salt. Cook turning for 3-5 minutes until all the chicken is cooked through. Set aside and keep warm. (You can do this step on the BBQ if you have one for a beautiful charred result or on a griddle pan).
FRESH SALSA
  1. Place all the diced salsa ingredients into a bowl and just before serving add the ground coriander, fresh coriander, lemon, olive oil and salt. Toss to combine.
GUACAMOLE
  1. Place the garlic into the Thermomix bowl and chop 3 Sec/Speed 5. Scrape down the sides of the bowl, add all the other ingredients and process 10-15 Sec/Speed 5.
SWEET PEPPERS
  1. Heat the oil in a large fry pan. Add the peppers and cook for 2-3 minutes or until just softened. Sprinkle with salt and serve.
  2. To assemble the Fajitas, grab a tortilla and top with chicken, salsa, guacamole, peppers & sour cream. Roll up and eat! Yum yum yum!!!
Kitch'n Thyme https://kitchnthyme.com.au/

Heirloom Tomato Tart


This beautiful tomato tart is one of my absolute favourites and a true crowd pleaser! It’s summery, fresh and tastes delicious!

The pastry is made from spelt using my old pastry ratio I learnt when I studied as a chef. It’s still really light and melts in the mouth as it’s loaded with butter!

The caramelised onions add so much delectable flavour to this summery tart! Bringing out the sweetness of the onions compliments the sweetness of the heirloom tomatoes so perfectly!

You can replace the Saracino sheep cheese with parmesan or leave it out if avoiding dairy. To make it completely dairy free, leave out the feta or ricotta and swap the milk for almond milk (or your choice of dairy free milk) and the sour cream for coconut cream. It will work just as beautifully!

I’ve always had an obsession with heirloom tomatoes and I’m so glad I live close to Noosa where I can get the most amazing ones from the local farmers market! Their unusual shapes and devine colours along with their amazing sweetness just make them delectable! And what could make these tomatoes more perfect than fresh basil, pepper and sea salt! Yum

Remember to share your creations with me too. Just hashtag #kitchnthyme or tag me @kitchnthyme  on Instagram or of course post your photo to my facebook wall! I love to see what you’re cooking!


Print

Heirloom Tomato Tart

If you are as obsessed with heirloom tomatoes as I am, you will be sure to love this!

  • Author: Gabrielle Tobin
  • Prep Time: 00:15
  • Cook Time: 00:25
  • Total Time: 40 minutes
  • Yield: 8

Ingredients

PASTRY

  • 100g Organic Wholemeal Spelt Flour
  • 100g Organic White Spelt Flour
  • ½ tsp Celtic Sea Salt
  • 100g Organic Butter
  • 40g Water

FILLING

  • 30g Saracino Sheep Cheese
  • 2 Tbsp Olive Oil
  • 4 Medium Brown Onions
  • 1 Tbsp Balsamic Vinegar
  • 1 Tbsp Rapadura Sugar
  • 4 Large Organic Eggs
  • 60g Sour Cream
  • 60ml Milk
  • 1/2 tsp Celtic Sea Salt
  • ½ Bunch Onion Chives
  • 100g Ricotta or Feta Cheese
  • 500g Mixed Heirloom Tomatoes, sliced
  • Sweet Red or Green Basil, leaves
  • Balsamic Reduction, for drizzling

Instructions

PASTRY

  1. To make the pastry, place the flours, butter & salt into the Thermomix bowl. Process for 8-10 Sec/Speed 6 until the mixture just resembles breadcrumbs.
  2. Add the water and knead 10-20 Sec. Transfer the dough to a sheet of cling wrap, press together, cover in cling wrap, flatten and place into the fridge for 30 minutes to rest. Preheat the oven to 180°C.
  3. Using the Thermomat or a lightly floured surface roll the dough to approx. 3mm thick and carefully place into and press to fit a round 10 inch/26cm tart tin. Prick with a fork. Place back into the fridge for a further 15-30 mins to chill.
  4. Place a small piece of baking paper over the pastry and fill the case with pie weights or dried legumes. Blind bake for 15 minutes. Allow to cool before taking the weights out of the case.

FILLING

  1. Place the cheese into the Thermomix and mill 10 Sec/Speed 9. Set aside.
  2. To make the caramelised onions, heat the olive oil in a pan and add the onions. Cook the onions, stirring occasionally until very well browned. The thinner the onions are sliced the better caramelisation you will get. Add the vinegar and sugar right at the end and stir to combine. Take off the heat and set aside.
  3. Place the eggs, sour cream, milk, salt & chives into the Thermomix bowl. Mix 10 Sec/Speed 4.
  4. To assemble, scatter the onions evenly over the base of the tart, follow with the dollops of the ricotta, pour over the egg mix and finish with the reserved grated cheese.
  5. Bake for 25 minutes or until just set. Let cool slightly.
  6. Place the tomatoes on top, mixing the colours. Top with fresh basil, sprinkle with salt, pepper and generously drizzle with olive oil and balsamic reduction.

Nutrition

  • Serving Size: 6

Apple & Blueberry Crumble Tarts

Blueberry Crumble Tarts

INGREDIENTS:

Shortcrust Pastry
100g Raw Sugar or Rapadura Sugar
1/2 Lemon, rind
150g Wholemeal Spelt Flour
150g Unbleached Spelt Flour
150g Butter
1 Egg
1/2 tsp Vanilla Essence

Filling
6-8 Large Granny Smith Apples
250g Organic Frozen Blueberries
40g Rapapdura Sugar or Coconut Palm Sugar
1 tsp Vanilla Essence
20ml Lime or Lemon Juice
80ml Water
1=2 Tbsp Cornflour (diluted in 2 Tbsp extra water)

Crumble Topping
80g Hazelnuts, roughly chopped
200g Wholemeal Spelt Flour
100g Rapadura Sugar
1 tsp Baking Powder (Aluminium Free)
200g Butter
120g Oats
80g Desiccated Coconut
1 1/2 tsp ground Cinnamon

Method:

  • For the pastry, place the sugar and the lemon rind into the Thermomix bowl. Mill 10 sec/Speed 9. Add the flour and butter and process for 10 sec/speed 6 or until the mixture resembles breadcrumbs.
  • Add the egg and vanilla and knead 10-20 sec.
  • Using the Thermomat or a lightly floured surface bring the dough together to form a ball. Flatten & wrap the dough in cling film and place in the fridge for 30 mins to rest.
  • To make the filling peel & quarter the apples and place into the Thermomix bowl. Chop for 3-4 sec/speed 4. Add all remaining ingredients and cook for 5 min/80C/speed 1/Reverse.
  • Add the cornflour and cook for a further 2 min/80C/speed 1/Reverse. Set aside.
  • Roll pastry, using a rolling pin, on a lightly floured surface, to be 3mm thick. Use pastry cutters to cut lining for individual tart cases. A 12 hole muffin tin is the ideal size for these tarts. Once all the muffin holes are lined, refrigerate to rest for 30 mins. Preheat the oven to 200 degrees.
  • To make the crumble topping, place the nuts into mixing bowl and press briefly 2 times/1 sec/turbo. Set aside. Place the flour, sugar & butter into the bowl and process 10 sec/speed 6 or until the mixture just resembles breadcrumbs. Add the remaining ingredients  and the chopped nuts and process 10 sec/speed 4/Reverse or until it just comes together. Set aside.
  • Blind bake pastry until golden (about 20-25 minutes) then once cool enough to touch take out and place on a baking tray lined with baking paper.
  • Reduce the oven to 180 degrees. To assemble the tarts, place spoonfuls of the apple mix into the pastry cases, top with the crumble and place back into the oven on a baking tray for another 10-15 minutes or until the crumble topping is nice and golden brown.
  • Cool on a wire rack and serve with Crème Anglaise (optional).